A job in Booston is more than a text. It is the page on your site, the source for your campaigns, the basis for your feeds and the place where applications arrive. If a field is wrong or a language is missing, you do not notice it in the dashboard but where it hurts: the candidate who cannot find your job.
Everything you need sits in one screen. You create a job, walk through four steps, check what is there and put it live. The end goal of this article: you create, copy, edit and publish your jobs entirely by yourself, in every language, without having to request anything.
After this article you know which fields are required and why, how to enter texts in several languages, how to reuse an existing job and what happens once your job is live. You find the screen via Menu → Recruitment → Jobs.
Before you start
- You need access to the Recruitment module. If you do not see Jobs in the menu, the module is switched off for your role. Someone with the Manager role arranges that via Users & Permissions.
- Your role decides which jobs you see. A Manager sees every job in the environment. A Recruiter only sees the jobs their own recruiter profile is linked to. If a job is missing from your overview, a colleague is probably attached to it.
- Which fields you see in the editor is set in your attributes under Settings → Attributes → Job Attributes. Anything switched off there does not appear in the job. How to manage them is in Managing attributes for jobs and candidates.
- The recruiters you can attach to a job come from Team members.
- If you work with an ATS connection that imports jobs, most fields are locked. What you can and cannot do then is in Working with an ATS connection.
The Jobs overview
The overview is your work list. At the top sits the title Jobs, on the right the New job button, and below it a green counter Active jobs with the number of jobs currently live. As soon as you filter, that line turns into Active jobs found for: with your active filters behind it, and the red link Clear Filters appears to wipe them in one click.
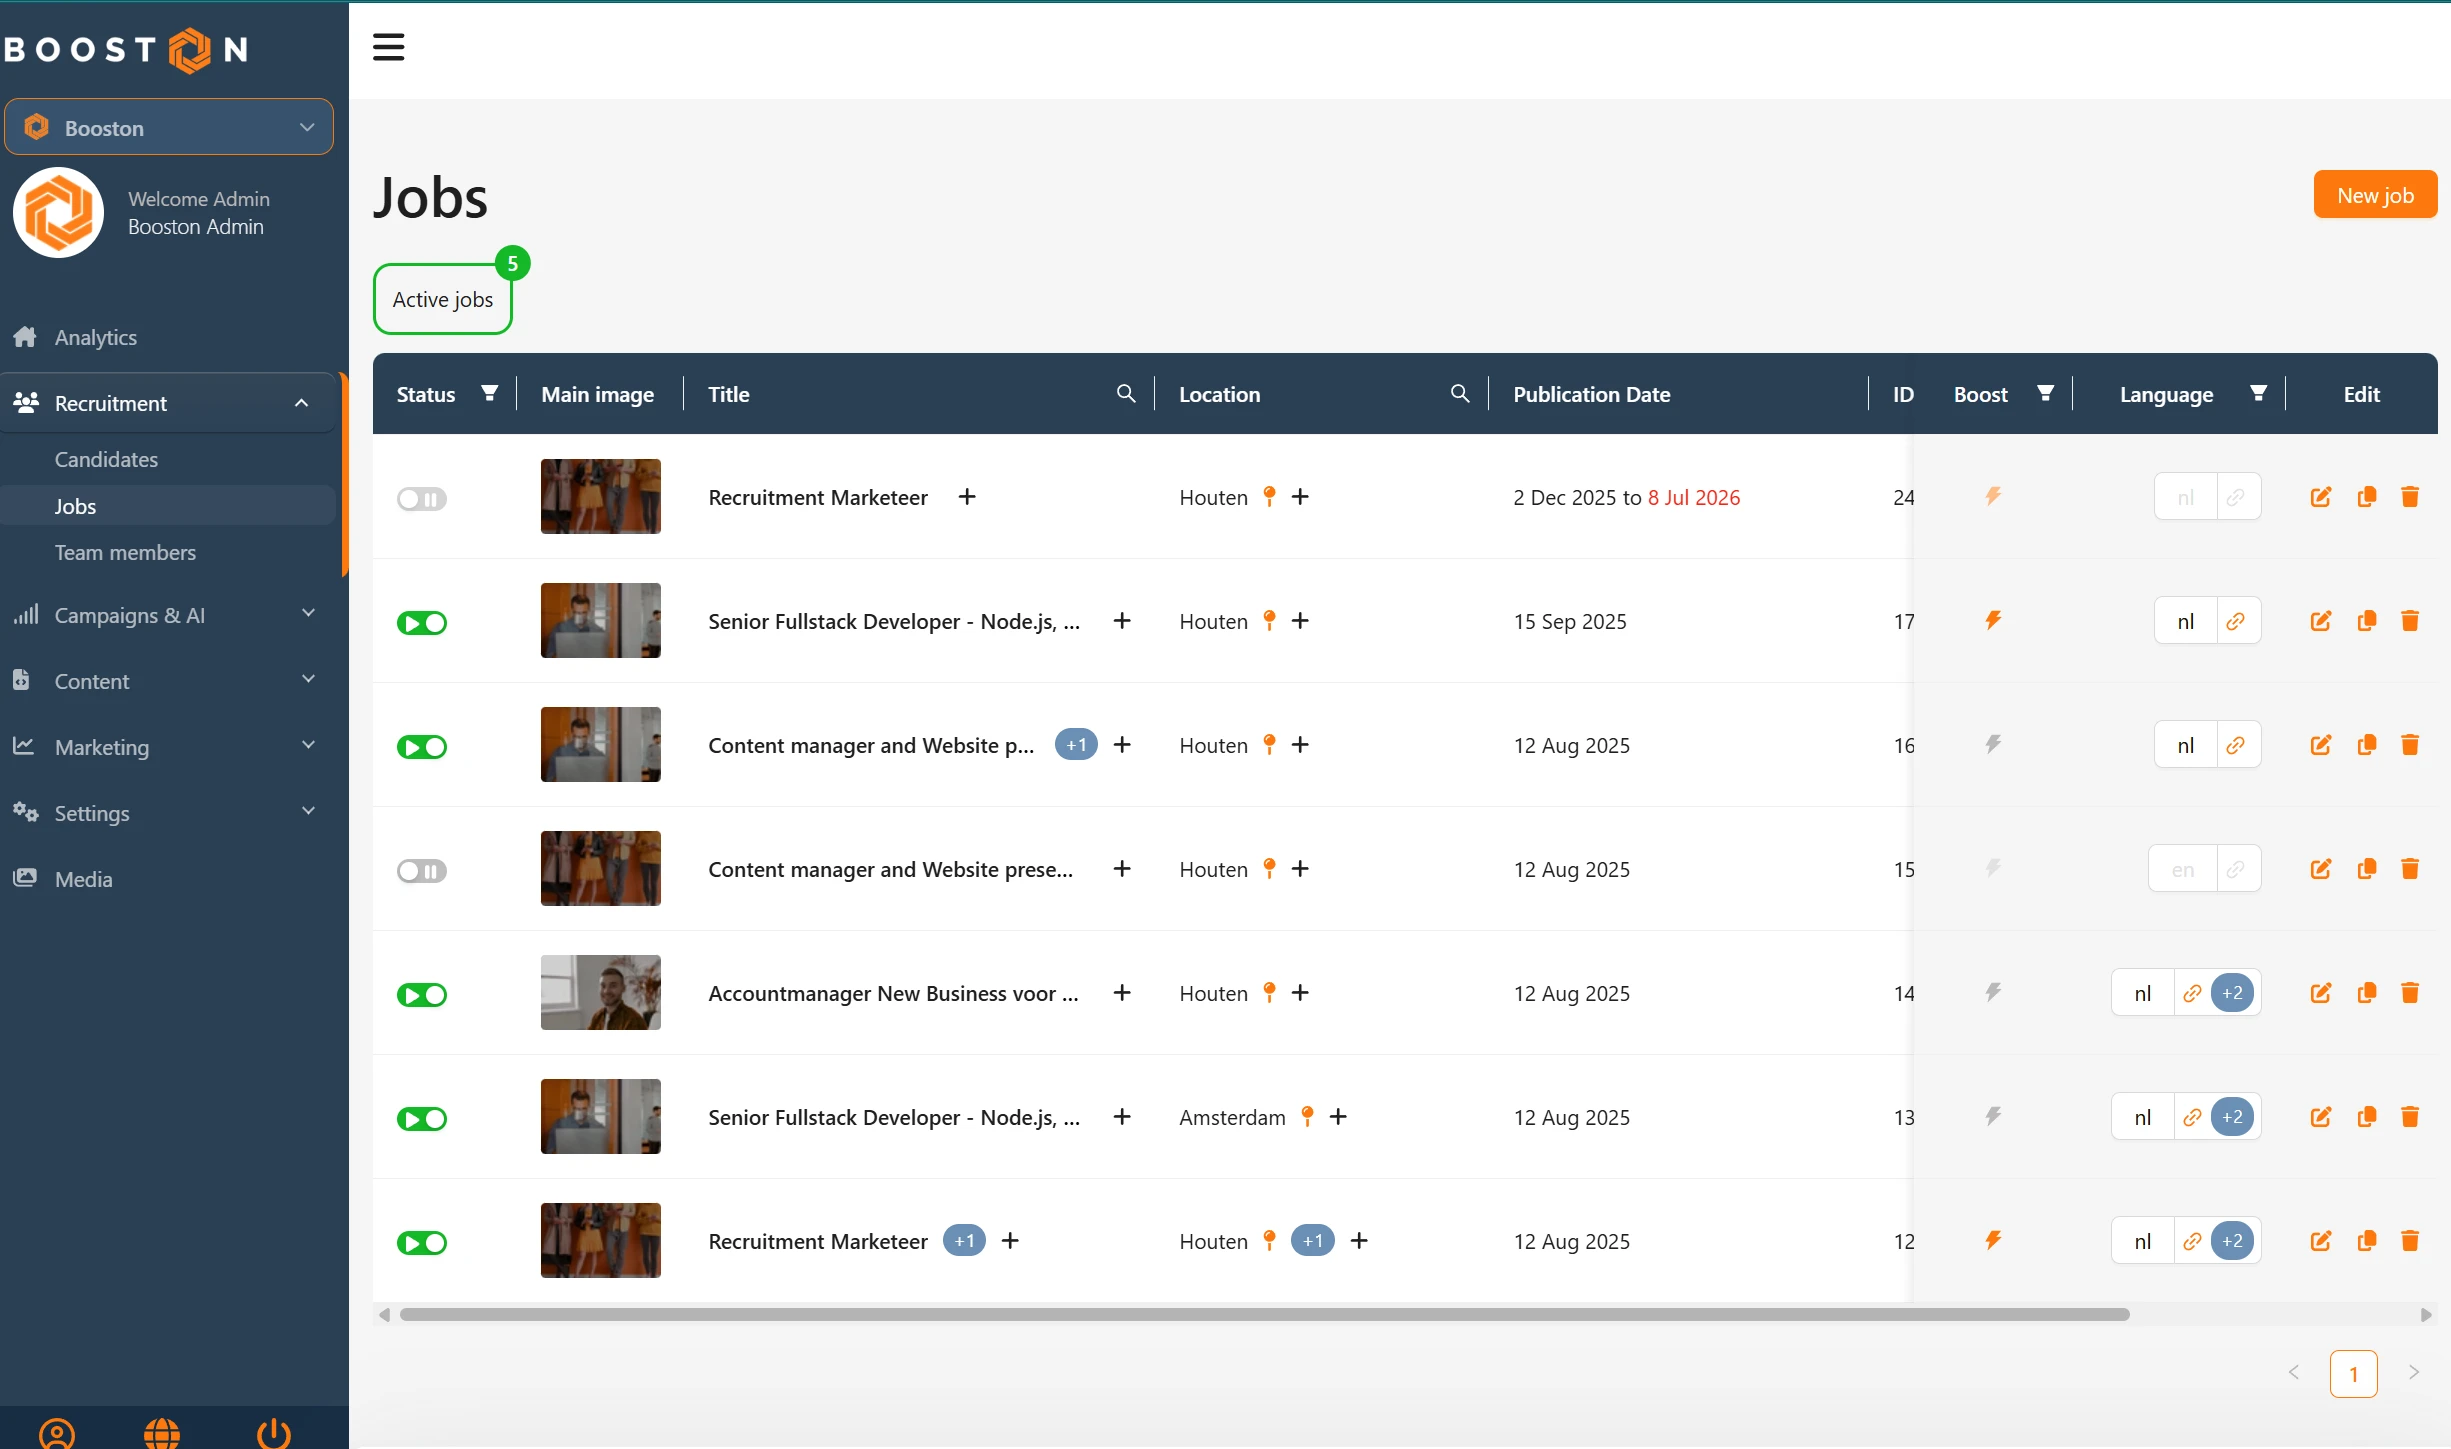
What the columns show
- Status: a switch per job. Green means live, grey means paused. You flip it here without opening the job.
- Main image: the image that belongs to the job, as it appears on your site. This column is only there when the image attribute is switched on.
- Title: the title of the job. If the job has extra titles, a blue plus sign sits behind it. Note: clicking the title opens the job straight on the Candidates step. To edit the content, use the pencil on the right.
- Location: the city. A plus sign shows whether several locations are attached.
- Publication Date: the start date, and the end date if you filled one in. An end date that has passed turns red.
- ID: the job number in Booston. Useful when you discuss a specific job with support or a colleague. In an ATS environment there is an ATS ID column next to it.
- Recruiter: the recruiter attached to the job and shown on the job page.
- Boost: a lightning icon that lights up as soon as campaigns are running on this job.
- Language: the main language with a link icon to the live page, and a blue plus sign with the other published languages. A grey link icon means that language version is not live. This is also your quickest preview: click it and you see the job the way the candidate sees it.
- Edit: the three row actions, see The actions per row.
Filtering, searching and sorting
Above the Title, Location and ID columns sits a magnifier to search within that column. The Status, Recruiter, Boost and Language columns have a filter with a list, so you can keep only paused jobs or only the jobs of one colleague. Sorting works on ID. At the bottom you page through the results and change the page size.
The actions per row
Three icons sit on the right of the row. Hover them and you see what they do:
- Edit, the pencil, opens the job in the editor on the Setup step.
- Copy, the copy icon, makes a copy. See Copying a job.
- Delete, the bin, removes the job. See Pausing or deleting a job.
There are no checkboxes and no bulk actions. You always work one job at a time.
Creating a job
Click New job at the top right. A window opens with the question How do you want to create this job? and the line You can always edit everything before the job goes live. You choose between two cards.
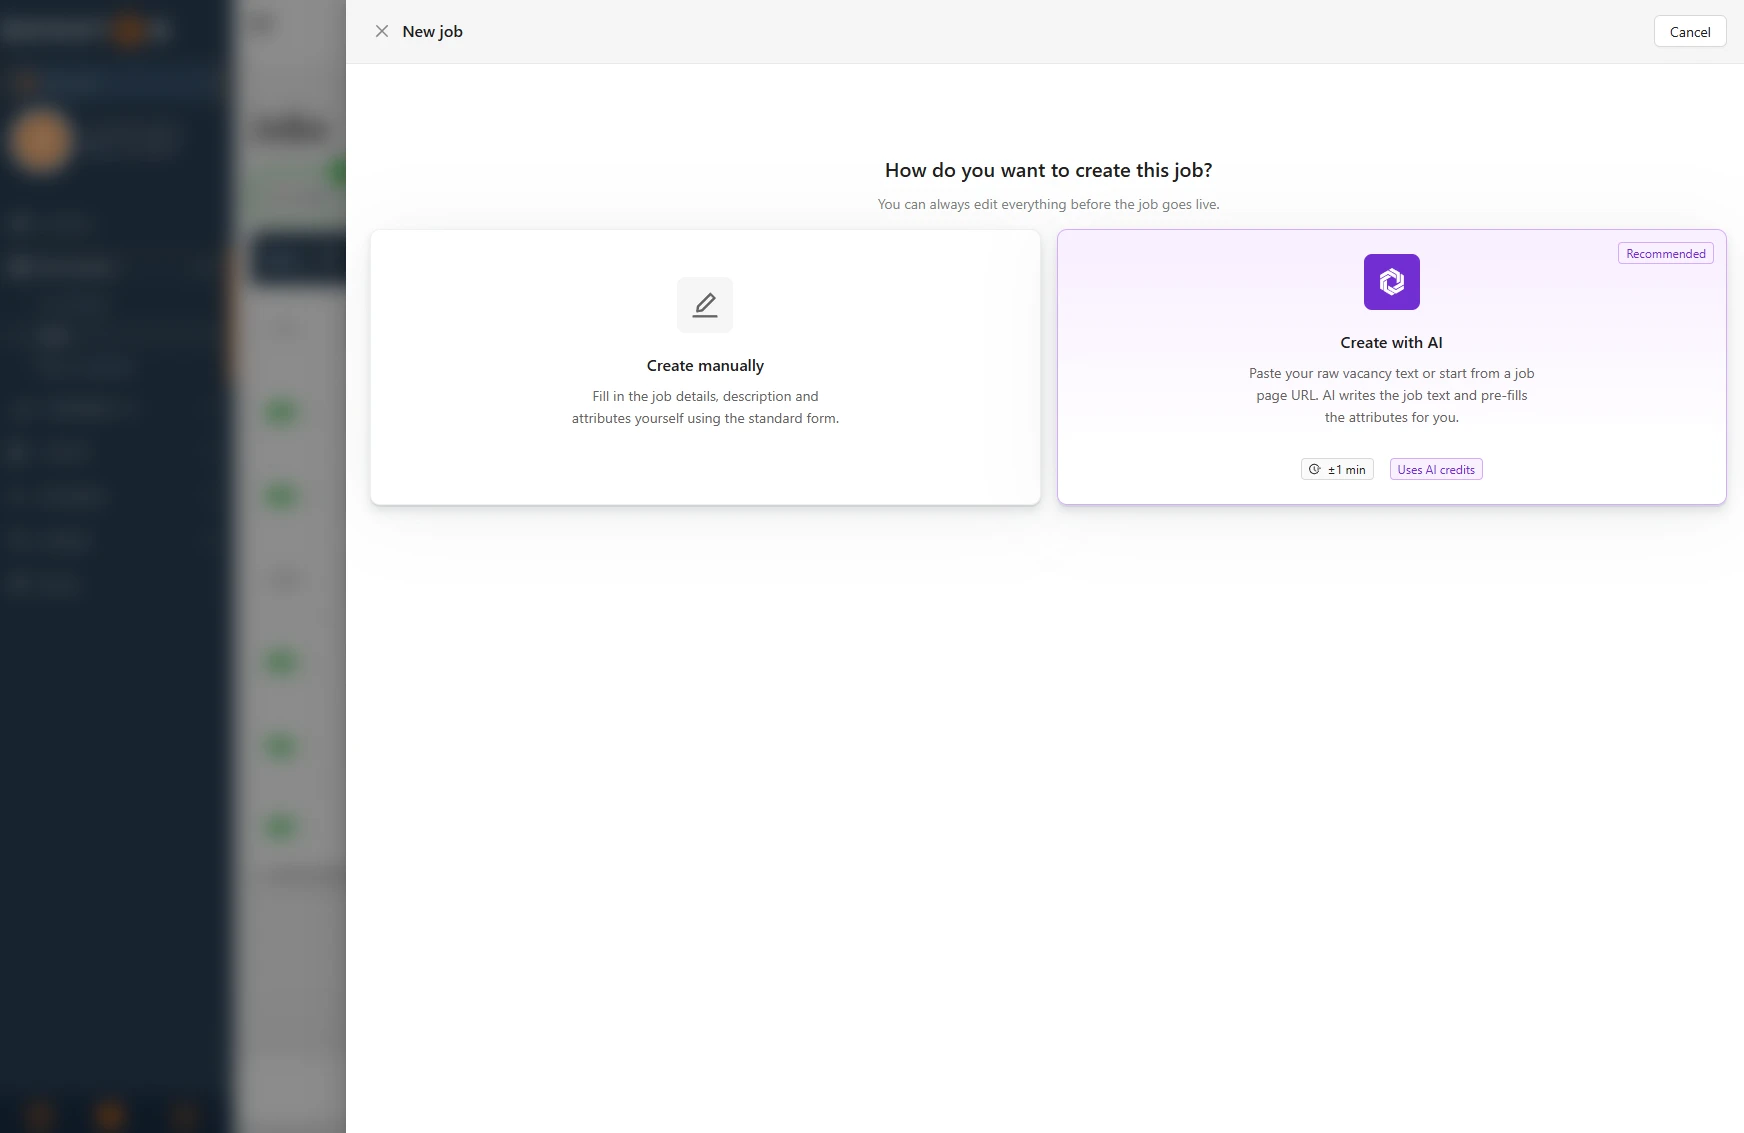
Choose Create manually to fill in the job yourself. The card says what to expect: Fill in the job details, description and attributes yourself using the standard form. The Create with AI card next to it lets AI write a first version, more about that under Working faster with AI.
After Create manually you land in the form. Fill in the essentials here:
- Pick the languages this job appears in at Languages. You can select several. Every language you tick gets its own tab.
- Fill in the Title per language tab. This is the job title as the candidate sees it.
- Choose at Select a recruiter who is the face of this job. The default is Unassigned.
- Check the Publication start date. It is set to today and is required. Optionally fill in a Publication end date, and the job goes offline on that date by itself.
- Click Save & next.
You see the confirmation New job has been created successfully. The job is now paused and you move on to the Description step automatically. To return to the choice between manual and AI, use Back.
The job editor: steps, buttons and side panel
You open every job in the same screen. At the top sits Edit Job with the title behind it, and on the right four buttons: Previous, Next, Save and Cancel. Save saves and keeps you on the same step, Next saves and moves on.
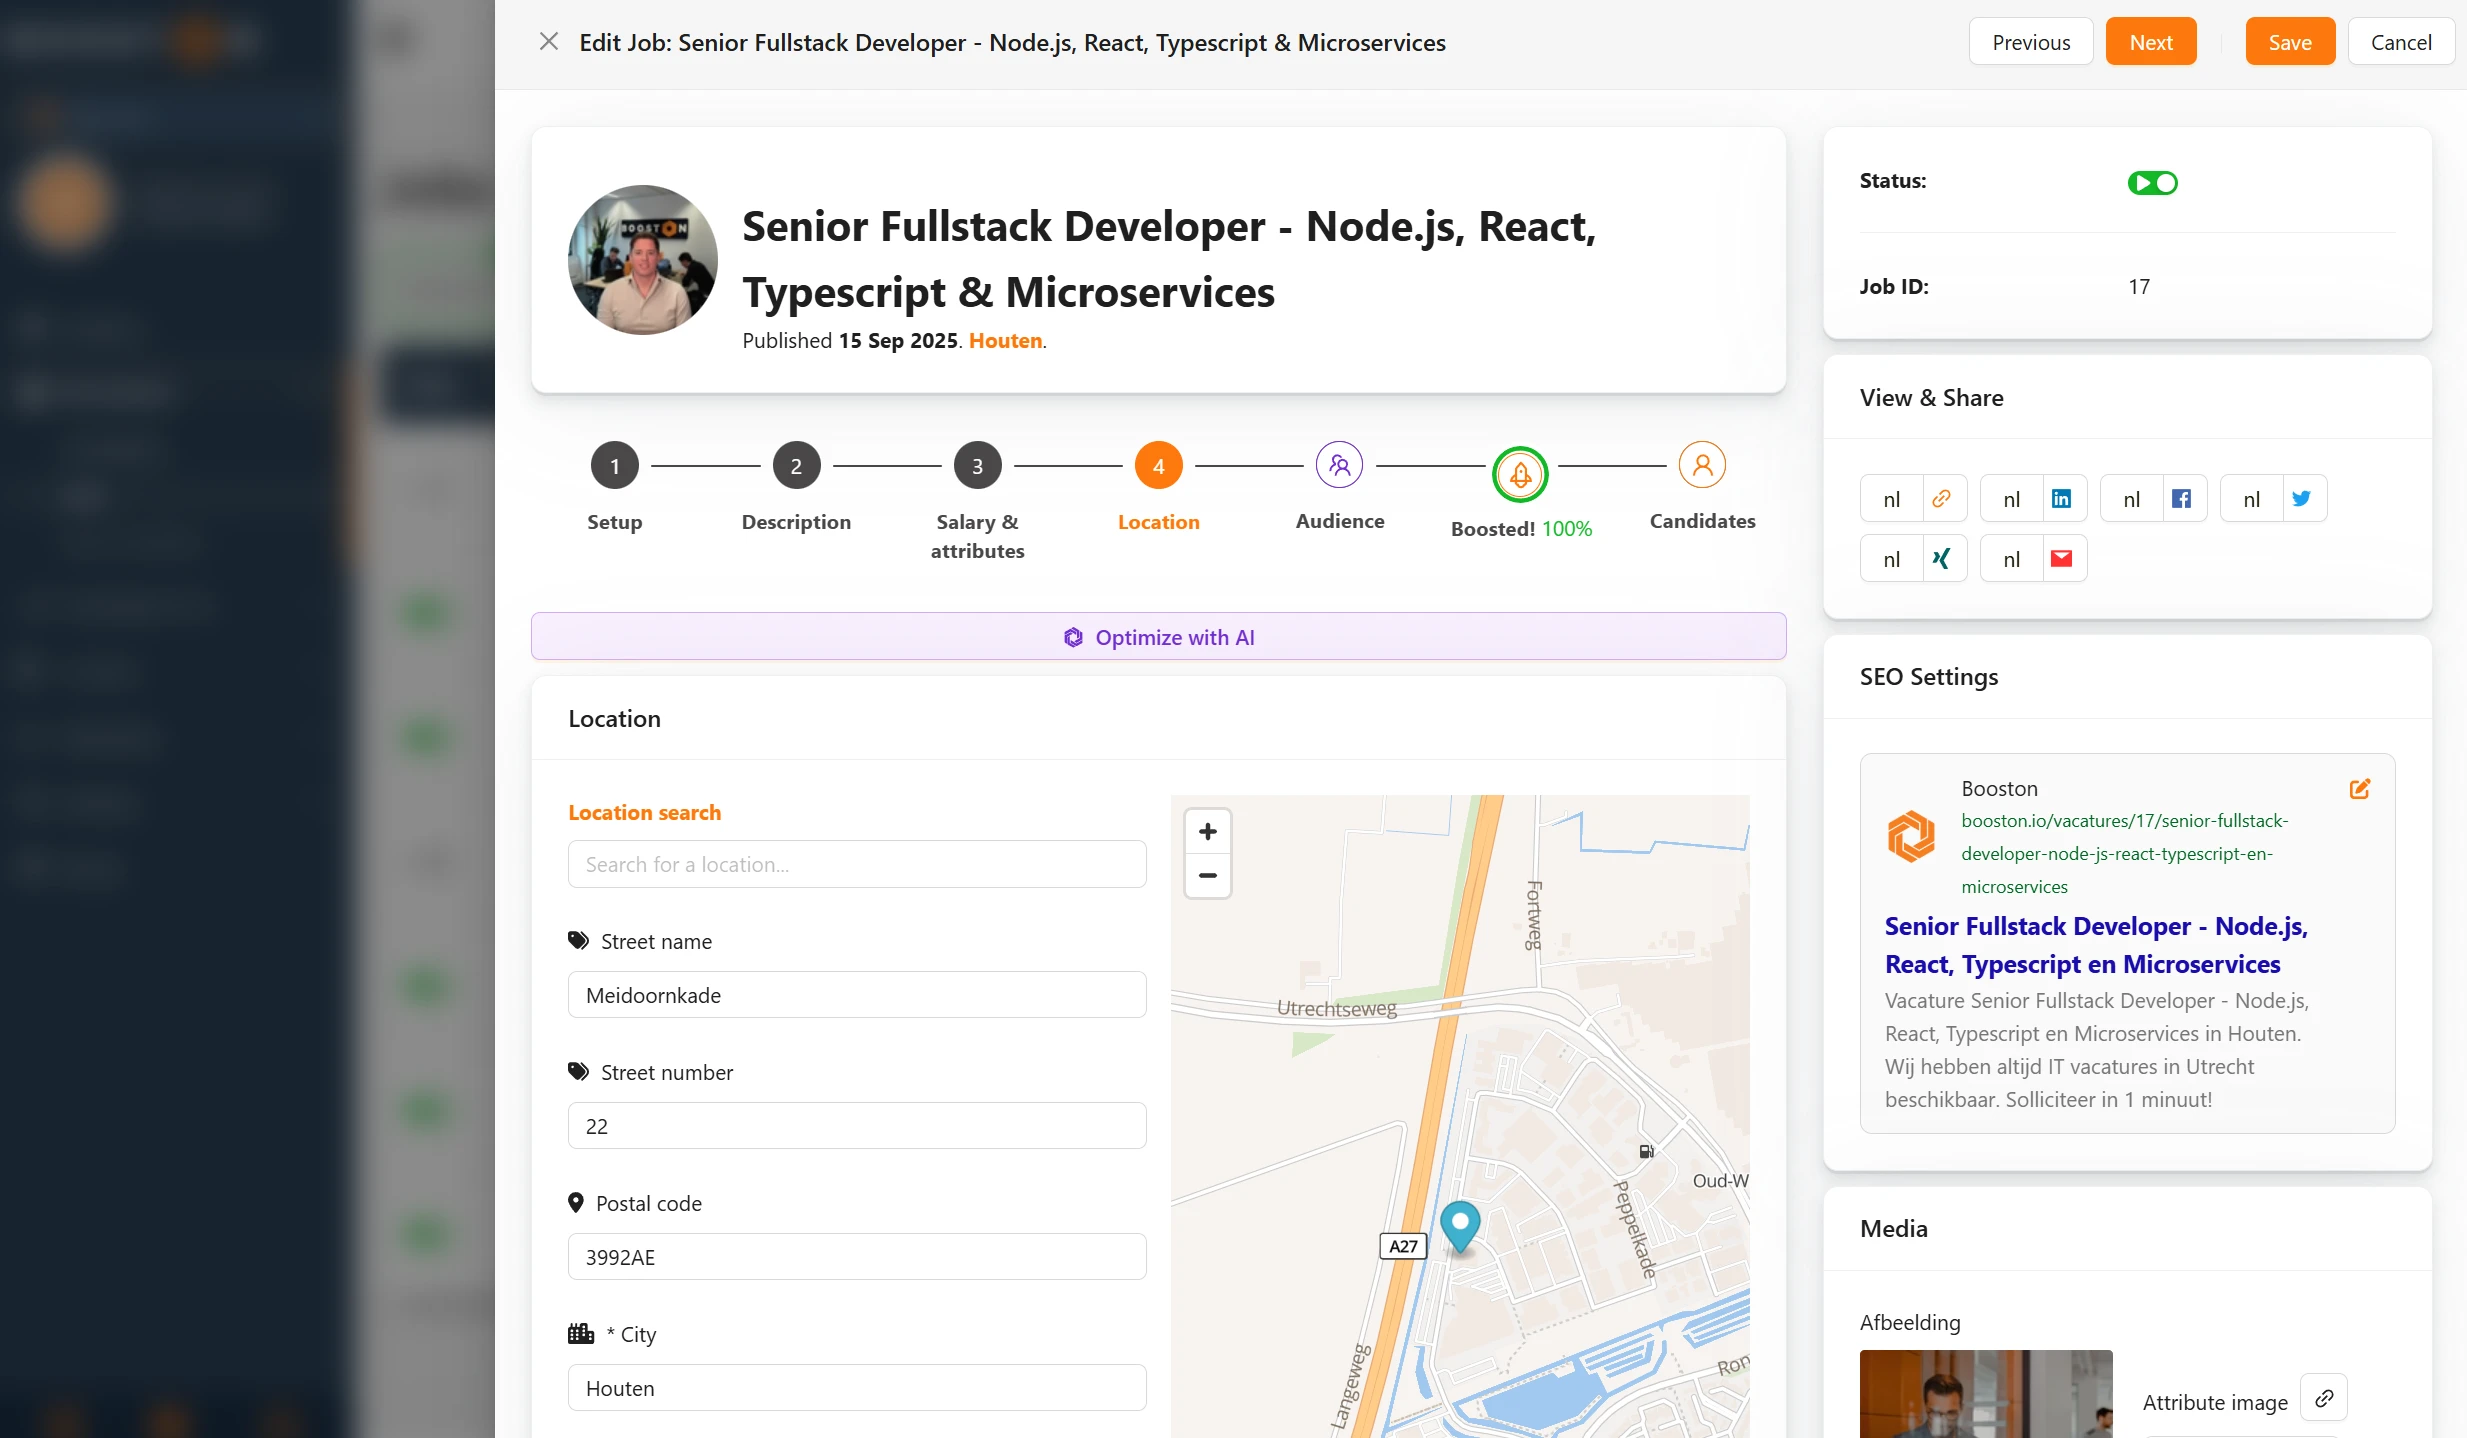
The step bar sits below it:
| Step | What it covers |
|---|---|
| Setup | Languages, title, recruiter and publication dates |
| Description | The job text, per language |
| Salary & attributes | Salary and the remaining fields of the role |
| Location | The address. On a job that is not live yet the step is called Location & job activation |
| Audience | The AI audience analysis for this job |
| Boost! | Campaigns on this job. With campaigns running the step is called Boosted! with the percentage behind it |
| Candidates | The applicants for this job |
You can click through the steps freely, but only as far as you got: steps further along stay grey until you finish the previous one.
On the right sits a side panel that stays visible on the first four steps:
- Status: the same switch as in the overview. Use it to put the job live or pause it.
- Job ID: the job number, with the ATS ID next to it in an ATS environment.
- View & Share: a button per language to open the live page, and buttons to share the job on LinkedIn, Facebook, X, Xing or by mail.
- SEO Settings: a preview of how your job appears in Google. The pencil lets you adjust Page title, URL and Meta description. This card only appears once you have finished the job through Location. Booston fills the fields automatically, so you only go in here if you want it different. More about findability is in Assessing SEO advice.
- Media: the image for the job and a YouTube ID for a video on the job page. If you pick no image of your own, Booston falls back on the image of an attribute value, marked Attribute image. Uploading and cropping goes through the file browser.
The side panel belongs to the step you are on: click Save or Next and Media and SEO Settings are saved along with it. If something is wrong there, the step itself cannot save either.
Setup: languages, title, recruiter and publication dates
This is the same step as when creating the job, and you can always return to it.
- Languages decides which languages the job exists in. Add a language here and a tab appears that you still need to fill. Remove a language and that version goes offline. See Multilingual: one job in several languages.
- The title is required in every selected language. The name of this field comes from your attributes, so it may be called something other than "Title" in your environment.
- Select a recruiter attaches the recruiter to the job. They appear on the job page and travel to your campaigns.
- Publication start date and Publication end date decide between which dates the job may be live. Outside that period you cannot activate the job.
Description: the job text
This step holds the Description Attributes card with your text fields below it. Which fields those are, what they are called and in which order they sit is something you set in your attributes. Think of an introduction, a block about the company, what you will do, what we ask and what we offer.
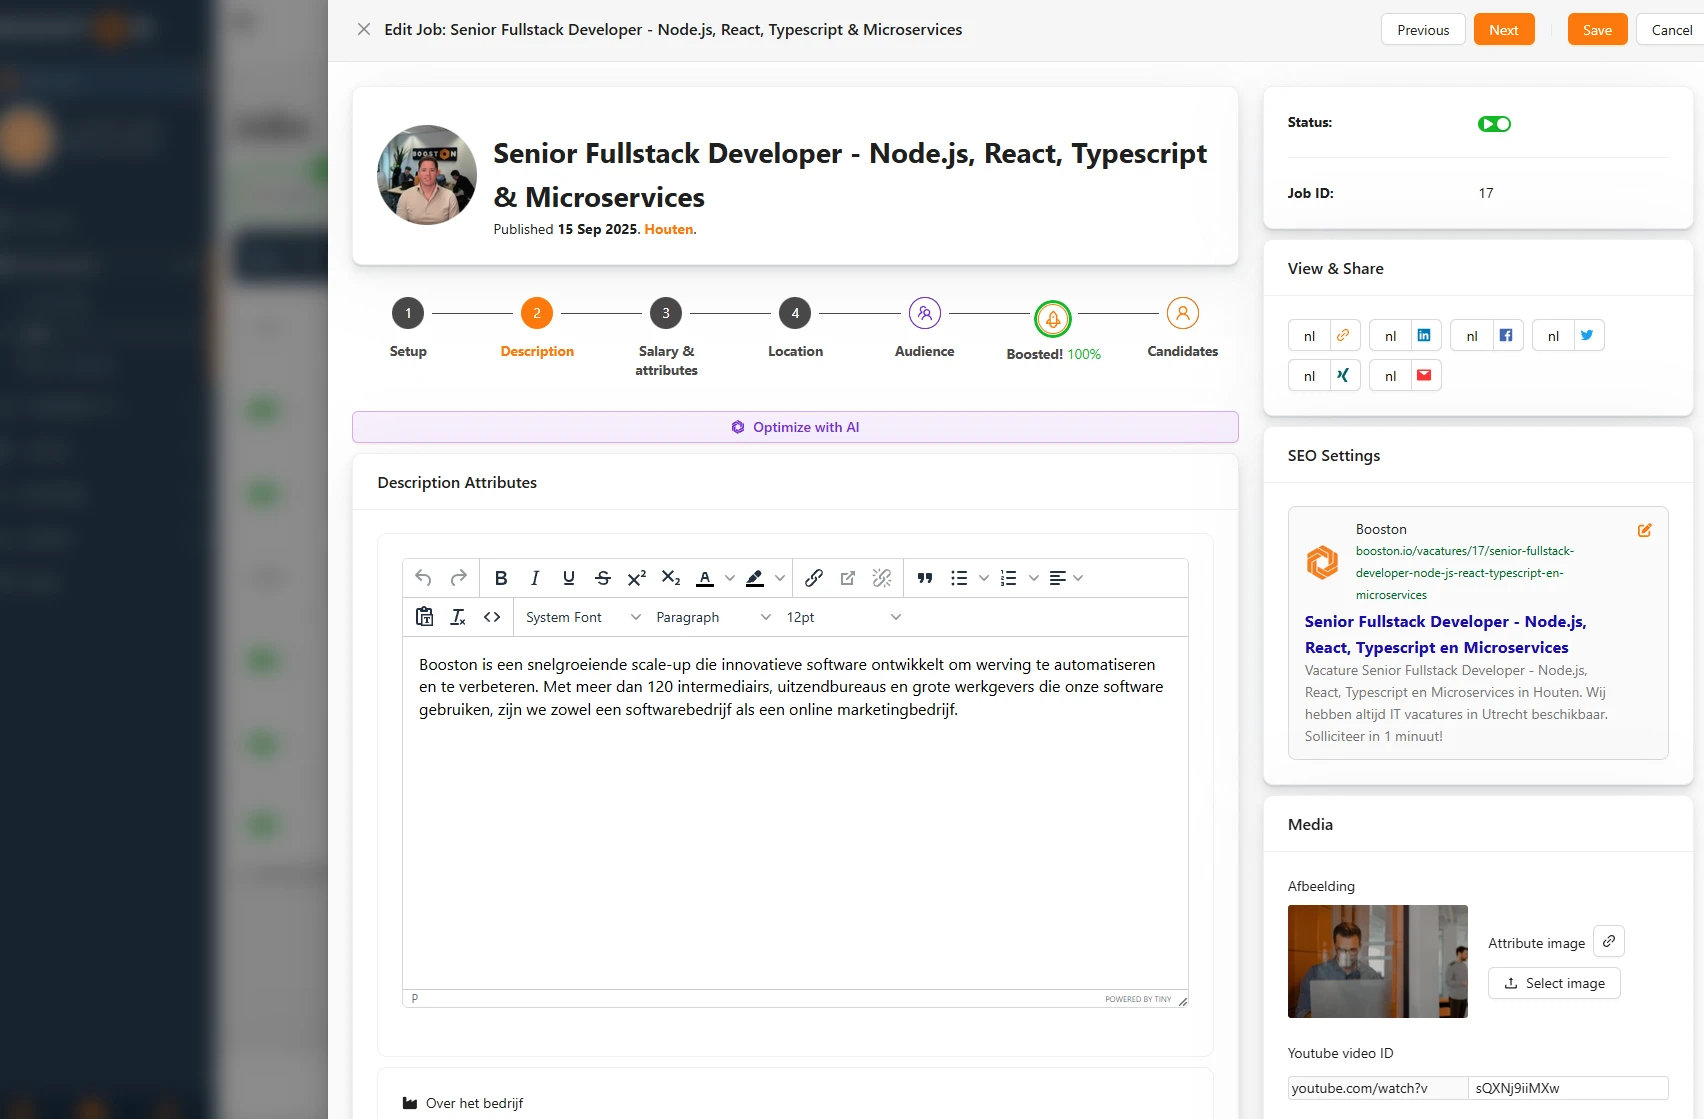
Every text field has a formatting bar. You make text bold or italic, add lists, place a link and pick a text colour. Keep it calm: the styling of your site decides how it ends up looking, and too much of your own formatting is exactly what clashes with it.
An asterisk in front of a field name means the field is required. See Where the fields come from: attributes.
Salary & attributes: the remaining fields
This step holds two cards:
- General Attributes: the choice fields that belong to the role. Think of contract type, hours per week, education level or field of work. You pick from the values you set up yourself, with Choose job attribute values... as the hint in the field.
- Salary Attributes: the salary indication, usually a minimum and a maximum, with Enter a price... as the hint.
These fields do more than inform. They fill the filters on your job page, they decide what a job alert fires on, and they travel into your feeds and campaigns. A job with empty attributes is about as findable online as a job that does not exist.
Location: the address and activating the job
On the last step you fill in the address and put the job live.
- Type the city or address into Location search and pick the right result. Booston fills Street name, Street number, Postal code and City by itself and drops the pin on the map.
- Check the fields. Below the address you usually find the choice fields for region and country.
- Click Next & activate or Save & activate.
You see the confirmation Job activated successfully and the status switch in the side panel turns green. The button is only called that on a job that has never been active. After that it simply reads Next or Save.
This address layout is the same as for candidates and locations, so filling in addresses works the same way everywhere in Booston.
Multilingual: one job in several languages
A job is one job, even when it sits on your site in three languages. You manage the languages on the Setup step, in the Languages field.
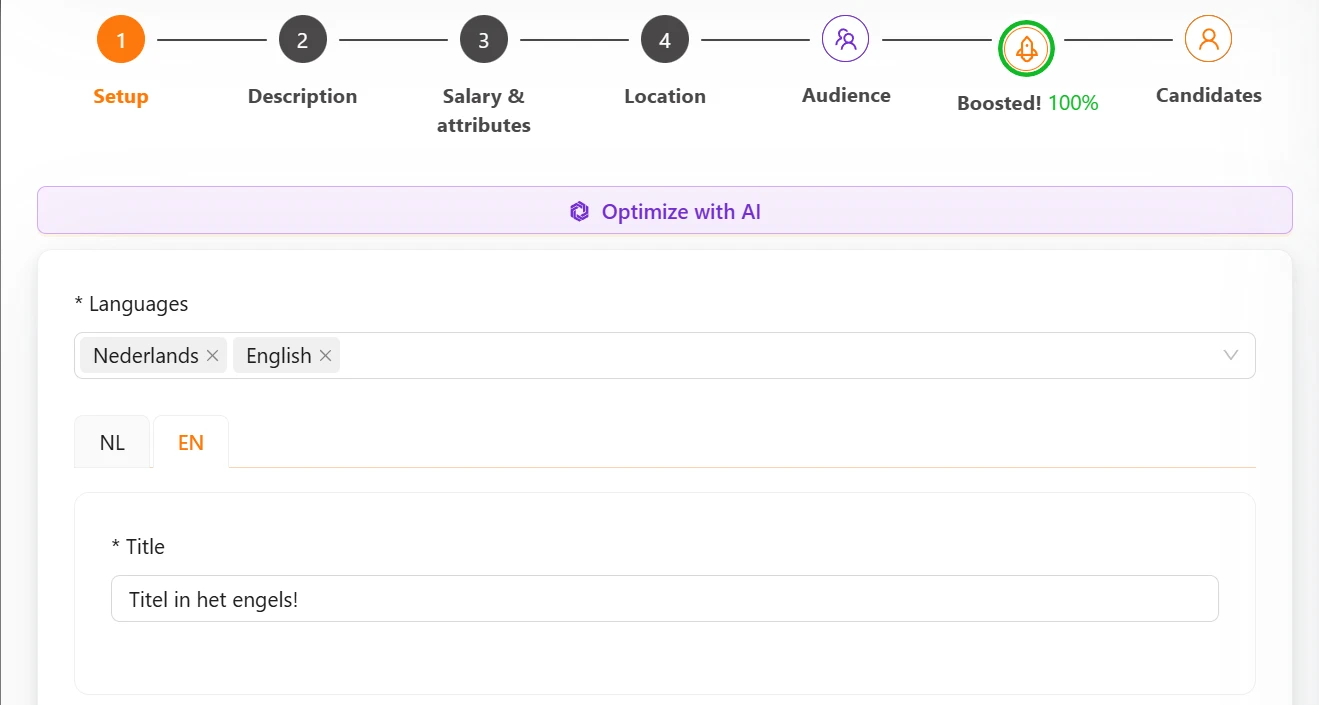
This is how it works:
- Every selected language gets a tab. Above a text field the tabs NL, EN, DE and so on appear. You type the text for that language per tab. Booston does not translate for you, you enter the text yourself.
- Not every field has tabs. Whether a field is kept per language is set on the attribute itself. Address and salary never have tabs: they apply to the whole job.
- Removing a language takes that version offline but throws nothing away. Remove English from Languages and save, and the English page disappears from your site. The text is kept. Put the language back later and everything is there again.
- Adding a language creates a new version. You fill in at least the title. Booston immediately creates its own URL, page title and meta description for it.
- Required fields apply per language. Forget a required field in one language and the form jumps to that tab on save and puts an exclamation mark behind the language code.
Where the fields come from: attributes
The job editor is not a fixed form. Almost every field you see is an attribute set up under Settings → Attributes → Job Attributes. That explains why the editor looks different in one environment than in another.
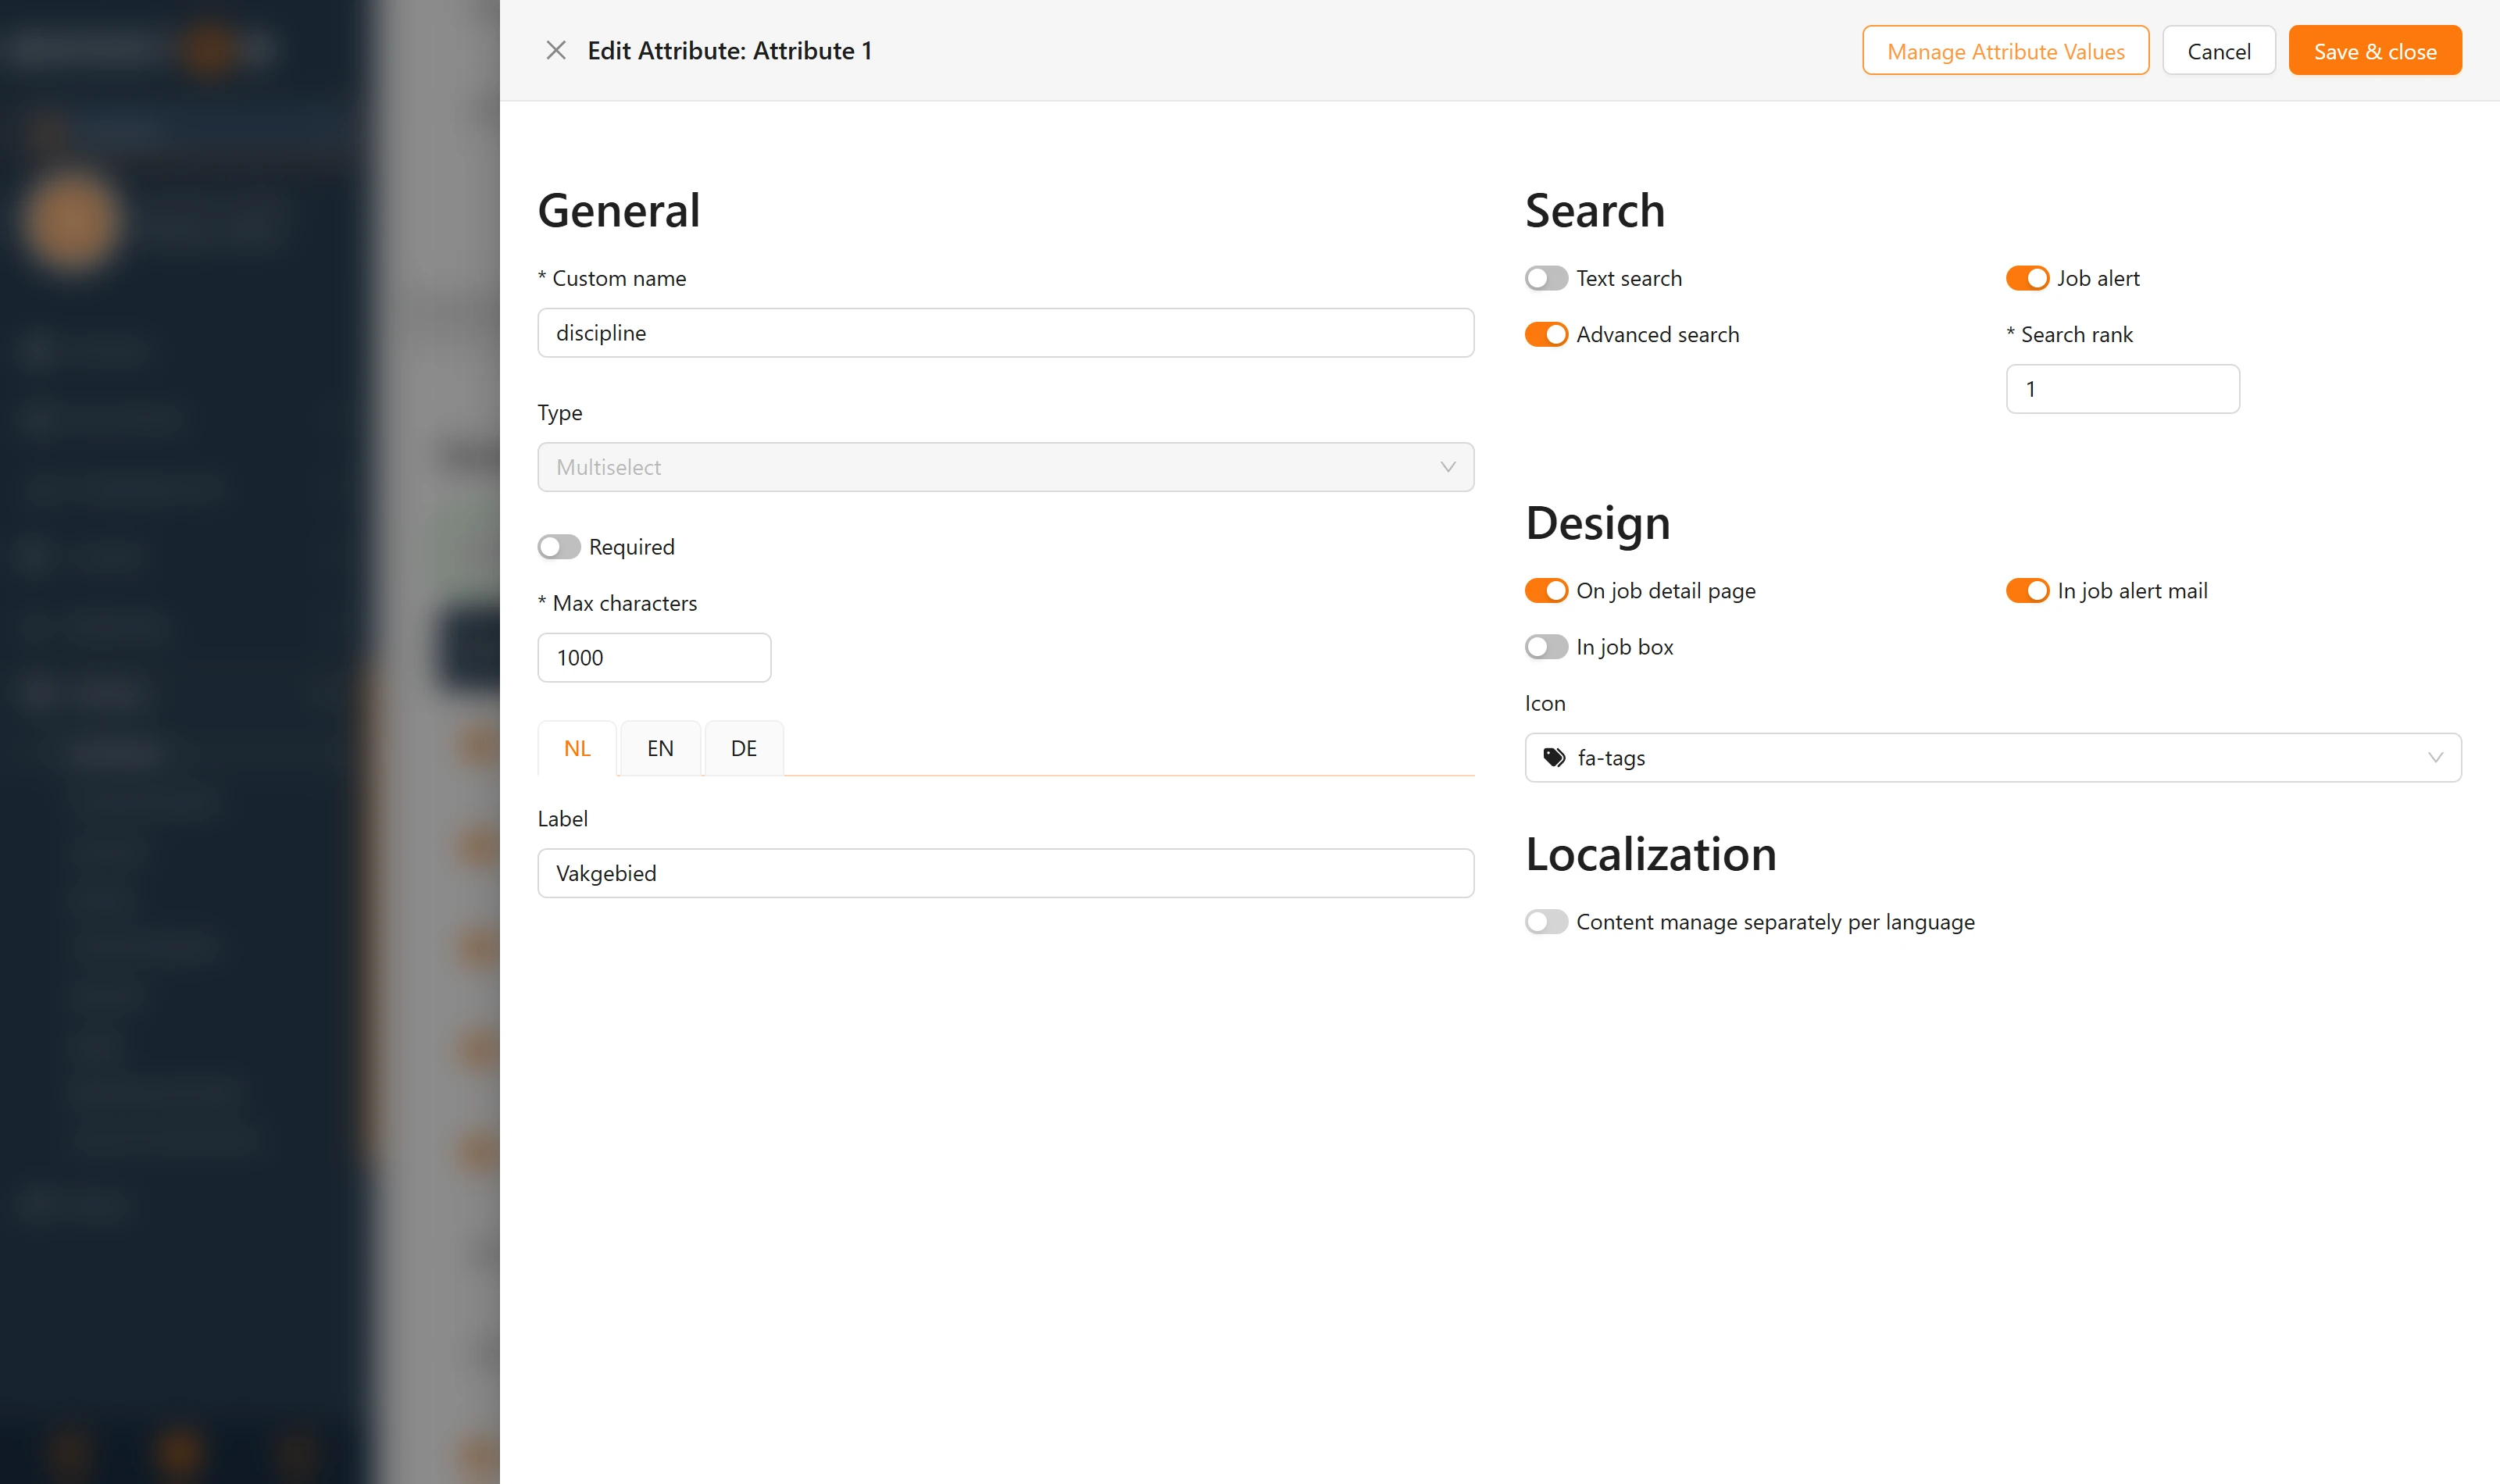
These settings on the attribute decide what you see in the job:
| Setting on the attribute | What you notice in the job |
|---|---|
| Status | With the attribute switched off, you do not see the field at all. |
| The table it sits in | Decides which step the field appears on: Title and description under Setup and Description, General and Salary under Salary & attributes, Location under Location, Media in the side panel. |
| Required | Puts an asterisk in front of the field name. While it is empty, that step cannot save. |
| Search rank | Decides the order of the fields within the card. |
| Label | The name of the field, per language. Rename it here and it is called something else in every job. |
| Content manage separately per language | Decides whether the field gets its own tabs per language or shares one value across all languages. |
For choice fields you manage the options as attribute values, including an image per value. The full story is in Managing attributes for jobs and candidates.
Copying a job
If you have jobs that look a lot like each other, you do not have to start over. Click the copy icon on the row.
Booston makes a copy straight away and opens it in the editor on Setup. You see the confirmation Job has been copied successfully. What happens:
- The copy gets the same texts, attributes, recruiter and publication dates as the original.
- - Copy is added behind the title, in every language. Change that first.
- The copy is paused and still has to pass Location before you can activate it.
- The URL, page title and meta description are rebuilt from the new title, so you do not end up with duplicate addresses.
- Applicants do not come along. They belong to the original job.
Pausing or deleting a job
There are two ways to take a job off your site, and the difference is large.
Pausing is done with the status switch, in the overview or in the side panel of the editor. The job disappears from your site and your feeds but stays in Booston with all applicants and figures. One click and it is back. This is what you want in almost every case: a filled role, a job that needs to go quiet for a while, a role that returns next quarter. Note that pausing also stops the Meta ads on this job.
Deleting is done with the bin in the overview. Booston asks for confirmation with the message Are you sure you want to delete this job? and below it This action cannot be undone. Confirm with Yes and the job is gone.
A job that has to go offline by itself does not need pausing at all. Fill in a Publication end date and Booston stops it on that date.
What happens after publishing: Audience, Boost and Candidates
Next to the four data-entry steps there are three steps about what your job does afterwards.
Audience has AI work out who realistically applies to this job: who that candidate is, what motivates them, what they hesitate about and which angles convince them. You use that to sharpen your text. The step works once the job is active. Everything about it is in Candidate audience analysis.
Boost! is where you handle campaigns on this specific job, with the Campaigns and Cost & Performance tabs. You see per campaign what is running and what it brings in. With campaigns running the step is called Boosted! with a percentage behind it, and the lightning icon in the overview lights up. A paused job cannot be boosted. How the channels themselves work is in Jobboard network and Meta job ads. To deliver your jobs to a party that collects them itself, look at Job feed.
Candidates is what it was all about: the applicants for this job, with their resume, status and rating. You update them here or continue in the full candidate file. See Creating and editing candidates. What each channel brings you in applications is in Analytics.
Working faster with AI
Everything in this article can be done by hand, and that stays. On top of that, AI can take over the typing: writing a job from a raw text or a link, rewriting an existing text with Optimize with AI, and using the audience analysis as a foundation. The AI writes a proposal, you review it, and nothing changes until you confirm.
That is a story of its own and it is described separately in Creating and optimizing jobs with AI. The other AI topics are in the AI section of the helpdesk, and what is enabled for you and what it costs is in Switching on AI, setting it up and tracking your costs.
Working with an ATS connection
If your jobs come from your ATS, your ATS owns the content. Booston collects the jobs and keeps them up to date. For this screen that means:
- The New job button is not there, and Copy and Delete are missing from the rows. You create the job in your ATS, and after the next import it is in Booston.
- The status switch is locked, showing Set by ATS. Set the job to inactive in your ATS and Booston follows.
- Every field your ATS fills is greyed out. On the job text you then see the formatted text without a formatting bar.
- Fields your ATS does not deliver are yours to fill in. Those stay.
To see which fields are locked, look under Settings → Attributes → Job Attributes in the Sync with ATS column. With that switch on, your change is overwritten on the next import. A language you take offline by hand also returns on the next import. The URL, page title and meta description always stay yours. Which data travels back and forth differs per connection and is described in Connecting your ATS to Booston.
Troubleshooting
The status switch is locked and I cannot activate the job
Hover the switch, the tooltip says exactly what is wrong:
| Message | What is going on | What you do |
|---|---|---|
| Job creation not finished | The job never got past the Location step. | Open the job, continue to Location and finish it. |
| Can't be activated because publication start date hasn't been reached | The start date is in the future. | Set the Publication start date to today, or wait. |
| Can't be activated because publication date has expired | The end date has passed. | Extend or clear the Publication end date on Setup. |
| Can't be activated because all job variations are unpublished | No language version is live. | Put at least one language back into Languages on Setup. |
| Set by ATS | The status is decided by your ATS. | Change the status in your ATS. |
I cannot save and I see no error message
A required field is empty in a language you do not have open, or in the Media or SEO Settings card on the right. Look at the language tabs above the field: the language code with the problem carries an exclamation mark. The form jumps there by itself when you save.
My job is active but I do not see it on the site
Check three things: is the publication period right on Setup, is the language you are looking at listed in Languages, and is the link icon in the Language column grey or coloured? Grey means that particular language version is not live.
A field I need is not in the editor
That attribute is switched off or does not exist yet. Look under Settings → Attributes → Job Attributes or see Managing attributes for jobs and candidates.
Frequently asked questions
What is the difference between pausing and deleting?
Pausing takes the job off your site but keeps everything, including the link to your applicants. Deleting throws the job and all its URLs away for good. Pause when in doubt.
Can I have a job live in one language and not in another?
Yes. Only the languages listed in Languages appear on your site. Remove a language and that version goes offline while the text is kept.
Do I have to fill in the SEO fields myself?
No. Booston creates a URL, page title and meta description from the title automatically. Via SEO Settings in the side panel you adjust them if you want it different. That card appears once the job has been finished through Location.
What happens to applicants when I pause a job?
Nothing. They stay in your overview and you update their status as usual. Only new applications stop coming in, because the job can no longer be found.
Can I prepare a job in advance?
Yes. Fill in a Publication start date in the future. The job stays paused until that date is reached and can only become active afterwards.
Why does my editor look different from a colleague's in another environment?
Because the fields come from your own attributes. Every environment has its own set, with its own names, its own required fields and its own choice lists.
Need help?
Stuck, or unsure which setting fits your situation? Email support@booston.io or call 085 0044 215 and mention:
- the name of your environment;
- which job it concerns, preferably with the number from the ID column;
- what you want to achieve, or the message you see.
Prefer to walk through the screen together? Book a free 30-minute online demo, and we will go through it with you. Job Done!


