Most of the people who fit your job are not looking for one. They are not on a job board and they do not respond to an ad in a search engine — but they do scroll through Facebook and Instagram every day. As long as you are not there, you only reach the small part of the market that happens to be actively searching right now.
Meta job ads takes your job to the rest. For every job you create or import from your ATS, an ad is prepared automatically: copy, image, audience and budget are already filled in from the job data and the settings Booston has set up for you. You read it through, change what you want and click Publish. The result: your job is live on Facebook and Instagram, applicants arrive in your candidate overview, and you can see per job exactly what a lead costs you.
After reading this article you will know how to publish an ad and stop it again, how to adjust the copy, audience and budget, where to find your results and what to do when an ad is not delivering. You will find the screen via Campaigns & AI → Meta job ads.
Before you start
- The Meta job ads module is switched on for your environment.
- Your Facebook business page and ad account are connected. Booston sets this up for you during onboarding, together with the campaign, the main budget and the default templates. There is nothing for you to configure here.
- You have a role with access to Meta job ads. Who gets access to what is covered in Users: granting access, choosing roles and signing in through your ATS.
- At least one active job is ready. Without a job there is nothing to advertise.
What it gets you
Briefly, because the rest of this article is about using it:
- You reach the 80% who are not searching. You find active candidates on job boards and in search engines. Passive candidates — people with a job who are open to something better — you reach on social media.
- The ad is ready per job. Booston reads the job (title, city, what you offer, requirements) and prepares the ad up front. You never have to retype anything.
- You keep costs tight. You set a maximum daily budget per job and see daily what a lead costs you.
- Candidates apply without a resume. They fill in a short form that Facebook has largely pre-filled for them. That removes exactly the hurdle where passive candidates drop out.
The Job Ads screen
Under Meta job ads your jobs are listed one per row. This is the screen where you do most of the work: publishing, stopping, and deviating from the default settings per job.
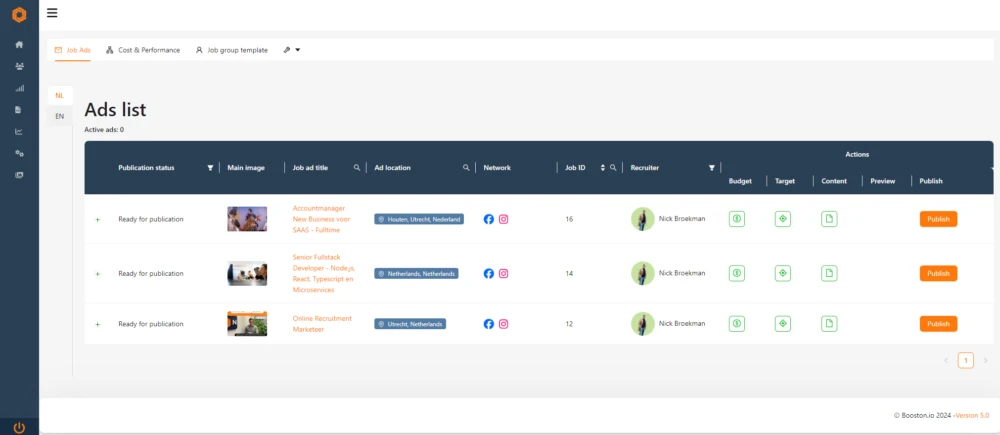
The language buttons (for example NL and EN) are at the top left. You always work in one language: every language version of a job is its own ad with its own copy, audience and budget.
The main columns:
| Column | What you see |
|---|---|
| Publ. status | Where the ad stands: Ready (ready to publish), Published (live), Unpublished (stopped) or Republish (something changed, so it needs publishing again). |
| Main image | The image used in the ad. |
| Job ad title | The job title. Click it to open the job itself. |
| Ad location | The area the ad is shown in. |
| Network | Whether the ad runs on Facebook, on Instagram or on both. |
| Recruiter | The recruiter attached to the job and shown in the ad. |
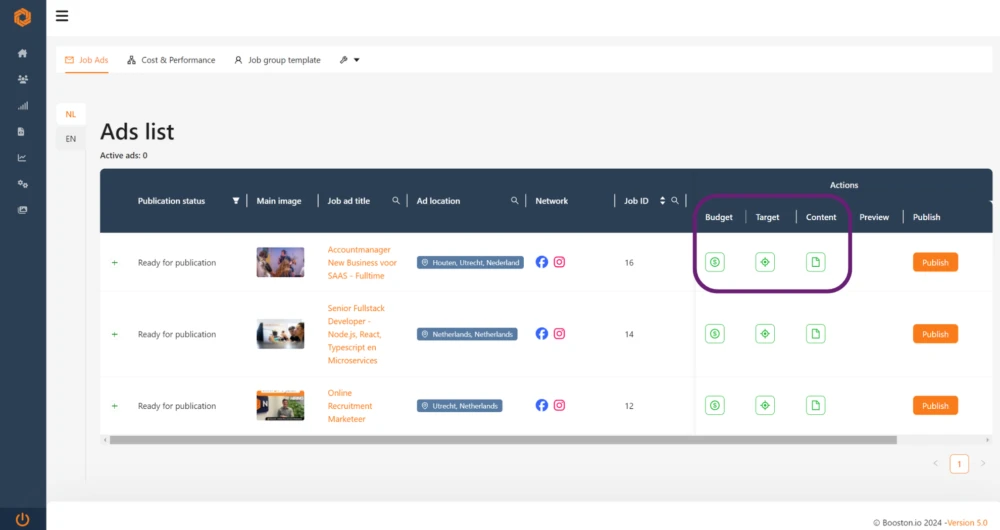
On the right each row has five action buttons: Budget, Target, Content, Info and Publish. The colour of the first three tells you something:
- Orange icon — this job uses the default setting from the template.
- Green outlined icon — this job has its own value, different from the template.
Click the + in front of a row to expand the details: there you see the configured content, the audience and — once the ad is running — the first results.
Publishing a job
Publishing is one button, but it pays to check three things first.
- Open the job in the list and click Content. Read the ad copy and change what is not right. Click Save.
- Click Target and check that the area and audience are right for this job. Click Save.
- Click Budget and set the maximum daily budget you want to spend on this job. Click Save.
- Click Publish.
Publishing takes a moment: Booston creates the ad at Meta and waits for it to be approved. You see a loading icon while that runs, and then a message that the ad has been published. The status changes to Published.
To stop an ad, click Unpublish. The ad disappears from Facebook and Instagram, and the settings stay in place. You can switch it back on later with one click.
Does it say Republish? Then the content, audience or budget changed after the ad went live. Click Republish to push the change through, or Pause to stop the ad.
Adjusting the ad
Click Content and the editor opens with three tabs: Content & media, Form and Follow up. On the right you see live what the ad looks like in the feed. Everything you type on the left changes in that preview straight away.
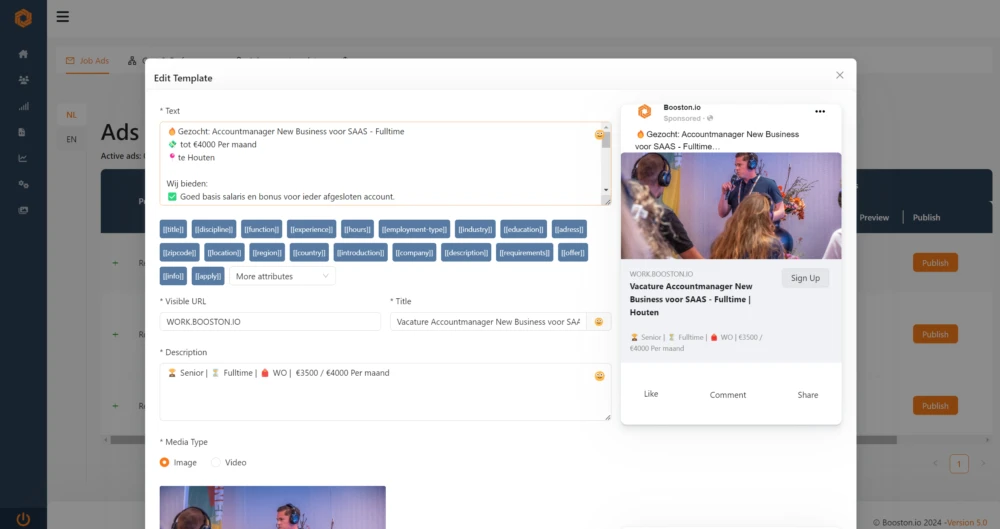
Content & media
This is the ad as someone sees it in their feed.
- Text — the copy above the image. This is the most important field: it decides whether someone stops scrolling. Emoji are fine to use.
- Ad Type — Single Ad (one image or video) or Carousel Ad (several cards the candidate can swipe through). A carousel has at least two cards, each with its own headline, description, link and image.
- Visible URL — the web address shown under the image.
- Title — the headline under the image.
- Description — one extra line under the headline. Useful for salary, hours or location.
- Media Type — Image or Video, with the picker underneath for selecting or uploading your visual. How to upload, crop and reuse images is covered in Images and files.
If the AI module is switched on, you will see the Generate with AI button at the top right of the text block: it writes three suggestions for the ad copy based on the job. With an image you also get Generate Video from Image, which turns a still into a short video. What AI costs and how to switch it on is in Switching on AI, setting it up and tracking your costs.
Form
When someone clicks your ad, a form opens inside Facebook or Instagram. So the candidate does not have to go to your website and does not need a resume — name, email address and phone number are already filled in.
- Language — the language of the form.
- Option to share the apply-form with a friend — switch this on and someone can forward the form to a contact. That often accounts for a share of your leads.
- Intro — the heading, layout and text of the intro screen, plus a few short bullet lines about what you have to offer.
- Questions — the questions you ask. Keep it short: every extra question costs you leads. Two or three questions you genuinely need in order to judge someone is usually enough.
Follow up
What the candidate sees after submitting the form.
- Privacy — the text and web address of your privacy statement. Meta requires this.
- Thank you — the heading, text and button on the thank-you screen. Under Thank you button link you choose where that button goes: the lead page of the job, the job page, your own web address or WhatsApp.
If you choose WhatsApp, you enter the international phone number and optionally a pre-filled message. The candidate then lands straight in a WhatsApp conversation with you — the fastest way to make contact while the interest is still there.
Targeting: who gets to see your ad
Click Target to set who the ad is shown to.
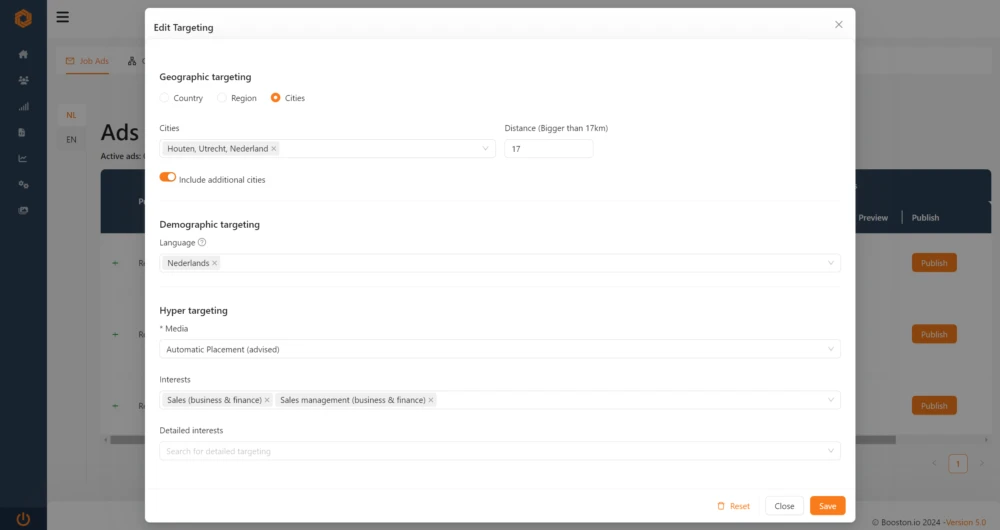
Geographic targeting — choose whether you target Country, Region or Cities. For cities you also enter a radius (at least 17 km). Include additional cities brings in the surrounding towns.
Demographic targeting — under Language you can address people who use a language that is not common in that area. Leave this empty if that does not apply.
Hyper targeting:
- Media — where the ad is shown: Automatic Placement (advised), Facebook only or Instagram only. Automatic is almost always best: Meta then spreads your budget itself to wherever it converts most cheaply at that moment.
- Interests — broad interest areas, for example Logistics or Healthcare.
- Detailed interests — refinement within those interests.
If you want to know who your audience really is and what appeals to them, the Candidate audience analysis helps: it builds a profile of the candidate per job, with drivers and objections you can use in your ad copy.
Budget per job
Click Budget to set what a job may cost per day at most.
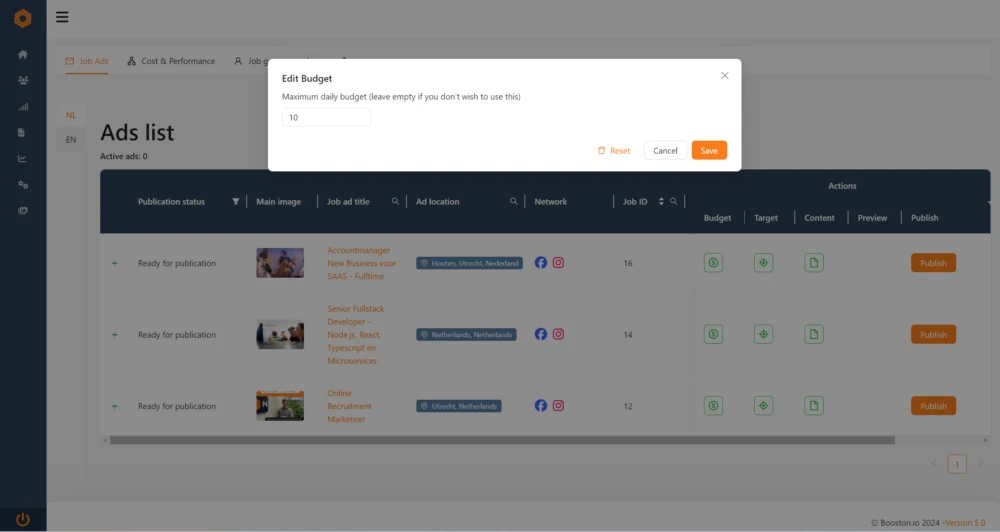
- Maximum daily budget — the maximum amount this job may spend per day. Leave it empty and the default amount from the template applies.
- Under Budget Template you set the default daily budget per ad, so you do not have to do this per job.
The daily budget is a ceiling, not a target: on a quiet day Meta spends less. The total across all jobs is capped by the daily campaign budget.
Templates: set it once, apply it everywhere
You do not want to fill in the same copy, audience and budget for every job. That is what the templates are for. Booston works with three levels, from general to specific:
- The template — applies to all your jobs.
- The job group — a different setting for a group of jobs.
- The job itself — a different setting for one job.
The most specific level wins. If you set nothing at job level, Booston takes the job group, and otherwise the template.
Content Template, Targeting Template and Budget Template
The Meta job ads menu has three templates side by side. In the Content Template you write the default ad. You do not retype it per job: you use job fields such as [[title]], [[location]], [[offer]] and [[hours]], which get filled in automatically per job. The available fields are listed as clickable blocks under the text field.
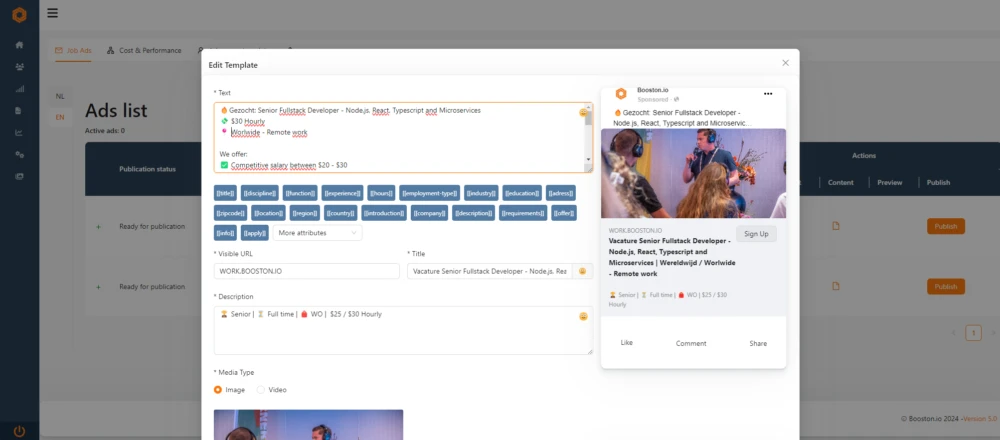
In the Targeting Template and the Budget Template you do the same for the default audience and the default daily budget per ad.
Job group template
Job groups let you deviate per type of job. Drivers call for different copy, a different area and often a different budget than software developers.
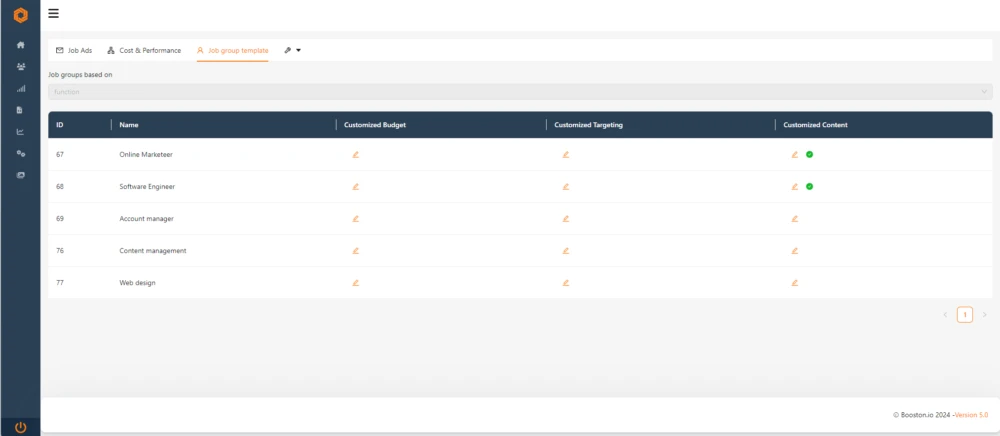
- Go to Job group template.
- Under Job groups based on, choose the job field you want to group by, for example the discipline or the job family. Every value of that field becomes a group.
- In the row of a group, click the icon under Customized Budget, Customized Targeting or Customized Content and fill in what should be different for that group.
- Click Save.
A green dot in the row shows that the group has its own setting.
Where your leads end up
Every completed application arrives as a candidate in your candidate overview, with the answers the candidate gave to your questions. If you work with an ATS connection, the candidate is passed on to your ATS.
The candidate automatically receives a confirmation email. You change its text under Email templates, in the template for the Facebook lead confirmation.
Cost & Performance: what it delivers
Under Cost & Performance you see what your ads cost and deliver. At the top are the totals and a graph of costs and leads over time; underneath is the same list of jobs, now with numbers.
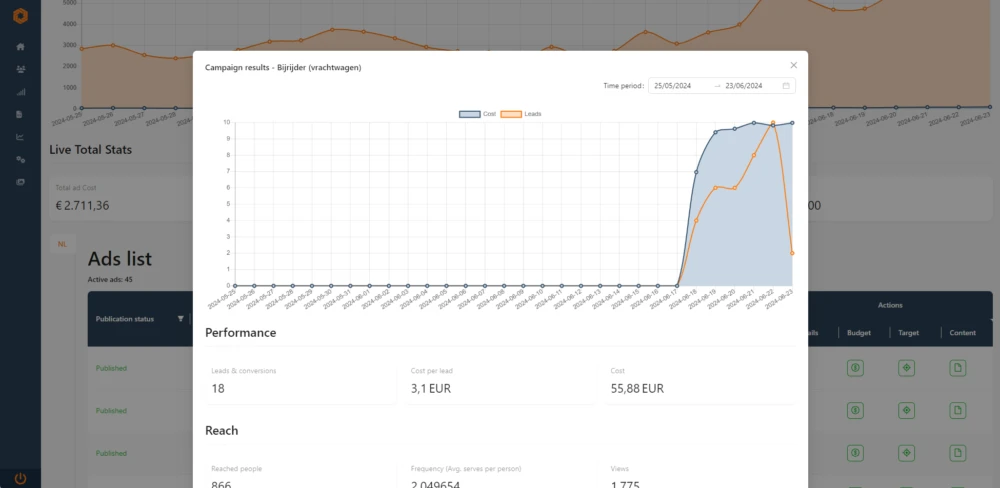
Per job you see:
| Figure | What it means |
|---|---|
| Total cost | What this job has cost so far in the selected period. |
| Leads | The number of completed forms. |
| Avg. cost per lead | The cost divided by the number of leads. This is your key number. |
| CTR | The percentage of people who clicked the ad after seeing it. |
Click the chart icon behind a row for the details of that one ad. There is more there:
- Performance — leads, cost and cost per lead.
- Reach — how many people you reached, how often they saw the ad on average, the number of impressions and the cost per thousand impressions.
- Quality — the quality score, the engagement and the conversion rate as Meta estimates them against other ads. It says something about how your ad performs compared to the rest, not about the quality of your candidates.
At the top you choose the period. Compare the same ad across different periods: an ad that has been running for three weeks almost always gets more expensive, because the same people keep seeing it.
An ad that is not delivering
If a job is running and no leads — or only expensive ones — come in, work from cheap to expensive.
- Look at the cost per lead first, not at the number of leads. Set the period to the last seven days and compare the job with your other jobs. What counts as a normal price differs a lot per field.
- Widen the audience. Too narrow is the most common mistake. Remove interests, increase the radius or set Media to Automatic Placement (advised).
- Replace the visual. The visual decides whether someone stops scrolling. A different photo is the cheapest test you can run. Try a photo of real colleagues at work instead of a stock image.
- Rewrite the first two lines. Only those are visible before someone has to click more. Put what the candidate gains there, not what you want from them.
- Make the form shorter. Every question you drop earns you leads.
- Switch the ad off for a few days and start again. If it has been running for weeks, your audience has simply seen it too often. Check the frequency under Reach: if it climbs while the leads drop, that is your cause.
What you cannot arrange yourself
A few settings sit at account level and are read-only for you. They apply to all your ads at once, and a typo there costs money immediately.
- The status of the campaign — whether the campaign as a whole is on or off. If the campaign is off, published ads are not visible on Facebook. You then see a message at the top saying the campaign is not active.
- The daily campaign budget — the ceiling for all your jobs together. It also determines how many jobs can be live at the same time.
- The bid strategy and the campaign objective — how Meta buys and what it optimises for.
- The connection with your Facebook page and ad account — Booston sets that up for you during onboarding.
If you want to change any of this, email support@booston.io with your environment and the amount or status you want. We adjust it the same working day.
Troubleshooting
The Publish button is greyed out
You have hit the ceiling of the daily campaign budget. Stop a running ad, or request a higher campaign budget through the helpdesk.
The status says Published, but I cannot see the ad on Facebook
Check the message at the top of the screen. If the campaign is not active, that is the cause and it goes through the helpdesk. Otherwise the ad is still being reviewed by Meta: approval usually takes minutes, sometimes a few hours.
An ad that was doing fine now says Republish
Something changed in the content, audience or budget — on the job itself, on the job group or in a template. The live ad keeps running unchanged until you click Republish.
I am not getting leads while the ad is being shown
Check the form first: is there a question that makes people drop out? If leads do arrive at Facebook but not in Booston, the page permissions are usually the problem. That is covered in Facebook Lead Import not working? Check the page permissions.
I cannot select my Facebook page
Then the invitation for the business page has not been accepted yet. The steps are in Accepting a Facebook business page invitation.
Frequently asked questions
Do I have to create a separate ad per language?
Yes. Every language version of a job is its own ad with its own copy, audience and budget. You switch with the language buttons at the top left of the list.
What happens when a job expires or goes offline?
Booston stops the matching ads automatically as soon as the end date passes or the job is set to hidden. So you do not have to worry about paying for a job that has already been filled.
Can I put the same job on job boards as well?
Yes, they run side by side. With the Jobboard network you spread one budget across job boards, and with the Job feed you send your jobs to partners automatically. Meta job ads reaches the people who never look there.
How much budget do I need?
That differs per field and region. Start with an amount that can be expected to bring in a few leads a week and check Avg. cost per lead after a week. If you are unsure, email support@booston.io — we will look with you at what comparable jobs cost.
Does a published ad change along when I edit the job text?
Not by itself. The live ad keeps running as it is; the row gets the status Republish, so you decide when the change goes to Facebook.
Coming soon
- Ad copy written entirely by AI. You switch on AI once as an alternative to the content template, and from then on every ad is written automatically from the full job, per language. You can still edit the copy afterwards or have it generated again.
- The audience analysis as the basis for that copy. If a Candidate audience analysis exists for the job, Booston uses the drivers and objections from it directly in the ad copy.
- An ad preview that looks exactly like Facebook. The preview in the content editor becomes a faithful rendering of the feed, including the way long copy gets cut off.
- Disqualifying candidates based on their answer. You will be able to mark an answer as disqualifying; that candidate does not complete the form and sees a separate closing screen.
- A/B testing inside Booston. Run two variants of the same ad side by side, split the budget and let Booston determine which variant wins.
As soon as this is live, we will update this article.
Need help?
Cannot work it out, or unsure which setting fits your situation? Email support@booston.io or call 085 0044 215 and mention:
- the name of your environment;
- what you want to achieve;
- the message you see, if there is an error message.
Would you rather go through the settings together? Book a free 30-minute online demo — then we will walk through it with you. Job Done!


