Most candidates arrive on their own: through your job page, through a Meta campaign, through a job board. But not all of them. Someone calls, someone mails a CV, someone speaks to you at a career fair. Those candidates belong in the same system as the rest, otherwise you are keeping two lists and by the end of the month you no longer know what actually came in.
Under Candidates every candidate sits as one file: contact details, CV and cover letter, every job they responded to, the stage each of those is in, your colleagues' notes and a score. You add candidates yourself and you keep them up to date without having to request anything. The end goal of this article: you manage your candidate base entirely yourself, you can see where every candidate came from, and you record what you think of them so your colleague can still see it tomorrow.
By the end of this article you will know how to read and filter the overview, how to add a candidate by hand, how to update their file and how the score and the report work. You will find the screen under Menu → Recruitment → Candidates.
Before you start
- You need access to the Recruitment module. If you cannot see Candidates in the menu, the module is off for your role. Someone with the Manager role arranges that through Users and permissions.
- Which fields you see on a candidate is set in your attributes under Settings → Attributes → Candidate Attributes. More on that in The fields come from your attributes.
- The recruiters that can be attached to a candidate come from Team members. You do not link them to the candidate but to the job.
- If you work with an ATS connection that exports candidates to your ATS, this screen changes. What you can and cannot do then is covered in Working with an ATS connection.
- AI can read the CV for you and rate the candidate. That is optional and is described separately in the AI section of the helpdesk.
The Candidates overview
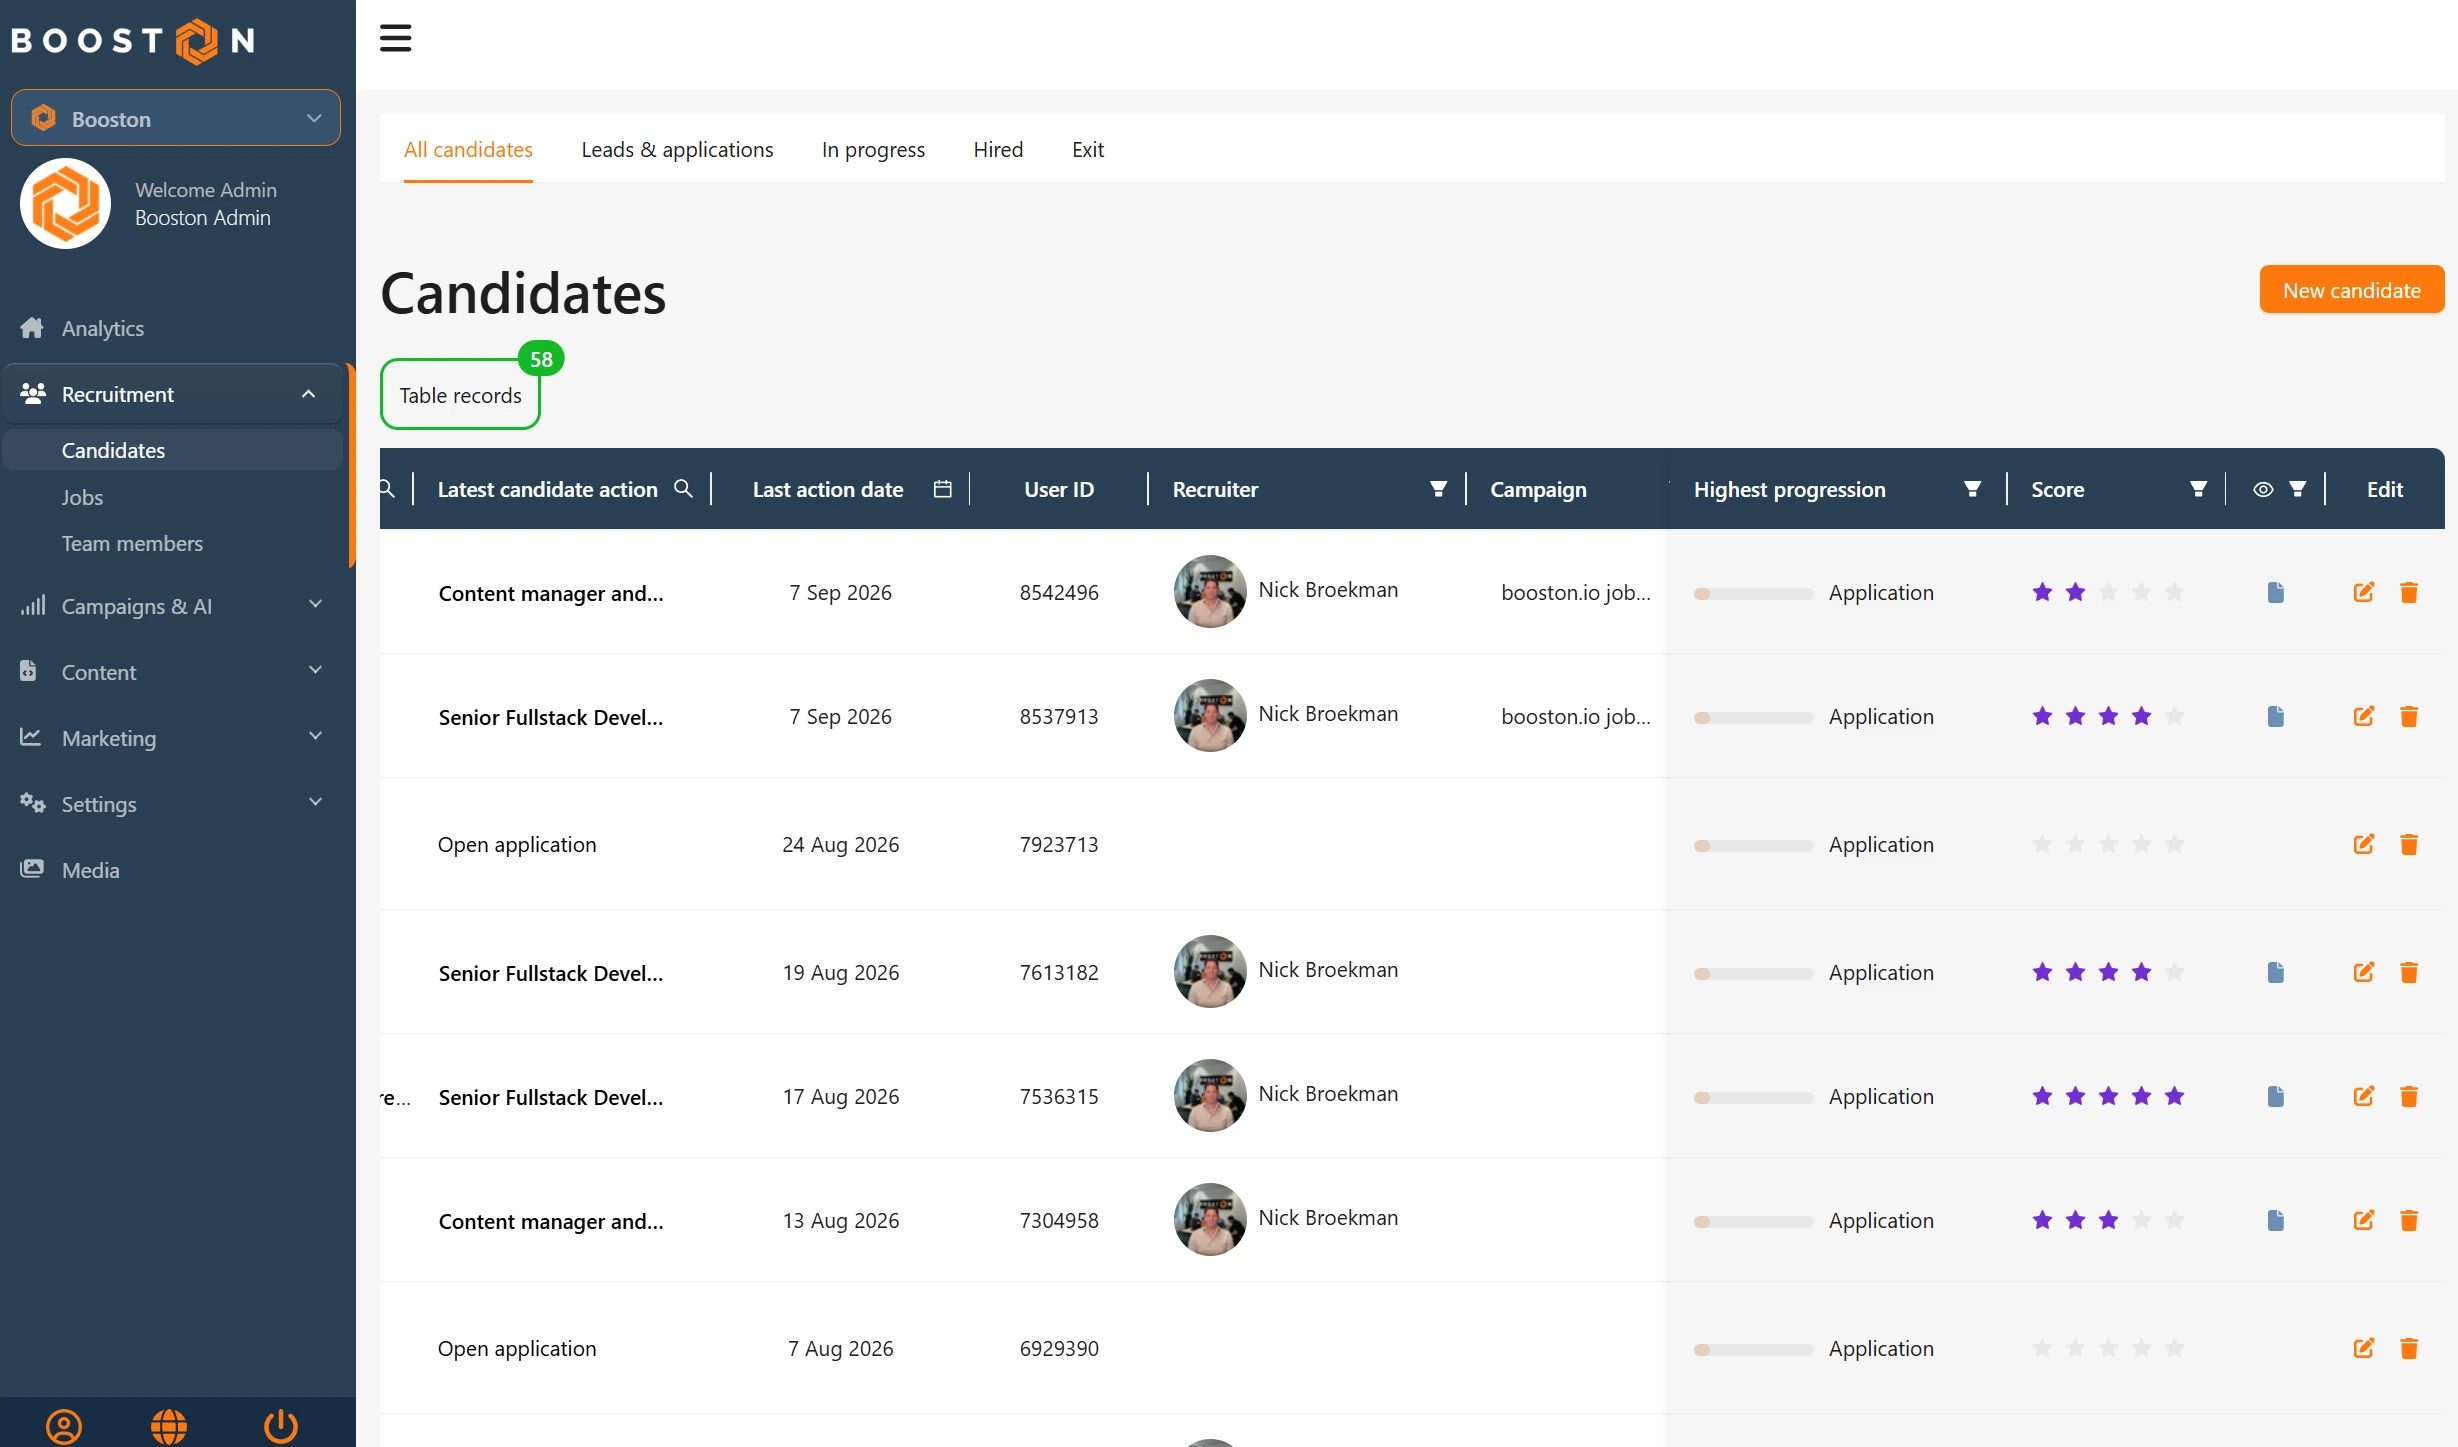
The overview is your working list. At the top sits the title Candidates, the New candidate button on the right, and below it a green counter Table records with the number of candidates matching your filters. As soon as you filter, that line becomes Table records found for: with your active filters behind it, and the red Clear Filters link appears.
The tabs: from first response to closed
Above the title sit five tabs. They are shortcuts to a fixed set of statuses, so you do not have to build the same filter every time.
| Tab | Who you see |
|---|---|
| All candidates | Everyone, with no filter on status. |
| Leads & applications | New responses: status Lead and Application. This is your work in hand. |
| In progress | Running processes: Contact, Appointment, Presented to team and Presented to client. |
| Hired | Only Hired. |
| Exit | Closed without a placement: No contact, No potential for us, No reaction back, Rejected by team, Rejected by client and Candidate withdraw. |
A tab simply sets a filter in the URL. So you can still filter on recruiter or campaign on top of it, and Clear Filters drops you back to All candidates.
What the columns show
- Name: the candidate's name. Click it to open the file.
- Latest candidate action: the job they responded to most recently, or Open application if the response was not tied to a job.
- Last action date: the date of that latest action.
- User ID: the number the candidate is known by in Booston. Useful when you mail the helpdesk about one specific candidate.
- Recruiter: the recruiter attached to the job.
- Campaign: the campaign the candidate came in from.
- Highest progression: a small bar showing the highest stage this candidate reached anywhere.
- Score: the rating in stars.
- A column with an eye as its header: a document icon here means the candidate has a CV. One click opens it in a new tab, without opening the file.
- Edit: the pencil opens the file, the bin deletes the candidate.
Where those columns come from
This is the part that tends to raise questions, because you never fill in three of these columns yourself. They are derived from the application.
The recruiter comes from the job, not from the candidate. So you cannot attach a candidate to a recruiter. If someone applies for a job owned by Sanne, Sanne appears in the column. If they then respond to a job owned by Tom, you see both names, most recent first. An open application has no job, so the column stays empty. If you want a different recruiter to show, change the recruiter on the job.
The campaign comes from the UTM tags the candidate arrived with. If they clicked a Meta ad or a job board link, that link carries the campaign and Booston stores it with the application. If the same candidate responded through several campaigns, you see the first one with a blue plus behind it. Hover it to see them all. What each channel delivers in total is in Analytics: this screen shows it per candidate, Analytics adds it up per channel.
The progression is the highest one across all applications. If someone responded to three jobs and sits at Appointment on one of them, the overview shows Appointment. You only see the separate processes once you expand the row.
The latest action is the most recent application. A candidate can have several actions. The overview shows one, the file shows them all.
Filtering and searching
Every column with a filter or search icon can be switched on. You can combine them, and everything that is on is listed in the counter at the top.
- Search on Name or on Latest candidate action, for instance on a job title.
- Filter by period through Last action date, with a start and an end date.
- Filter on Recruiter and on Campaign. The campaign list fills itself with what actually came in.
- Filter on Highest progression when you want a stage that does not exist as a tab.
- Filter on Score, from Zero stars to Five stars.
- Filter on the eye: With resume or No resume. Useful for seeing who you still need to ask for a CV.
Expanding a row: the actions per candidate
Click a row to unfold it. You then see each application separately, with Action source (through the website, a Meta lead form, a campaign or added by hand), Action with the job title, Action date, Action id, Campaign, Action progress and, with an ATS connection, ATS Status.
This is where you read back a process. The overview shows the candidate's highest status, the unfolded row shows which process holds that status and where the others stand.
Changing status and score directly
You do not have to open the file to update something. Click the stars under Score to rate, or click the icon next to the progress bar to move one process a stage further. Both are saved immediately.
Adding a candidate by hand
Click New candidate at the top right. A panel opens with the title Create Candidate.
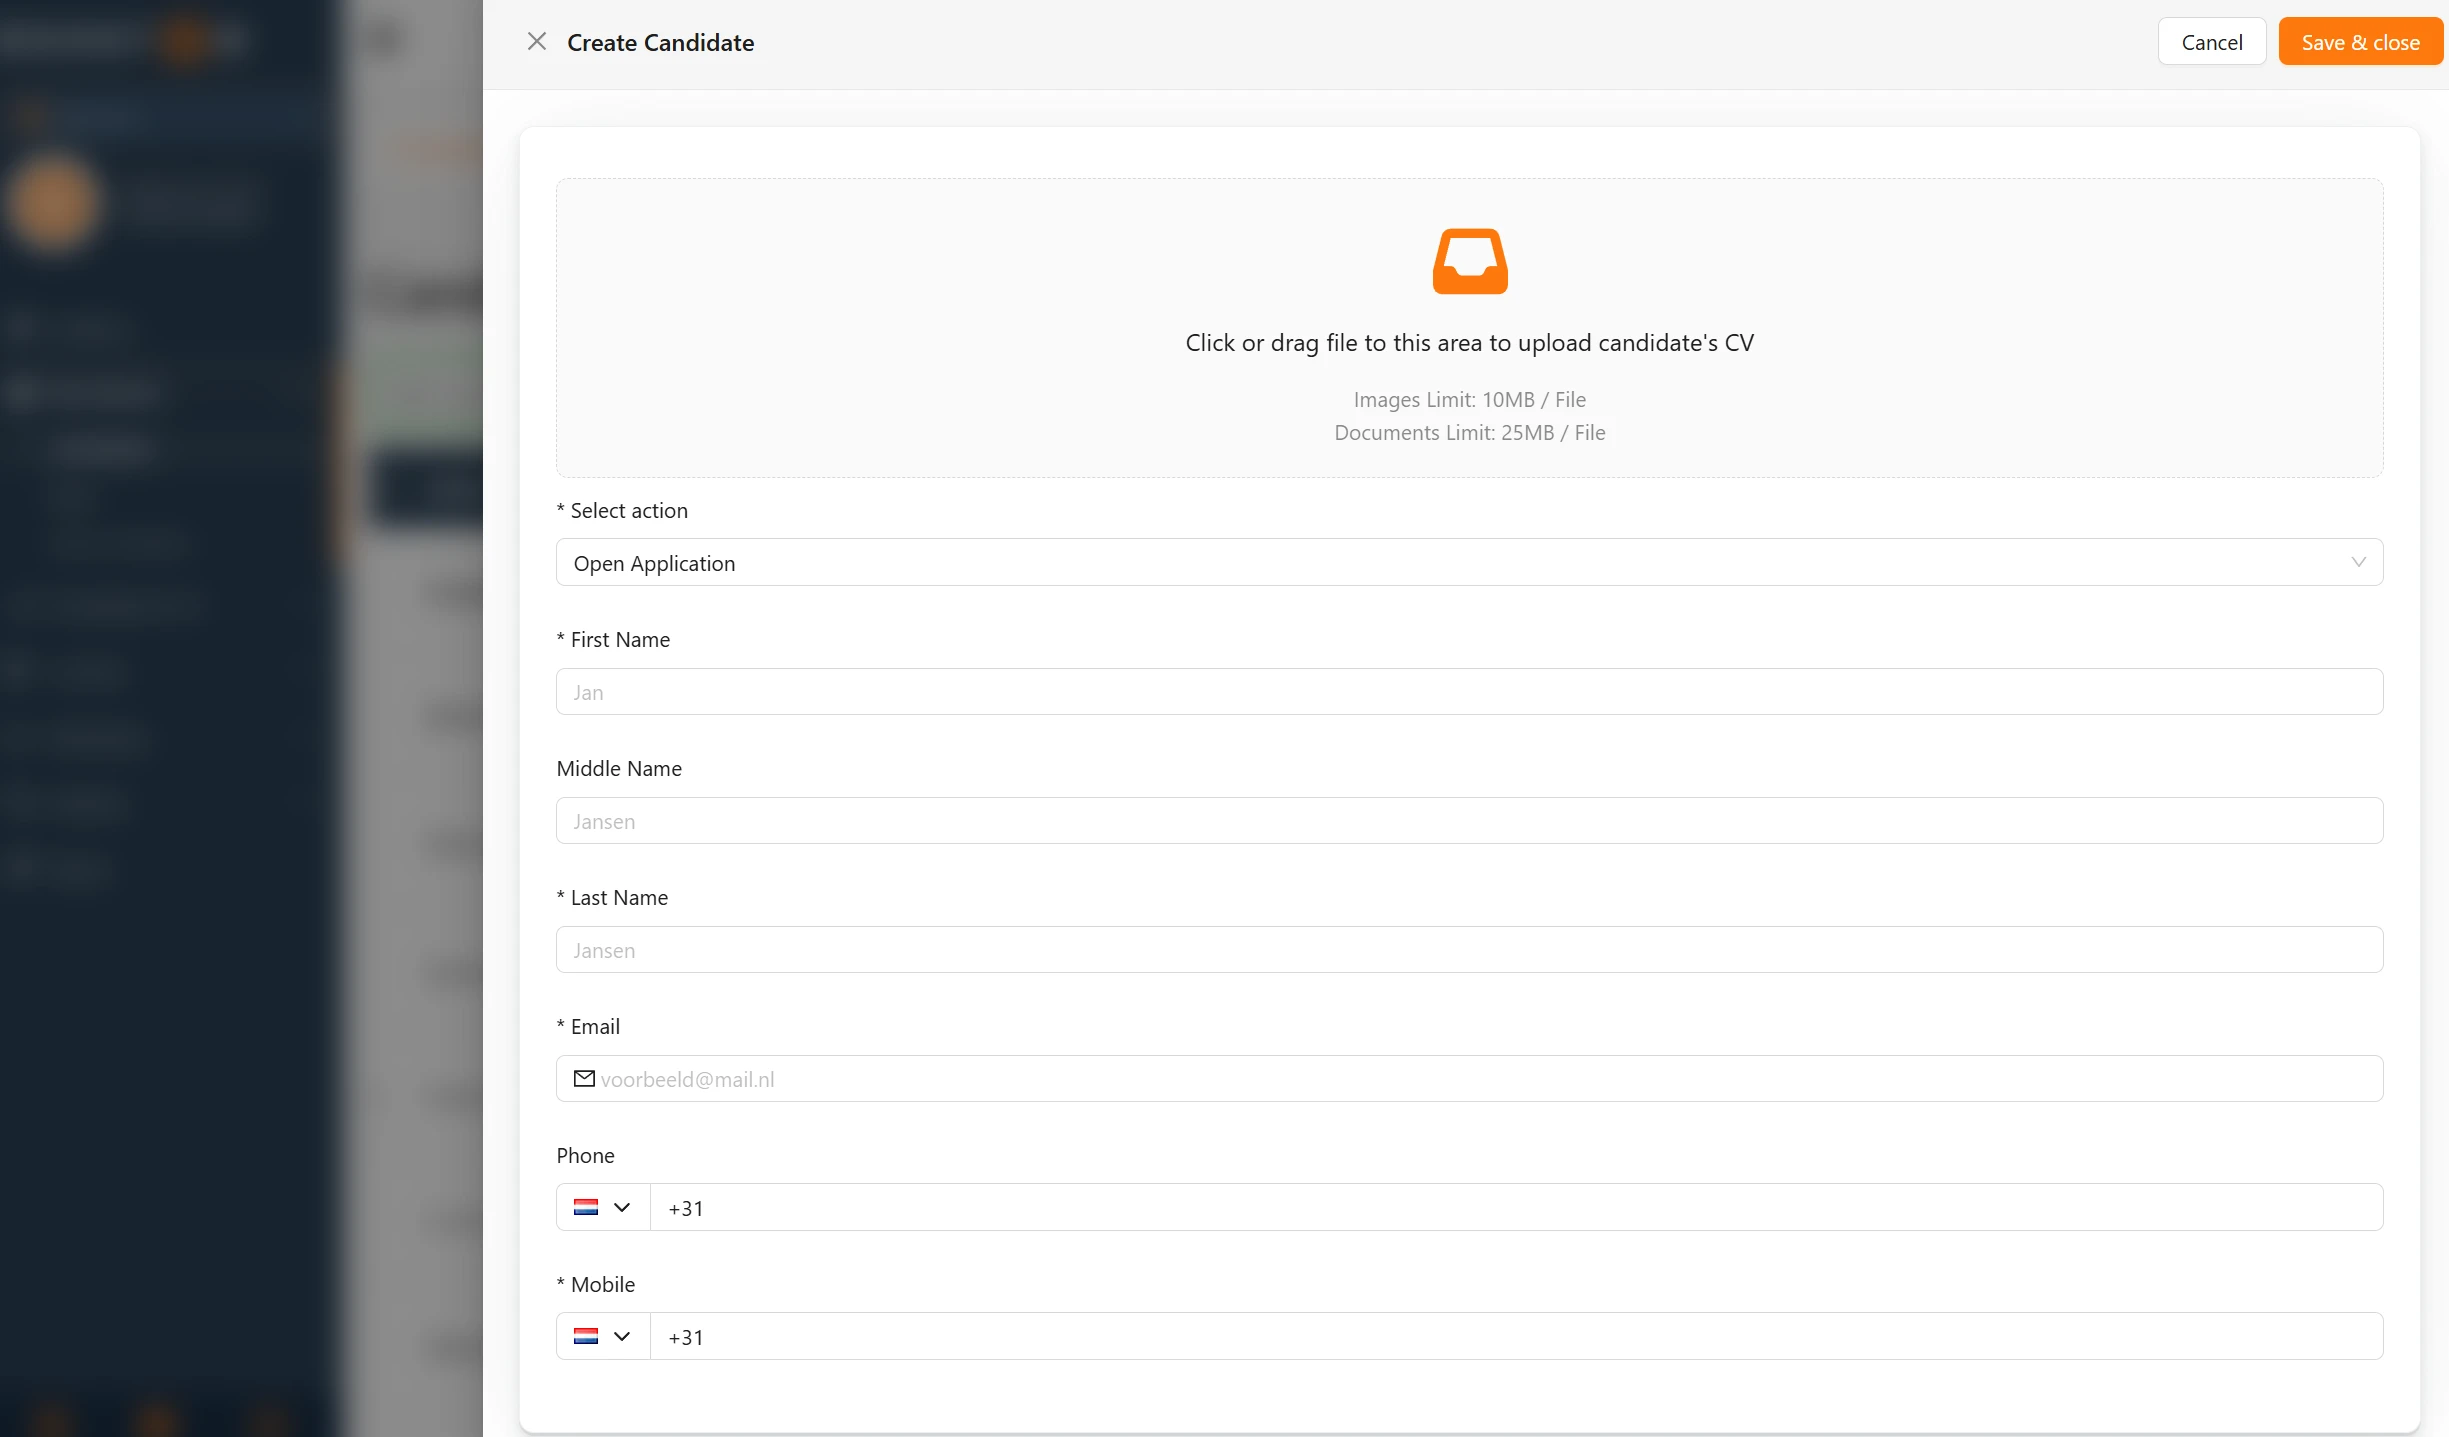
- Drag the CV into the upload area at the top, or click it to pick a file. This is optional, but it saves you typing. Files can be up to 25 MB, images up to 10 MB.
- Under Select action, choose the job the candidate is responding to. Type to search: the list shows the job title, the job number and the recruiter. If they do not belong to a job, leave Open Application selected. This field is required, and it decides which recruiter and which job end up in your overview.
- Fill in the details. By default this panel asks for first name, an optional middle name, last name, e-mail address and phone number. For a phone number you pick the country code first and type the rest after it. Fields with an asterisk are required.
- Click Save & close. The candidate is created, the CV is filed under Files as Resume, and the file opens straight away on the Overview tab. That is where you add the rest.
Choose deliberately at step 2. If you park a candidate on Open Application while they responded to a specific job, that job is missing an applicant in its figures and the recruiter column stays empty.
Faster entry: have the CV read for you
With AI switched on for your environment, Booston reads the CV you upload straight away and fills the empty fields for you: education level, industry, languages, driving licence, availability and whatever else you have switched on as attributes. Anything you already filled in stays as it is. Fields the AI filled get a purple icon next to their label, so in the file you can see what came from the CV and what a person typed. Change such a field and that icon disappears.
You can work without this. It simply saves a lot of retyping on a stack of CVs. How to switch it on, what it costs and how to steer its quality is covered in the AI section of the helpdesk and in Switching on AI, setting it up and tracking your costs.
The fields come from your attributes
The candidate screen has no fixed fields. Everything you see in the file, and the order it sits in, comes from Settings → Attributes → Candidate Attributes. That is why the screen shows four fields under General at one client and twelve at another.
Per attribute you decide three things you see back immediately:
- On or off. An attribute that is off does not exist as far as this screen is concerned. You will not see it in the file, not in the create panel and not on the application form.
- Required or not. Required fields get an asterisk in front of the label and block saving while they are empty.
- The name and its translation. The label you see is the title you gave the attribute, per language. That is why one environment says Voornaam and another says First name for the same field. The card titles above them, such as General and Contact, are fixed.
Attributes with a select list, such as industry or driving licence, also have their own values. You manage those in the same place. Add a value there and you can pick it on a candidate right away. Everything about this is in Managing attributes for jobs and candidates.
Asking more before someone applies
The same attributes decide what a candidate fills in themselves before they land in this screen. That is the fastest way to enrich your base, because what the candidate fills in is what you no longer have to find out.
It works in two places:
- The application form on your job page. The form is built from the attributes that are on. Switch on availability, driving licence, preferred hours or an open question and that question appears on the form, with the answer arriving in the candidate's file. So you are not limited to name, e-mail and phone.
- The lead form on your Meta campaigns. There too you pick your questions from the same attributes. Someone responding on Facebook or Instagram fills them in inside the form, and the answers travel to Booston. More on that in Meta job ads.
Do weigh it up though. Every extra question is an extra hurdle, and on a phone that weighs heavier than behind a laptop. Ask what you need in order to judge or to call, and leave the rest out. The rest you add yourself or let the CV deliver.
The candidate file: Overview, Edit information and Files
In the overview, click the name or the pencil. The file opens with the title Edit Candidate and the name behind it. At the top sits a line that tells you at a glance what you are looking at: when the candidate was created, what their highest progression is and which source their first action came in through.
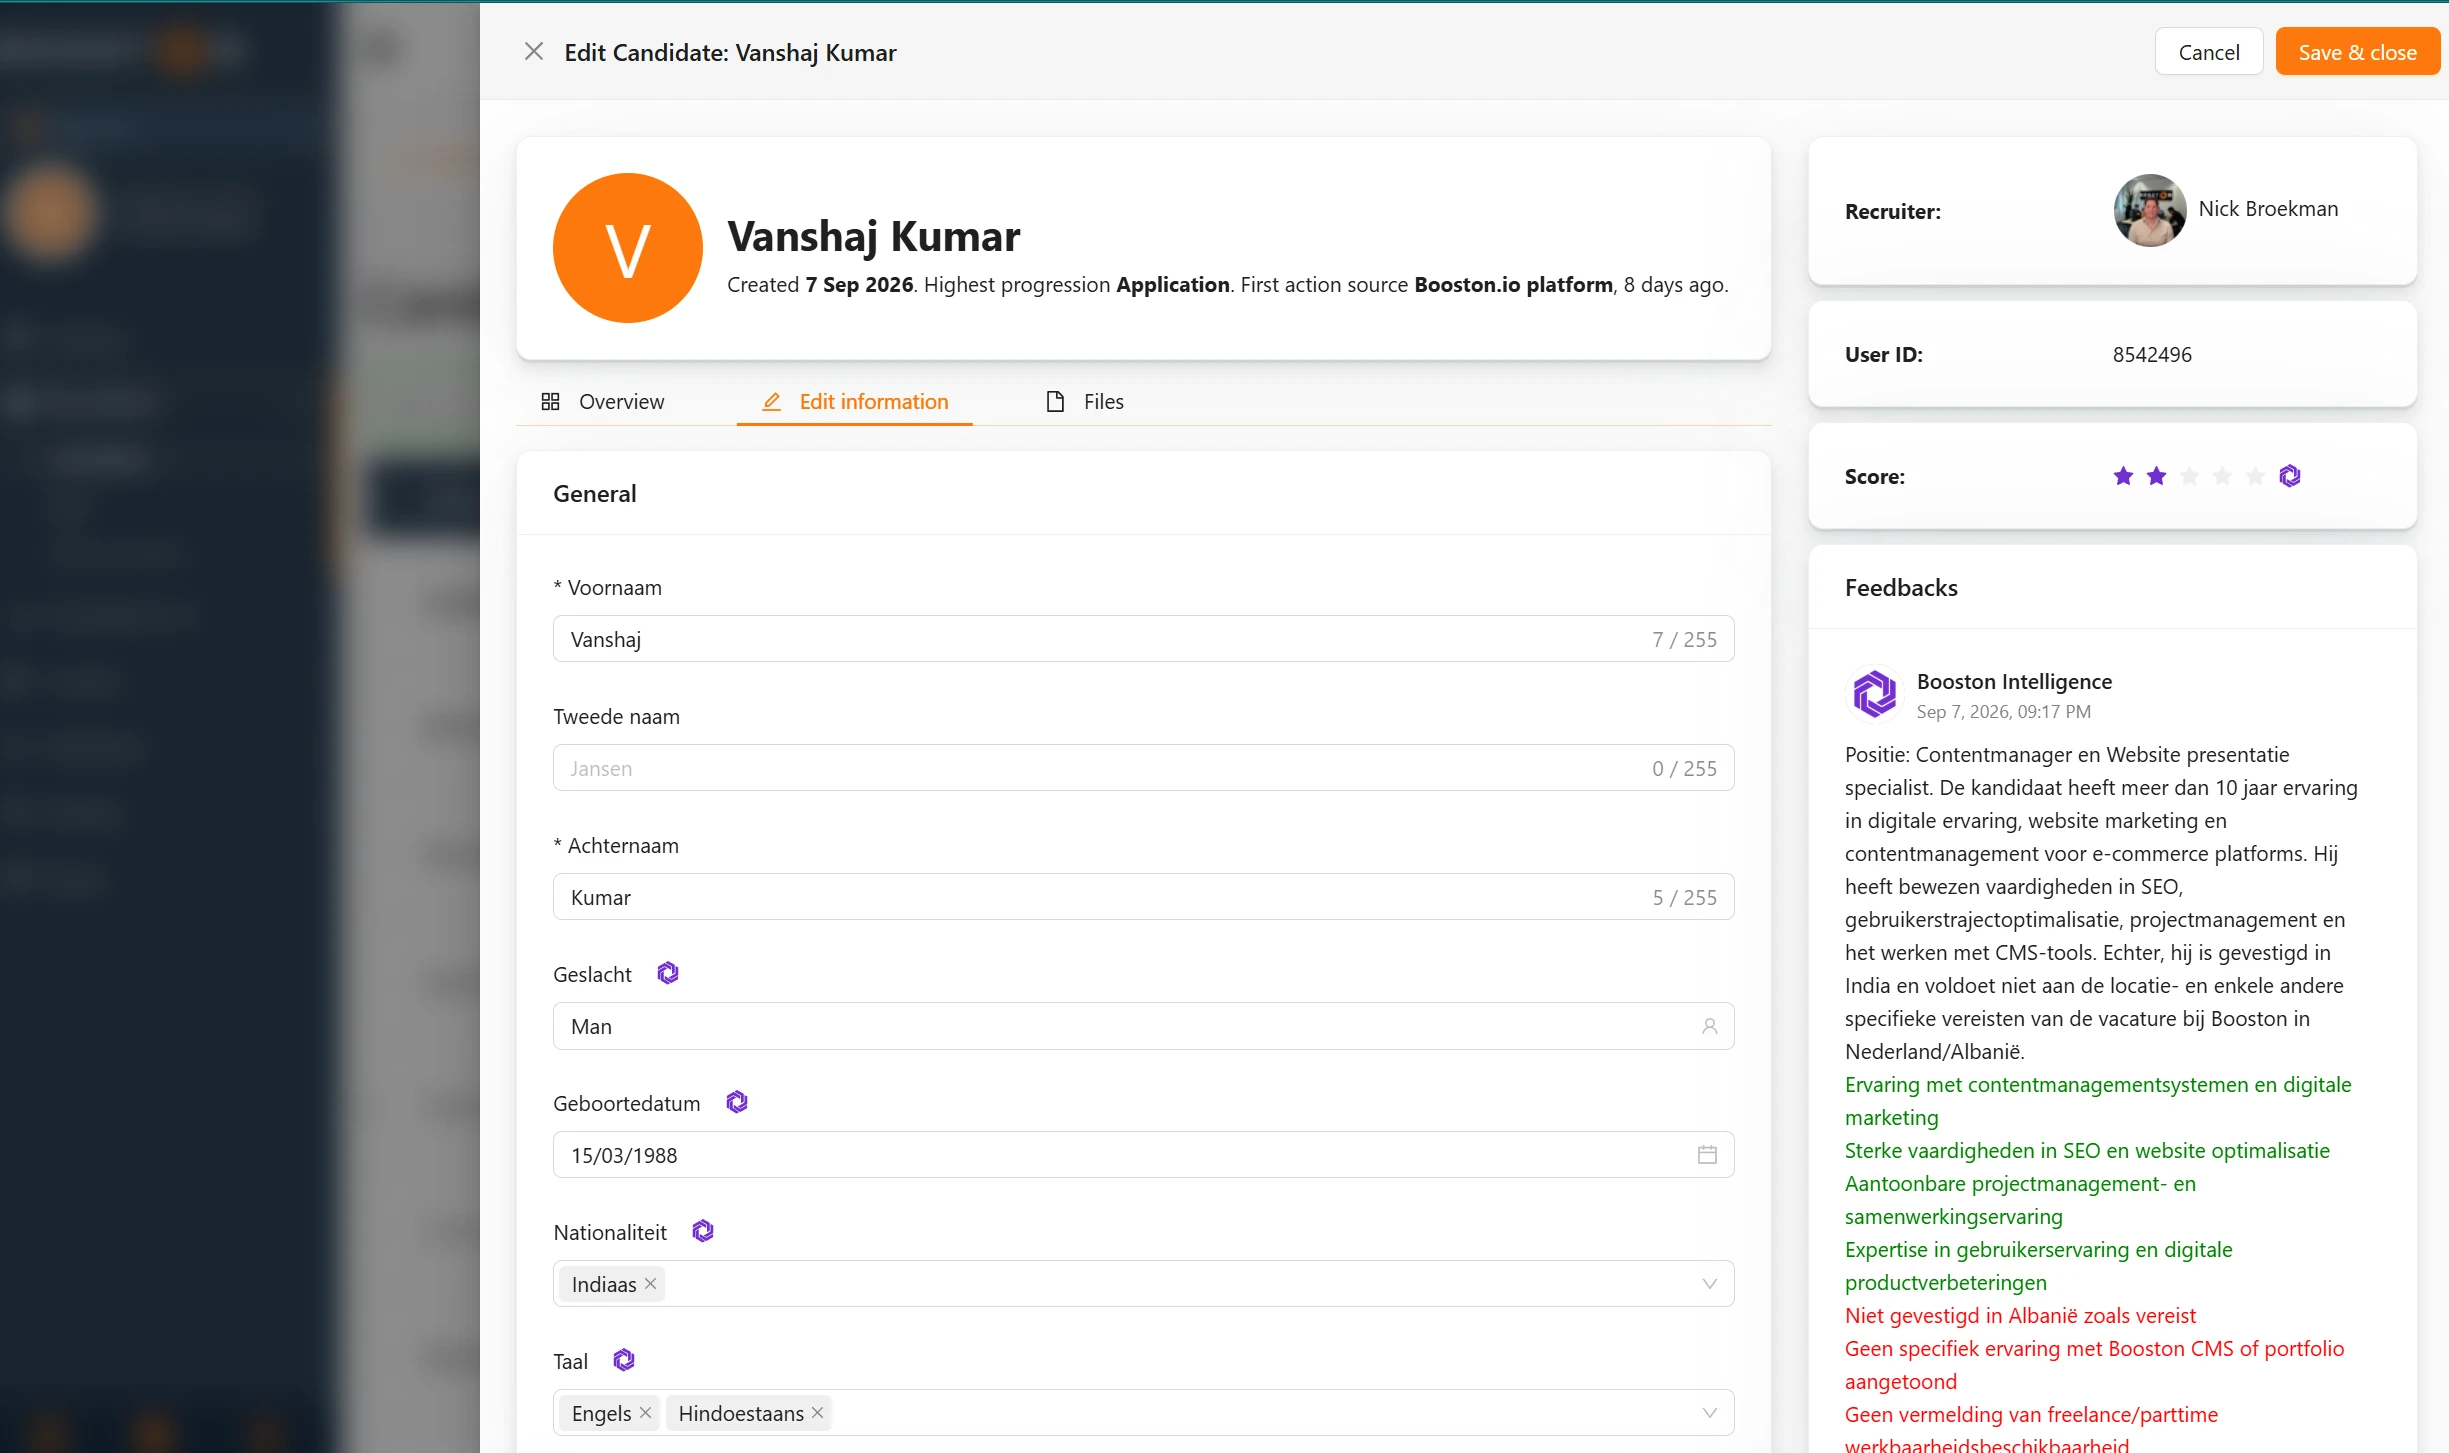
Below that sit three tabs. On the right sits a side panel that stays put on all three.
Overview: read everything without being able to break anything
The reading view, divided into cards: General, Contact, Location, Skills & Preferences, Misc, Personal & Social, Motivation & More, Questions and Documents. Those cards follow the same layout as the edit form, so what you read here you edit in the same place on the tab next to it.
E-mail addresses and phone numbers are clickable, so you call or mail straight from the file. Location holds a link to the map and Documents shows a preview of the CV and the cover letter. Cards without content stay visible but empty, so the layout stays recognisable.
Use this tab when you only want to assess or discuss a candidate. There is nothing here you can change by accident.
Edit information: updating the details
This is where you edit the file, in the same card layout. A few things that stand out:
- Below a text field sits a counter, for example 7 / 255. It says how many characters fit in that attribute.
- Location holds the Location search field with the map beside it. Type an address, pick the right result and the separate address fields fill themselves. The same block sits in Locations and in the job editor, so filling in an address works the same way everywhere.
- A purple icon next to a label means the value came from the CV rather than from your keyboard.
- At the bottom you save with Save & close. Cancel closes without saving.
Save before you switch tabs if you changed something. Your changes live in the form and are only recorded once you click Save & close.
Files: CV and cover letter
A table with the candidate's documents, showing the file name, the type (Resume or Motivational letter) and the actions to download or delete per row. You can search on both name and type, which helps as soon as a candidate has sent several versions.
The upload area sits below the table. Drag a file into it and Booston asks through Choose file type whether it is a Resume or a Motivational letter. Picked the wrong one? Delete the row and upload it again.
Deleting a file touches only that file. The rest of the file stays as it is.
The side panel: recruiter, score, feedback and actions
To the right of the tabs sits a column that stays visible at all times. This is your context for everything you do on the left.
- Recruiter: the recruiter of the job the candidate responded to.
- User ID, and with an ATS connection also ATS ID: the numbers the candidate is known by in Booston and in your ATS. Quote them when you pass a question about this candidate on.
- Score: the stars. Click them to rate.
- Feedbacks: the notes about this candidate. Type in the text box and click Save. You can edit or delete your own notes later, your colleagues' notes stay put. Above each note sits who wrote it and when.
- Actions: one card per application, with the job title that links through to the job, the source, the date and the status. The icon moves that one application a stage further. Add action links the candidate to an extra job or to an open application.
Use Add action as soon as someone also fits a second role, rather than repurposing the existing action. That keeps both processes separate, and keeps the applicant count per job correct.
Recording quality: the score and the report
A candidate base only becomes useful once there is a judgement attached. Otherwise your colleague opens the same CV next week and starts over.
The stars. Every candidate can get one to five stars. You set them in the overview or in the side panel, and they are saved immediately. There is no fixed meaning behind them: agree within your team what three stars stands for and stick to it. After that you can filter on stars in the overview and what remains is your shortlist.
The report. Under Feedbacks you record the why. That is the part that pays off most with a candidate you turn down now but want to call again in six months. Keep it short and concrete: what they can do, what you missed and what was agreed.
When AI is looking along. With AI rating switched on, Booston writes an assessment itself. The stars then appear in purple with a purple icon beside them, so you can see the judgement did not come from a colleague. Under Feedbacks a note from Booston Intelligence appears with a summary, the strengths in green and the points of attention in red. Add your own stars and your judgement takes over, and the purple display disappears. How to switch this on and how to steer what the AI considers important is in the AI section of the helpdesk.
Deleting a candidate
The bin in the Edit column deletes the candidate. You get a confirmation saying This action cannot be undone, and that is accurate: the file, the applications, the notes and the documents are gone afterwards. There is no bin to restore them from.
If a candidate asks you to erase their data, deleting is the right route.
Working with an ATS connection
If your connection exports candidates to your ATS, your ATS is where the process lives and Booston is mainly where the candidate comes in. For this screen that means:
- The New candidate button and the pencil are not there. You create and edit the candidate in your ATS. The bin does stay.
- If your ATS manages statuses and ratings, the stars and the progress bar are locked with the message Set by ATS. Change them in your ATS and Booston follows.
- The side panel holds the ATS ID, and the unfolded row shows the ATS Status per application. That is how you trace a candidate back to the same file on the other side.
Exactly which data travels back and forth differs per connection. That is covered in Connecting your ATS and Booston and in the article for your own ATS.
Troubleshooting
The Recruiter column is empty
The candidate is attached to an open application, or to a job without a recruiter. Open the job and attach a recruiter, or use Add action in the file to attach the candidate to the right job after all.
The Campaign column is empty
The candidate came in without UTM tags, for instance because they opened your job page directly or because you shared the link without tags. On a candidate added by hand the column is always empty, because there was no click.
I cannot see a field I want to fill in
The attribute is off. Switch it on under Settings → Attributes → Candidate Attributes. Note that it stays empty on existing candidates until someone fills it in.
A candidate appears twice in my overview
The same person with two different e-mail addresses counts as two candidates. Decide which file you keep, copy the missing details and documents across, and delete the other one.
The stars and the status bar do not respond
Set by ATS appears when you hover them. They are managed from your ATS and that is where you change them.
Frequently asked questions
Can I attach a candidate to a different recruiter?
Not directly. The recruiter follows the job. Change the recruiter on the job, or use Add action to attach the candidate to a job the right recruiter is on.
What is the difference between a lead and an application?
A Lead is someone who left their details without a full application, for instance through a Meta lead form. An Application is a completed application for a job. Both sit under the Leads & applications tab.
Can I update several candidates at once?
No, you work per candidate. You can change stars and statuses straight from the overview without opening the file, which makes running through a list a lot quicker.
Are my filters kept when I open a candidate and close them again?
Yes. Your filters live in the URL, so you come back to the same list.
Can I see who set a note or a score?
For notes, yes: name and time sit above them, and a note from the AI is filed under Booston Intelligence. For the stars you can only see whether they came from AI, by their purple colour.
Need help?
Cannot work it out, or unsure which setting fits your situation? Mail support@booston.io or call 085 0044 215 and mention:
- the name of your environment;
- the User ID of the candidate, if it concerns one candidate;
- what you want to achieve, or the message you see.
Would you rather walk through the screen together? Book a free 30 minute online demo and we will go through it with you. Job Done!


