You usually write a job from inside your own head. This is the role, this is what we ask, this is what we offer. The candidate reads it from a completely different starting point: does this fit my situation, does the salary match what I can get elsewhere, and do I feel like responding?
The Candidate audience analysis puts that starting point next to your job. The AI builds a profile of the candidate this type of role realistically attracts in your region: who they are, what drives them, what makes them hesitate and which angles win them over. After that you see how well your job matches.
The end goal: more applications from the right candidates. You tune your offer and your copy to what this audience is actually looking for. After this article you know how to switch the analysis on, run it, read it and turn it into a better job.
Before you start
- AI is switched on for your environment. How to arrange that is in Switching on AI, setting it up and tracking your costs.
- The job is active and published. You cannot start an analysis on a paused or expired job.
- Every analysis consumes AI tokens. What a job costs in AI is shown under Campaigns & AI → AI → Cost & Performance, explained in Analytics: seeing which channel brings you applications.
Step 1: switch the analysis on and choose how it runs
- Go to Campaigns & AI → AI → Prompts and scroll within the Jobs card to Candidate audience analysis.
- Switch on Enabled.
- At Analysis depth, choose how deep the AI goes. Quick keeps every explanation to one sentence, Thorough gives two to three sentences with more reasoning. You get the same number of sections either way.
- At Custom focus, optionally add instructions that travel with every analysis.
- At When to run the analysis, choose when an analysis starts. With Manual (on demand) you press the button per job yourself. With Automatically on job creation it runs by itself for every new job.
- Click Save.
Step 2: start the analysis on a job
- Open the job and go to the Audience step.
- Click Run analysis.
The analysis goes into the queue and runs in the background. You see "Analysing this job...", you can carry on working and the result appears by itself. That usually takes 15 to 30 seconds. If an analysis is already running for this job, started by a colleague or by your ATS connection for example, you see that here too. If something went wrong, a message says so and you can start again.
The AI looks at the details that decide which market you are addressing: the job title, the location and attributes such as education level, employment type and experience. It combines those with what is known about that group in the labour market. It uses the text of your job only to judge how well the offer matches, so a thin description does not make your audience smaller than it is. The About the Company text from your AI settings travels along as context.
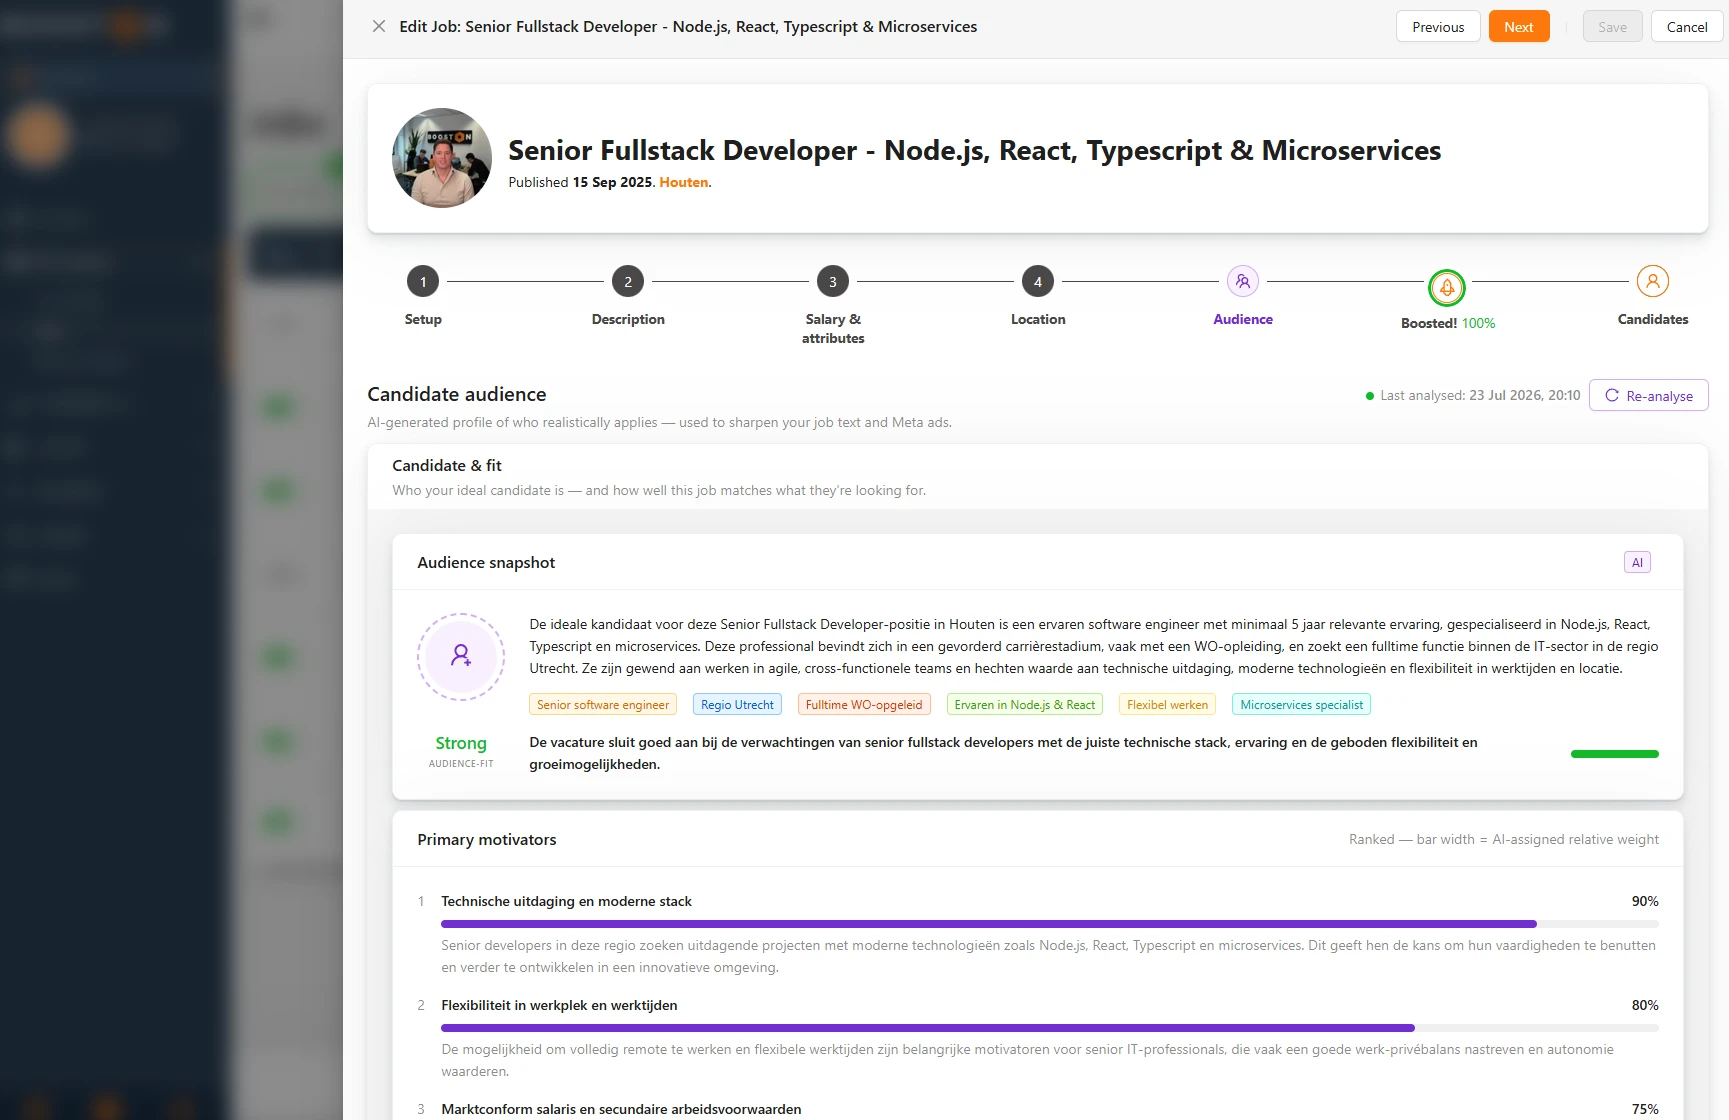
Candidate & fit: who is your audience and does your job match?
The first panel is about the candidate.
- Audience snapshot describes the ideal candidate in a few sentences: who they are, what stage of their career they are in and the situation they are searching from. Below it sit three to six tags summarising the audience.
- Audience-fit is the verdict on your job: Strong, Moderate or Weak, with one sentence saying what that is based on. This is the only section that judges your job. The rest describes the audience itself, regardless of what you happen to offer.
- Primary motivators shows up to five drivers in order of importance, each with a bar for its relative weight. This is what wins a candidate over.
At the bottom of the panel sits the Edit job button, which takes you to the Description step of the same job. If you score Moderate or Weak, the motivators usually show you straight away where it pinches: expectations around salary, flexibility or growth that you are not addressing. That is the moment to sharpen your offer and not only your copy.
Optimize: turning that knowledge into better copy
The second panel is about your communication.
- Likely objections names up to three points where this candidate drops off or scrolls past.
- Conversion hooks gives up to three concrete angles most likely to make this group click and apply.
- Language & Tone describes the tone that suits this audience, with a Use list of words to lean into and an Avoid list of words to stay away from.
At the bottom sits the Optimize job text button. It lets the AI rewrite your job text with this analysis as its basis. You see a proposal first and nothing changes until you confirm it.
Together the two panels answer the two questions that matter. The first says whether your offer fits the market you are addressing. The second says how to tell the part that does fit. That way the right message, in the right tone, reaches the right candidate.
From analysis to better job copy
The analysis also sits underneath the AI copy. In the same Jobs card under Campaigns & AI → AI → Prompts you find the Audience analysis field. There you decide what happens with the audience analysis as soon as you have a job written or rewritten.
| Option | What happens |
|---|---|
| Use if available, skip if not | If an analysis exists, it travels along as context. If not, the AI writes without it. |
| Run analysis first if missing, then optimize | If the analysis is missing, it runs first and the AI then writes with the result. |
| Always run a fresh analysis before optimizing | A fresh analysis always runs first, even when one is already there. |
| Don't use audience analysis | The analysis is left out of it. |
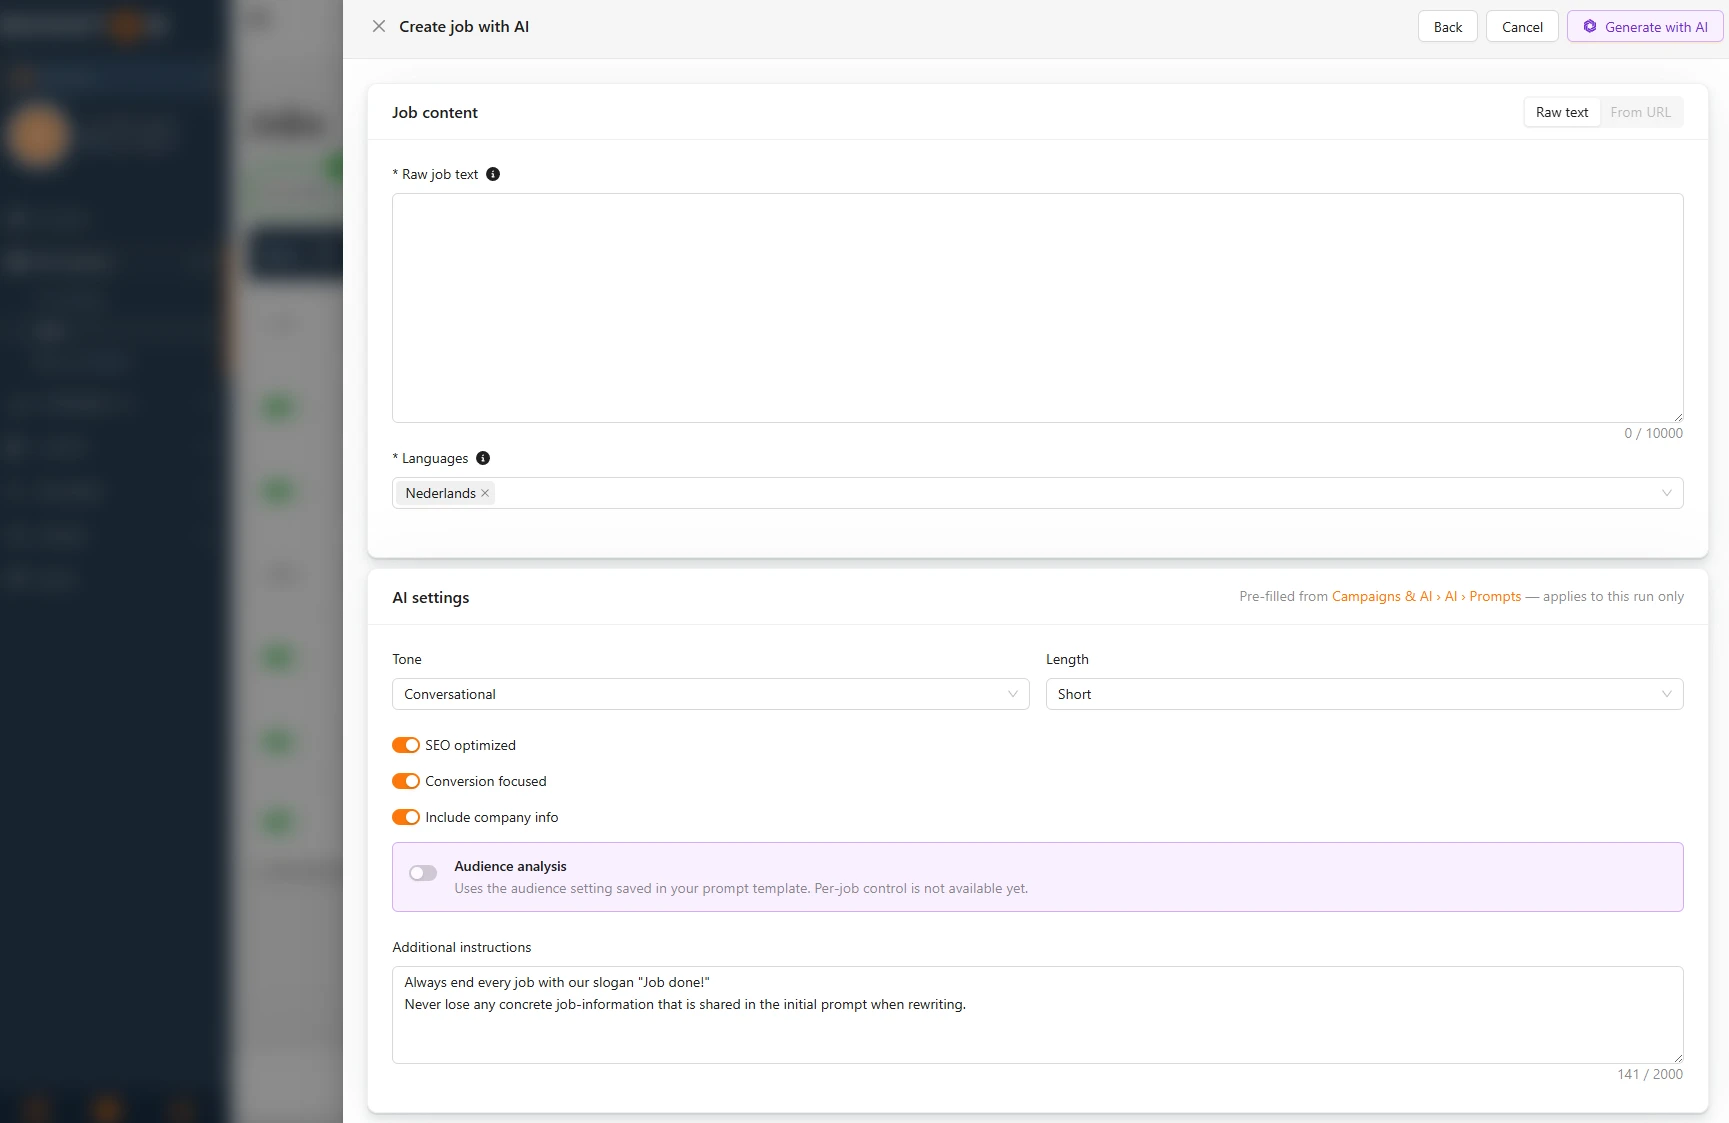
This setting applies to both AI routes to a job text: Create with AI on a new job and Optimize with AI on an existing one. How those two work is covered in Creating, editing and managing jobs. In the Create job with AI screen you see the setting reflected in the Audience analysis block. Switching it per job is not possible there yet, that runs through your prompt settings.
Analysing all jobs in one go
If you already have a stock of active jobs, you do not have to walk through them one by one.
- Go to Campaigns & AI → AI → Prompts and scroll to Candidate audience analysis.
- Click Run on all active jobs (one-time batch).
- Read in the confirmation how many jobs are included and click Run analysis.
The batch only takes active jobs without an analysis and skips the rest. Below the button you see how many jobs are queued and whether a batch is still running. If the button is greyed out, the tooltip tells you why: usually AI is switched off, or the analysis itself is still off. If it says all active jobs already have an analysis, there is nothing to do.
Automatically for every new job
Set When to run the analysis to Automatically on job creation and every new job gets its analysis without anyone having to ask. That covers jobs you create yourself and jobs coming in through your ATS connection. The analysis runs once, as soon as the job is active, and does not repeat when you edit the job later.
Re-analysing with a different focus
- Click Re-analyse at the top right of the Audience step.
- Adjust Depth if you want more or less reasoning.
- At Custom focus, add instructions that apply to this run only.
- Click Run analysis.
At the top of the step, Last analysed shows when the last analysis ran. If you have reworked your job substantially, that is the moment to run it again and see whether your Audience-fit moves up with it.
Frequently asked questions
Does the analysis change my job? No. The analysis only gives you insight. Only when you click Optimize job text does the AI write a proposal, and that is saved once you confirm it.
Why can I not start an analysis? Then the job is not active, AI is switched off for your environment, or the analysis itself is off. The top of the Audience step says which of the three it is.
What language do I get the result in? In the language of the recruiter attached to the job. If they speak several languages and the language of the job is among them, the analysis follows the job. If no recruiter is attached, you get the main language of your environment. See also Team members: the face beside your job.
Does every run count as cost? Yes. Every analysis consumes tokens, including a Re-analyse and every job in a batch. What that costs per job is shown under Cost & Performance.
Coming soon
- Choosing per job whether the audience analysis travels along when writing, instead of only through your prompt settings.
- Having a job written from a link to an existing job page.
- Using the analysis as the basis for the copy of your Meta job ads as well.
Need help?
Is the analysis not getting started, or are you unsure how best to translate the outcome into your job copy? Mail support@booston.io or call 085 0044 215 and mention:
- the name of your environment;
- which job it concerns;
- the message you see, if there is an error message.
Prefer to walk through the settings together? Book a free 30-minute online demo, and we will go through it with you. Job Done!


