You set up a publication in Easyflex, and only then does the real work start. The same text again on your own site, the hours and the salary filled in a second time, and as soon as someone responds, their details and CV typed over into Easyflex by hand. Every job twice, every applicant twice — and every hand-over is a chance for something to go wrong.
With the Easyflex connection you do it once. Booston pulls in your Easyflex publications, including the text, hours, salary, location and the handler attached to them, and sends applicants back to Easyflex automatically with their CV and cover letter. Change a candidate's stage or rating in Easyflex and Booston follows. The end goal: Easyflex stays your only place of entry, and everything you publish there appears on your site and in your campaigns by itself.
After this article you know which two details you need from Easyflex, how to set up the connection through the setup wizard, which fields travel in each direction, how to decide what you take over, and how to check that a publication came in correctly. You will find the screen under Menu → Settings → Connect → Ats.
Before you start
- You work with Easyflex2GO. The connection runs on its REST API; a separate OAuth client or publication filter is not needed.
- You have an API token for your environment from Easyflex. Request it from Easyflex or from your own Easyflex administrator; allow a few working days.
- The Ats module is switched on for your Booston environment and your user role has access to Settings → Connect. With the Recruiter role you will not see this screen.
- There is at least one publication in Easyflex. Without a publication there is nothing to pull in and no way to check the result.
What the connection does for you
The connection is not a copy of Easyflex. It is a set of agreed flows, each with its own direction. Everything to do with the job comes in from Easyflex; everything to do with the applicant goes back from Booston.
| Flow | Direction | What travels with it |
|---|---|---|
| Jobs | Easyflex → Booston | Publications with title, text, hours, contract type, salary, location and publication dates. |
| Recruiters | Easyflex → Booston | The handler of the job is created as a recruiter in Booston automatically. |
| Applicants | Booston → Easyflex | Name, email address, phone number, CV and cover letter, attached to the right publication. |
| Status and score | Easyflex → Booston | The stage the candidate is in and the rating from 1 to 5 stars. |
Four things are worth knowing up front:
- Easyflex owns the jobs. What is there wins. Change a connected field in Booston and it is overwritten with the value from Easyflex on the next round. You decide which fields those are in Step 7: set up your other job attributes.
- Booston owns the applicants. An application starts in Booston and is then created in Easyflex. Only the stage and the review score come back afterwards.
- How fast it goes. Booston asks for your publications periodically — in practice a new publication is in Booston within about ten minutes. Easyflex does not send a real-time signal on a change, so publishing instantly is not possible. On top of that, a full synchronisation runs every night and pulls everything in again.
- One language per environment. The connection currently pulls in one language version per publication. Multilingual support is being built; see Coming soon.
Which fields come across
Booston lines the fields of an Easyflex publication up against the attributes in Booston automatically. So you do not have to tie anything together by hand; you only decide which fields you use.
| Attribute in Booston | Field in Easyflex |
|---|---|
| Title | The name of the publication. |
| Text 1 | The description of the publication. Easyflex works with a single text field, so in Booston you only use Text 1. |
| Attribute 1 | The relation: the client the job belongs to. |
| Attribute 2 | The location of the job. |
| Attribute 3 | The function. |
| Attribute 4 | The number of hours per week, converted into the bands 0-8, 9-16, 17-24, 25-32 and 33+. |
| Attribute 5 | The labels you attach to the job in Easyflex. |
| Attribute 6 | The contract type. |
| Address, Zipcode, City, Country | The address of the publication. |
| Salary min, Salary max | The salary of the publication, falling back to the salary of the job. |
| Unit | The salary unit, for example per hour or per month. |
| Currency | Always euro. |
| Recruiter | The handler assigned to the job in Easyflex. |
A few more things happen while pulling in:
- The publication status decides whether the job is live. If a publication is not active in Easyflex, the job comes into Booston as inactive.
- The publication dates are taken over as the start and end date of the job in Booston.
- A high priority becomes a Boost marker. Set a job in Easyflex to a priority higher than 3 and it comes into Booston with the Boost marker.
- Several publications of the same job stay together. Publish one Easyflex job more than once and Booston keeps those publications attached to the same job.
Step 1: request your Easyflex details
You need two things. Keep them at hand, you will fill them in at Step 3: fill in your connection details.
- Ask Easyflex or your Easyflex administrator for the details for the Booston connection. Mention that it is about the REST API of Easyflex2GO.
- Note the address of your Easyflex2GO environment. It has the form
https://<yourenvironment>.easyflex2go.nl. - Keep the API token you get back. Booston uses it to identify itself to Easyflex.
Step 2: start the connection and choose Easyflex
- In Booston, go to Menu → Settings → Connect and click the Ats tab.
- If it says Ats is not connected, click Connect. The setup wizard opens.
- Under Select ATS, choose Easyflex from the list. You will recognise it by the logo.
- Click Next.
For Easyflex the wizard has four steps: Select ATS, Main settings, Functionality and Activation. You can move back and forth with Previous and Next; nothing is saved until you click Save on the last step.
Step 3: fill in your connection details
Under Main settings you fill in the connection itself.
| Field | What you fill in |
|---|---|
| Username | Leave empty. Easyflex works with a token instead of a login. |
| Password | The API token from Step 1: request your Easyflex details. This field is stored encrypted. |
| Url | The address of your Easyflex2GO environment: https://<yourenvironment>.easyflex2go.nl. |
| Qualifier | The extra filter rule for which jobs are pulled in. For Easyflex you leave this empty. |
| Multilingual | Leave off. The connection currently works with one language. |
Then click Next.
Step 4: choose what the connection does
Under Functionality you switch on or off, per function, what the connection arranges for you. The settings that matter for Easyflex sit under Sync.
| Setting | What it does | Advice |
|---|---|---|
| Job, job attribute and recruiter import | Pulls in publications, job attributes and handlers from Easyflex. | On. Without it nothing comes in. |
| Skip job import on zero results | Leaves your existing jobs in place if Easyflex returns an empty list once. | On. Prevents a temporary outage from emptying your whole job overview. |
| Candidate export | Sends applicants with their CV and cover letter through to Easyflex. | On, unless you deliberately want to keep applications in Booston only. |
| Candidate export retry | Tries again if sending an applicant through fails once. | On. Prevents a candidate being lost during a short outage. |
| Candidate review score and status import | Pulls in both the stage and the review score of candidates from Easyflex. | On if you work through your pipeline in Easyflex. |
| Postback job URL export | Sends the url of the published job back to the ATS. | Off. Easyflex does not support this. |
You will not see the Real time connection settings block for Easyflex: there are no webhooks, so everything runs through the periodic round from What the connection does for you. Click Next.
Step 5: activate the connection
The last step decides what happens to your current setup the moment the connection goes live. Read the four switches carefully before you save.
| Switch | What happens when you switch it on |
|---|---|
| Apply default attribute settings for this ATS | Booston sets your attribute settings to the default configuration that belongs to Easyflex. |
| Purge existing jobs and reload from ATS | All existing jobs are removed and pulled in from Easyflex again. |
| Purge existing job attribute values and reload from ATS | All existing attribute values are removed and pulled in again. |
| Purge all recruiters and reload from ATS | All recruiters are removed and pulled in from Easyflex again. |
Click Save. Booston pulls in your publications at that moment; that can take a few minutes. As soon as it is done, the You are connected screen appears.
Step 6: set up your job texts
The connection is live, but you have not yet decided which texts you take over from Easyflex. You do that at the attributes. Start with the texts, because they decide what your job page looks like.
Go to Menu → Settings → Attributes → Job attributes. The screen is split into sections: Title And Description, General, Salary, Location, Media and Other. The texts sit under Title And Description.
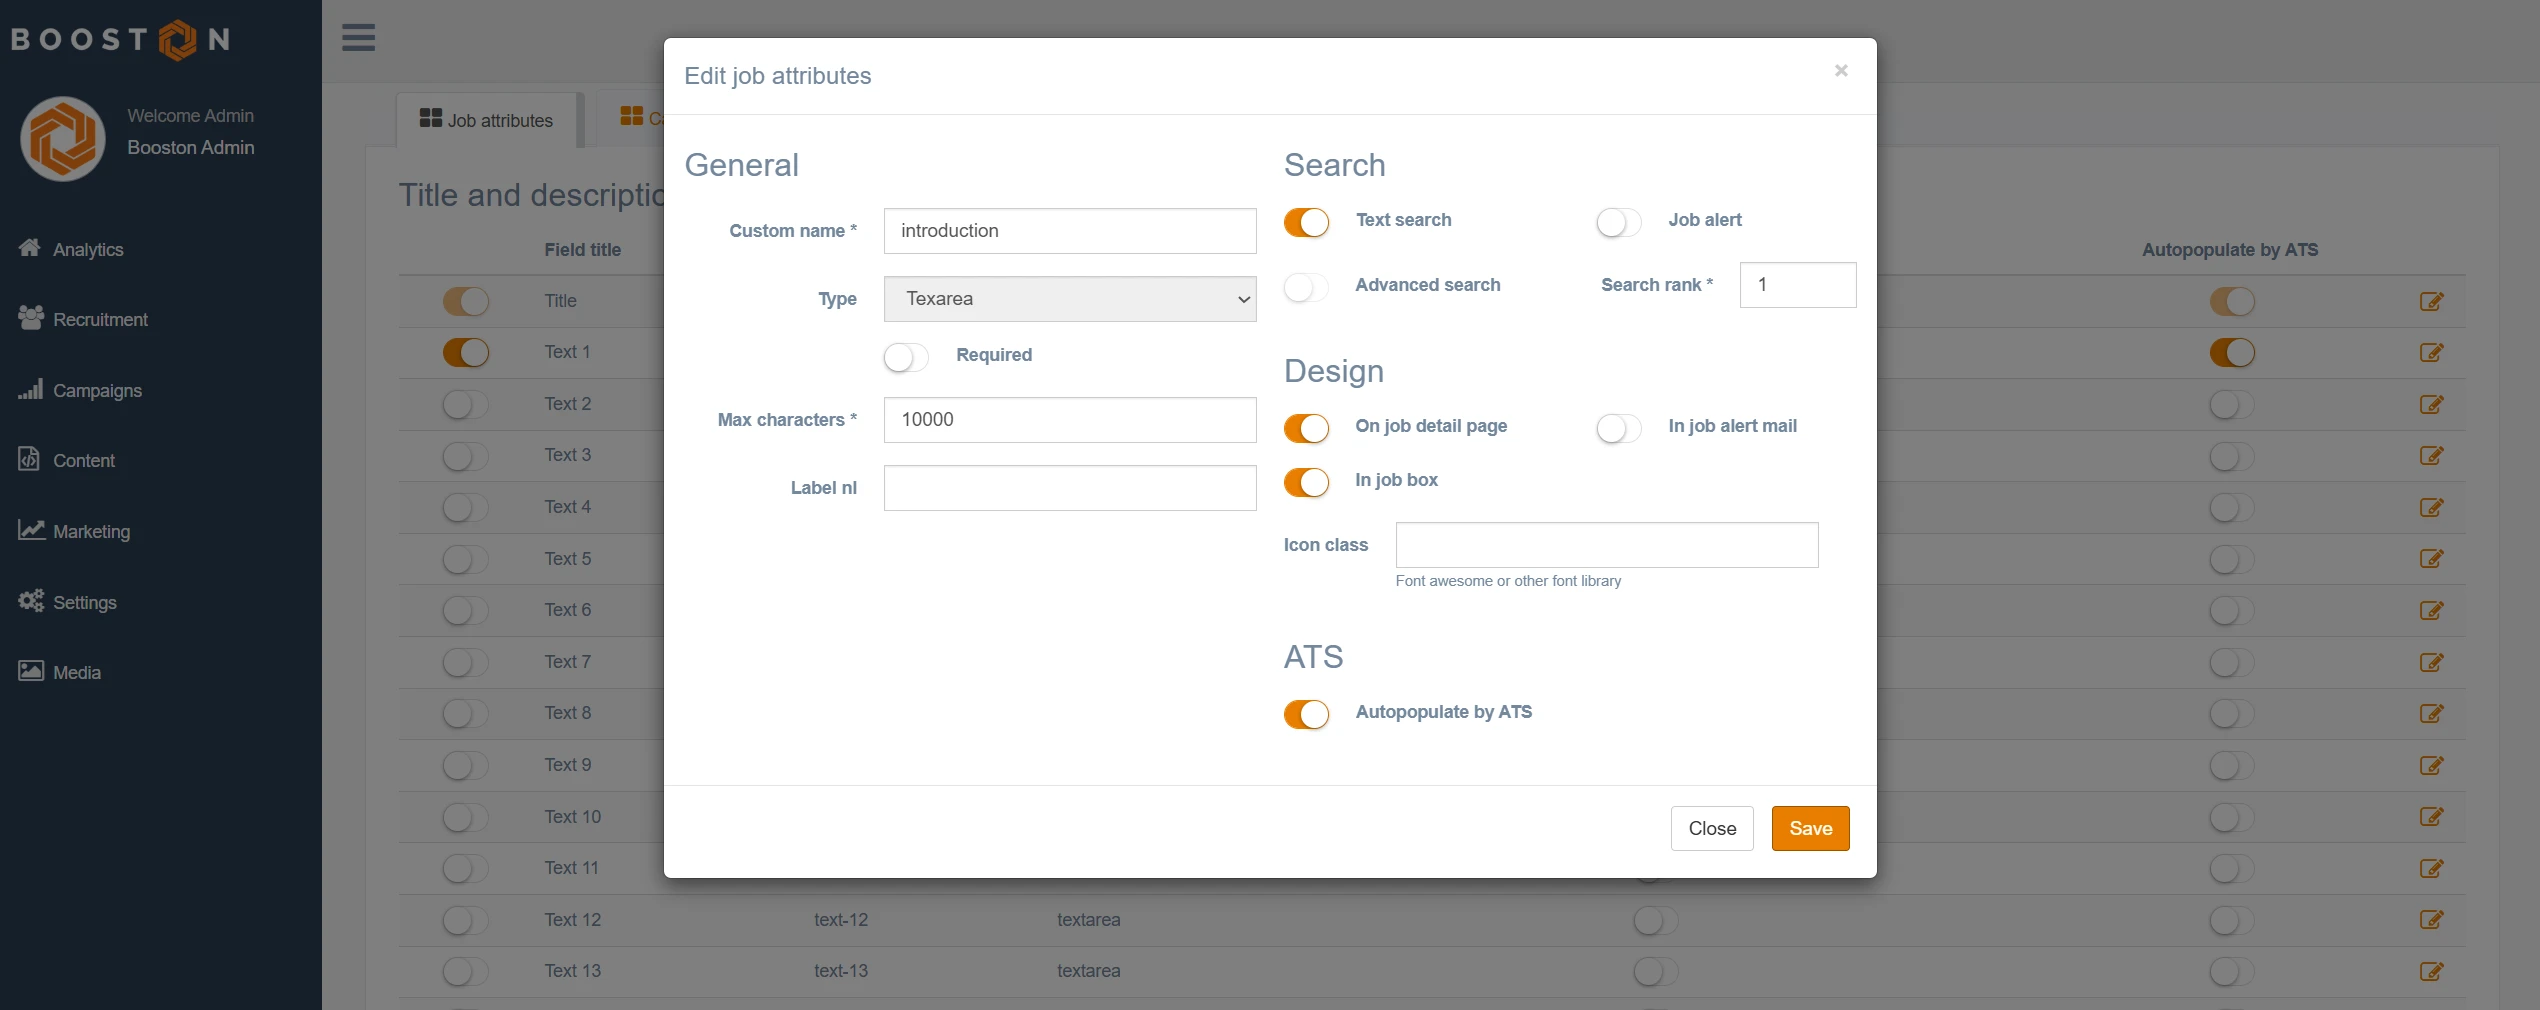
Easyflex supplies the job text as a single field. So in Booston you only use Text 1 — the other text fields stay empty unless you fill them yourself.
Two switches per attribute decide what happens:
- Status off means: the attribute is not active in Booston and the matching text is not pulled in from Easyflex.
- Sync with ATS on means: Easyflex fills this text automatically. This is what you want in most cases.
- If Status is on but Sync with ATS is off, the field stays empty until you fill it in yourself on the job in Booston.
Click the pencil icon to configure the attribute further. The most important fields:
| Field | What it does |
|---|---|
| Custom name | The heading shown above this text on your job page. |
| Text search | Whether this text counts in the search function on your website. |
| Search rank | The order the texts appear in on the job page. |
| On job detail page | Whether the text is visible on the job page. |
| In job box | Whether the text is used as the intro in job overviews. |
Check the result under Menu → Recruitment → Jobs and open a job. That way you see exactly what a candidate will get to see and whether the order is right.
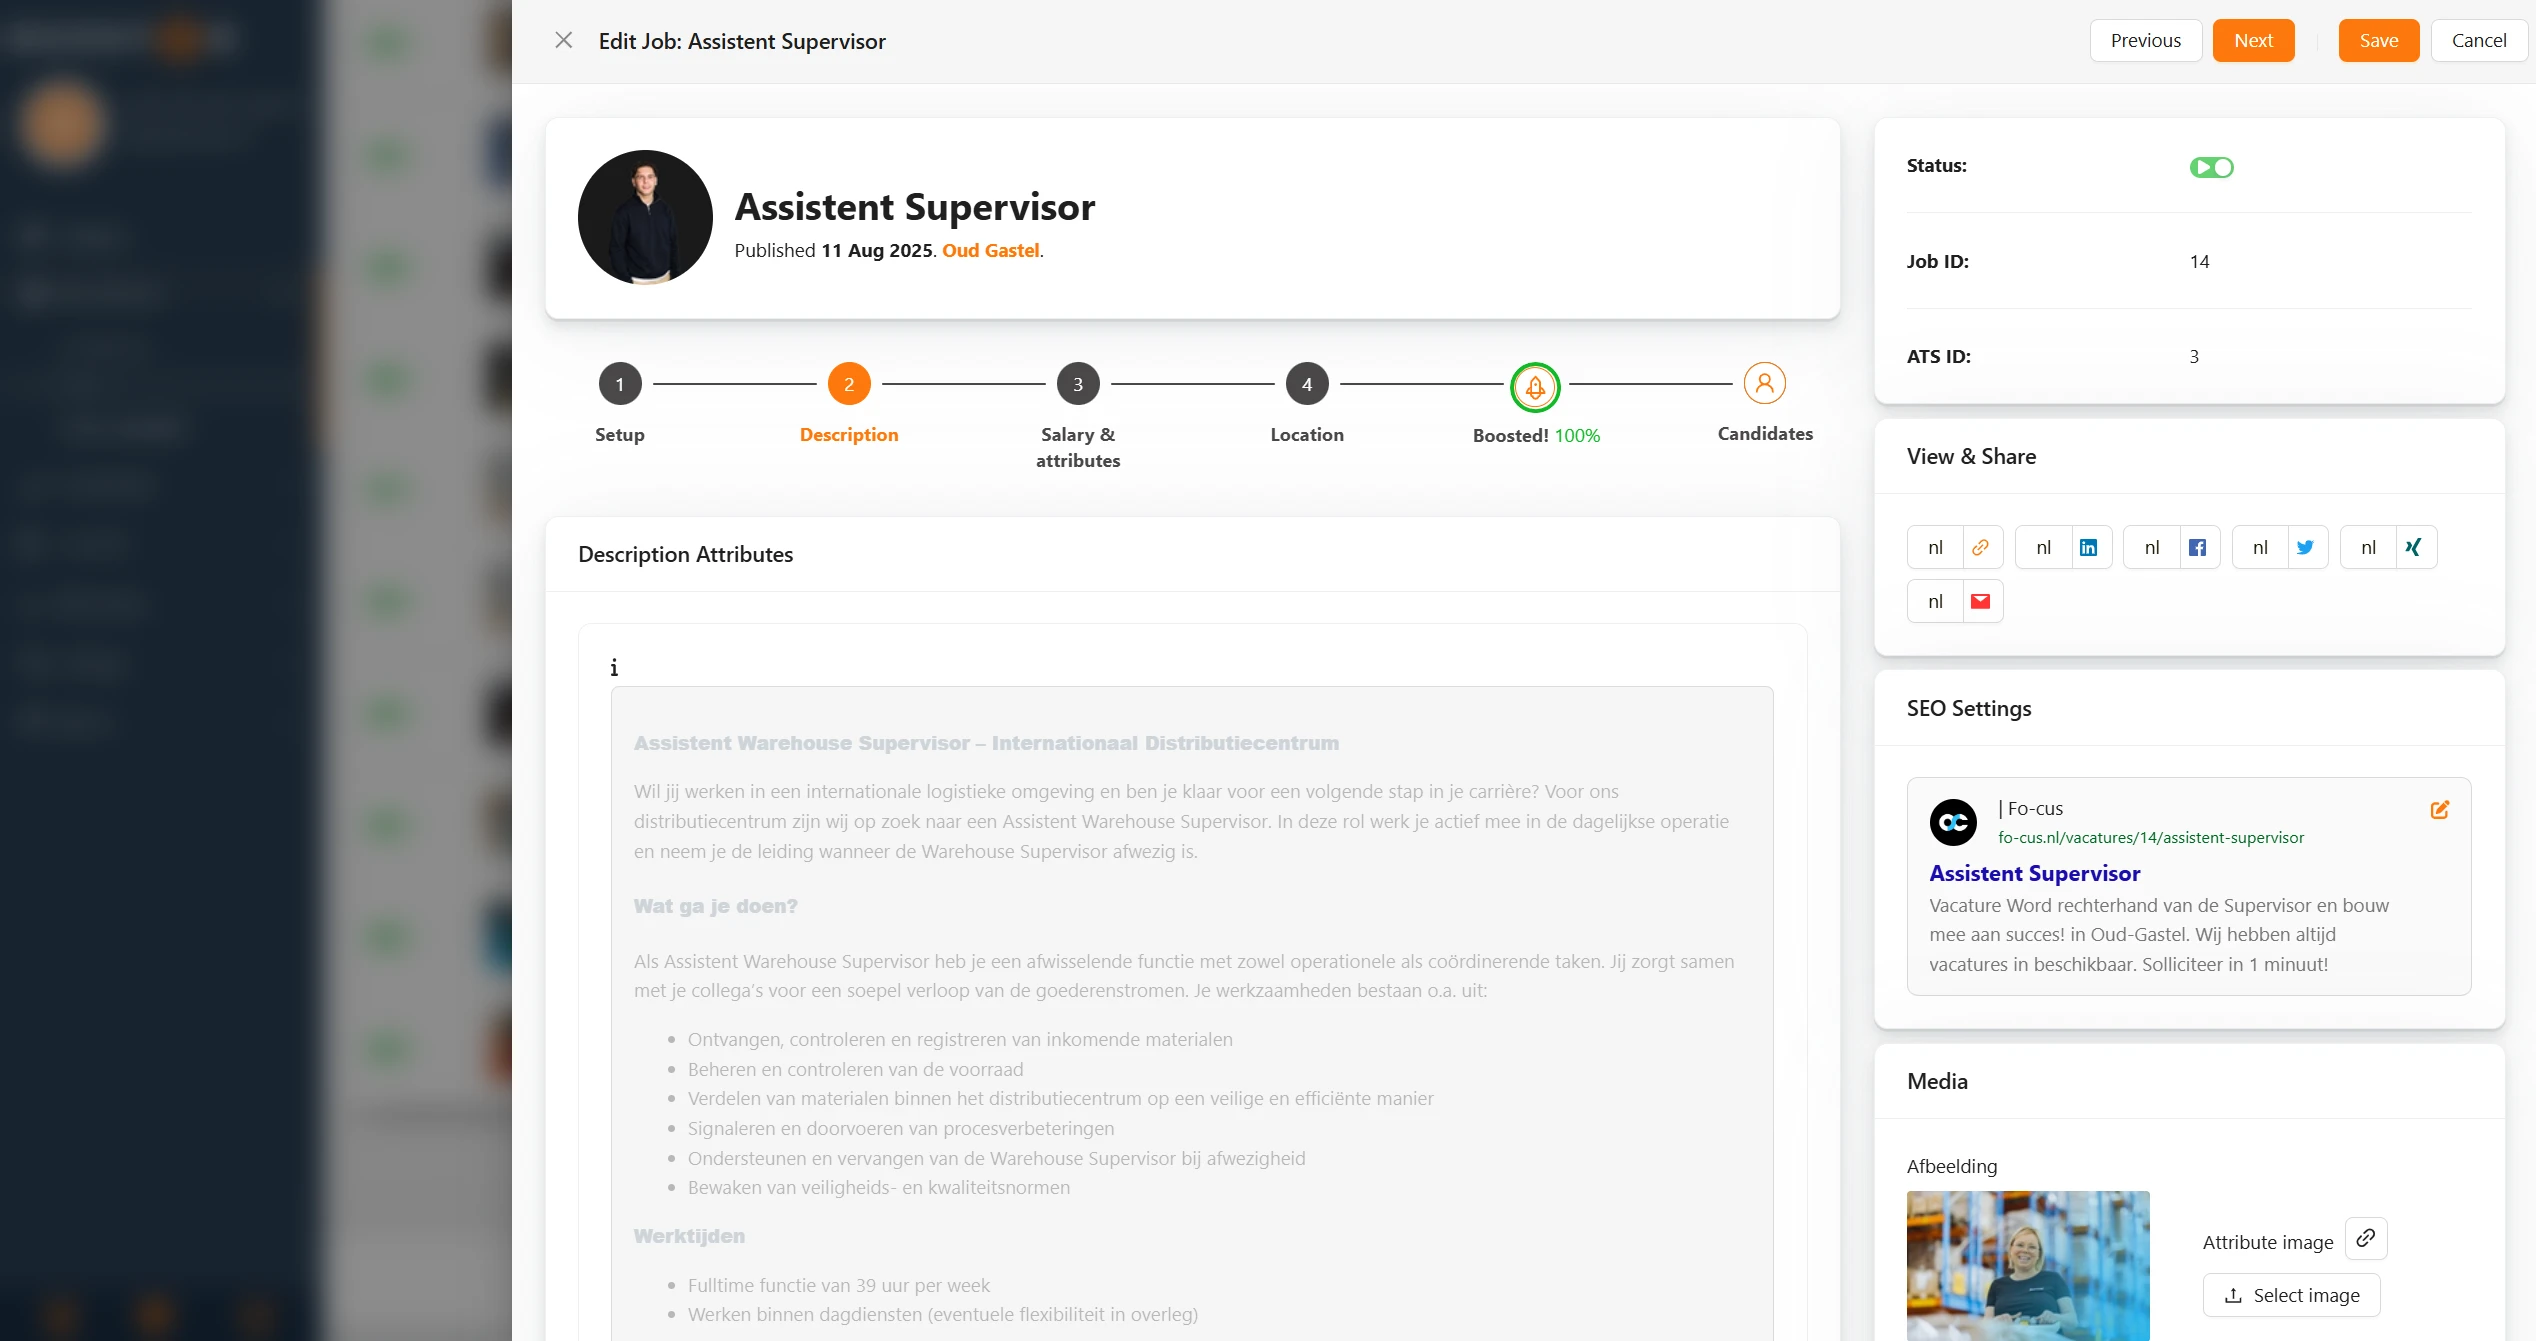
Step 7: set up your other job attributes
In the other sections — General, Salary, Location, Media and Other — you manage the attributes with fixed values: client, function, contract type, hours, salary and location.
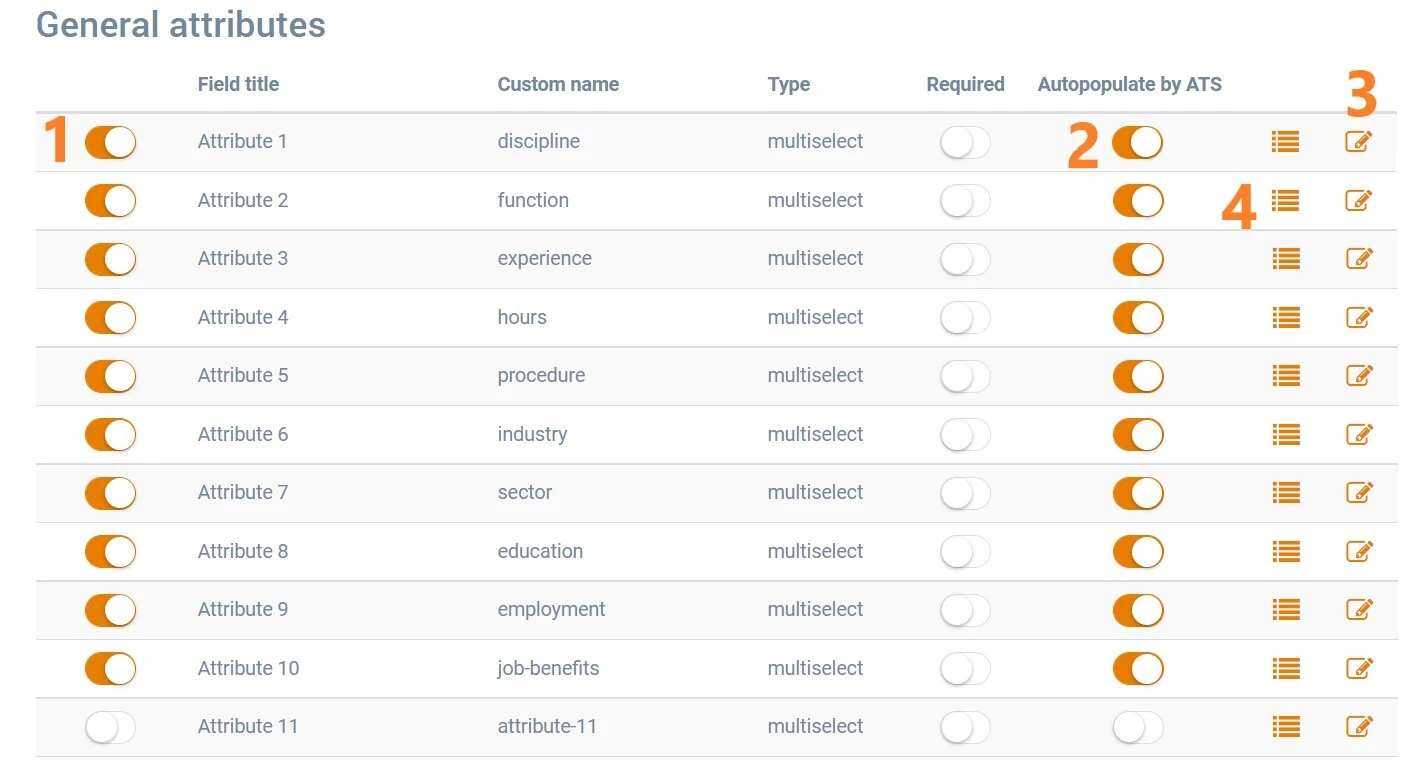
The two switches work the same way as for the texts: Status decides whether the attribute exists in Booston, Sync with ATS whether Easyflex fills the value. Switch Sync with ATS off while Status is on and you fill the value in yourself under Menu → Recruitment → Jobs → edit job.
The edit screen of an attribute with values has a few extra fields compared to the texts:
| Field | What it does |
|---|---|
| Job alert | Whether the value can be chosen in the job alert form. |
| In job alert mail | Whether the value is shown in the job alert email. |
| Required | Whether the attribute is mandatory when creating a job by hand. |
| Icon | The icon shown with this attribute on the job page. |
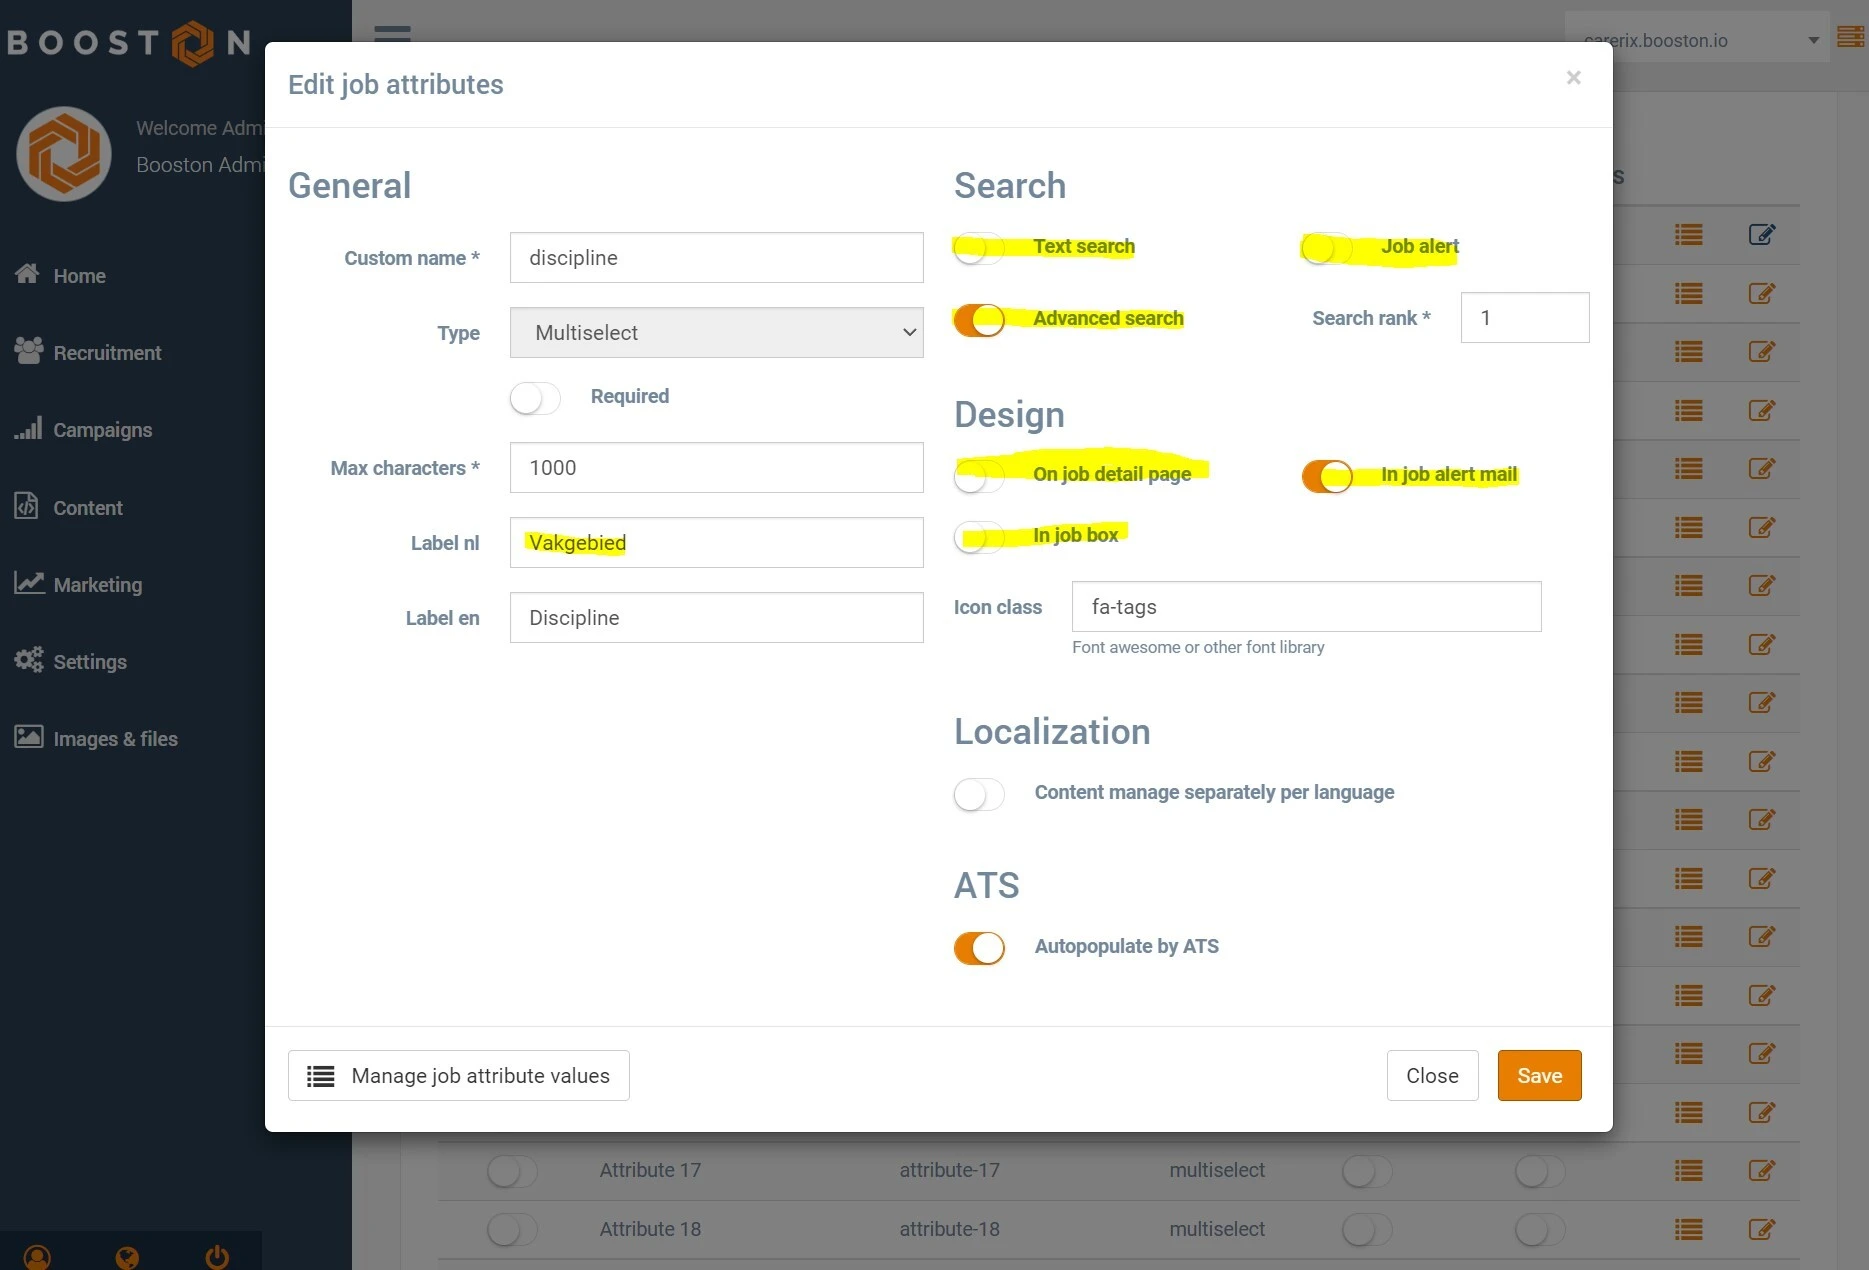
Next to the pencil icon there is a list icon. It opens all the values that came in through Easyflex, for example all clients or all contract types.
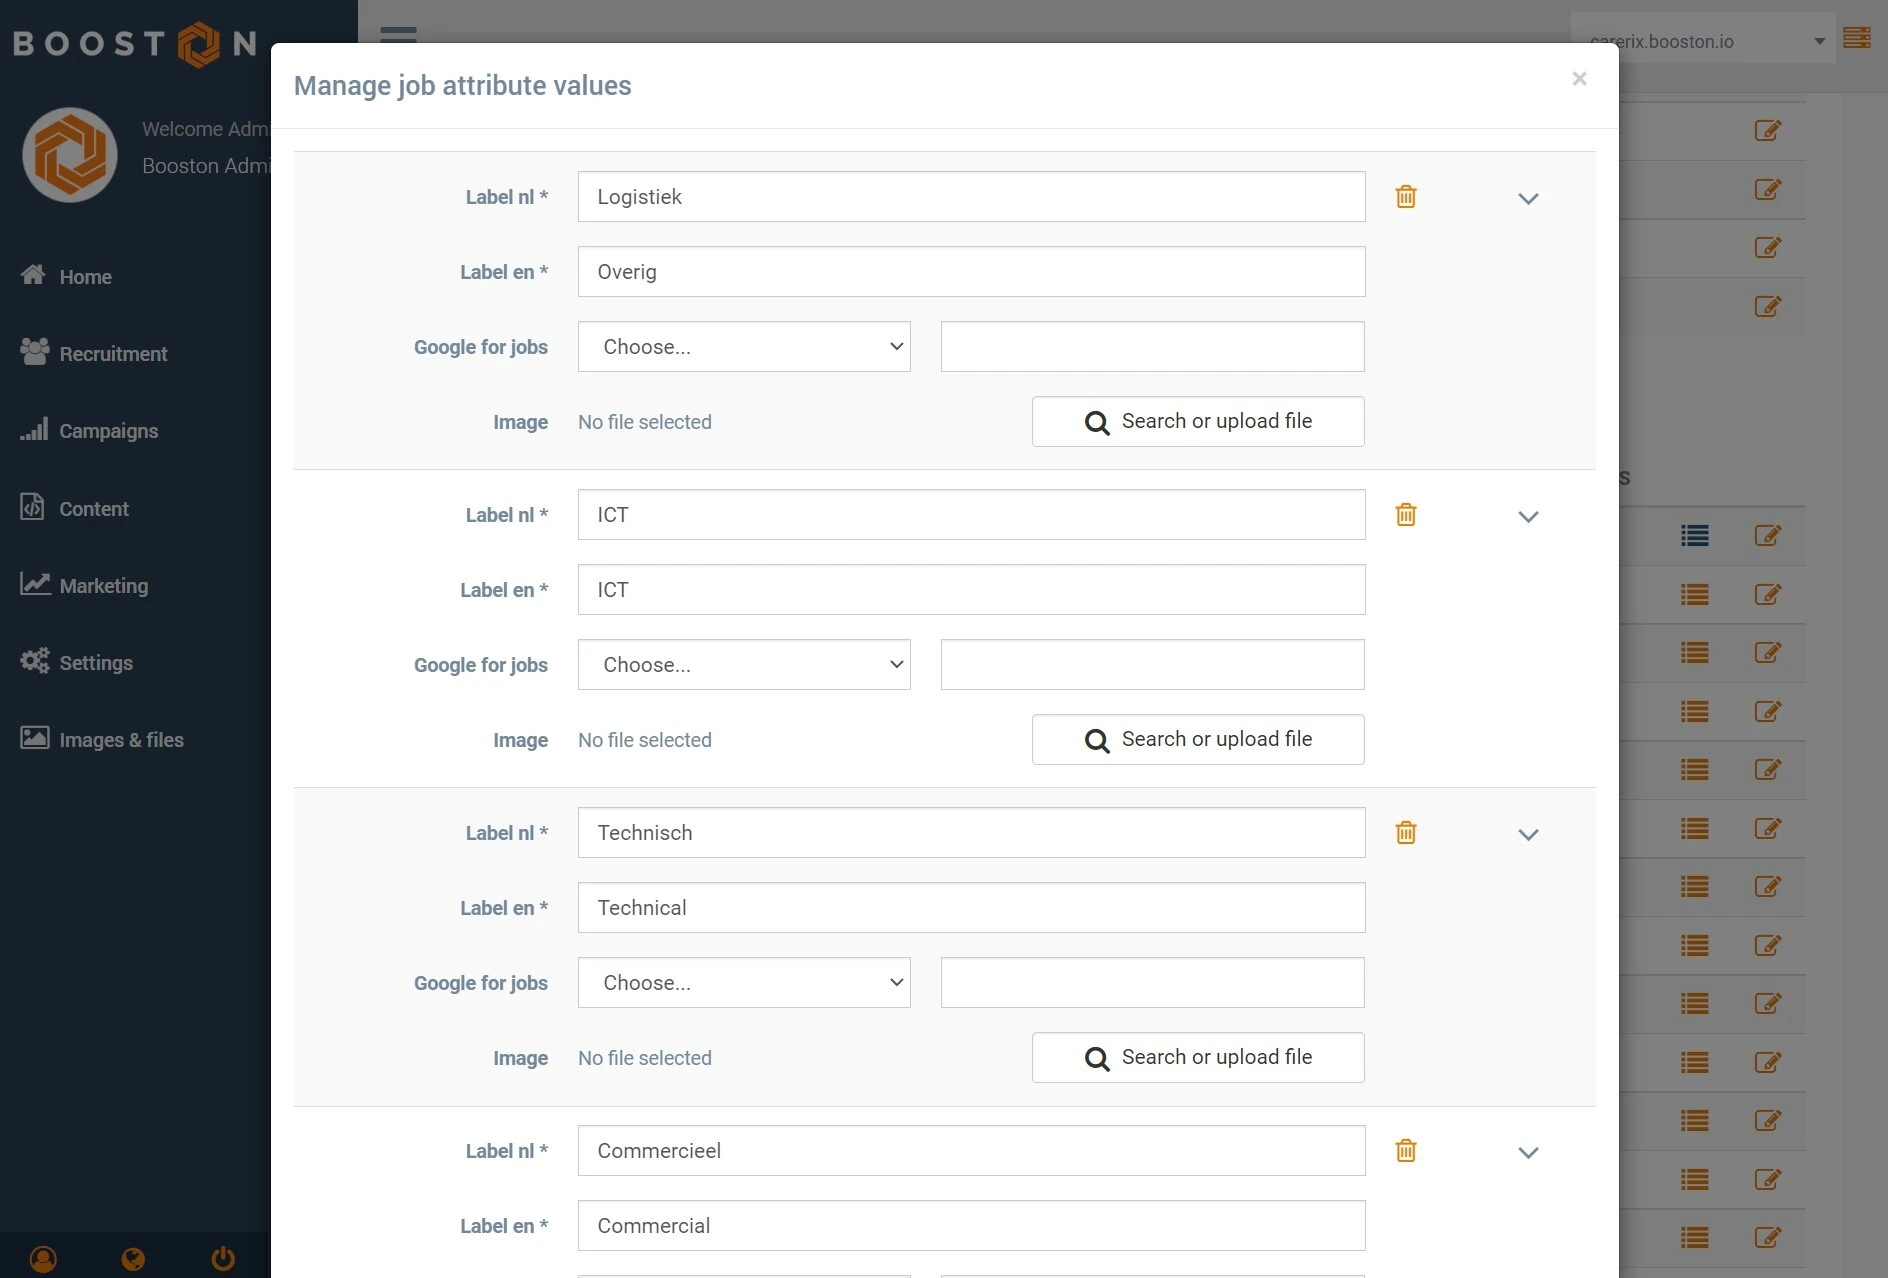
When an Easyflex publication comes in with a value Booston does not know yet, that value is added to this list automatically. You can then edit such a value and cut it loose from Easyflex — handy if you use an abbreviation in Easyflex but want to show the full word on your site.
Publish a job in Easyflex
From now on you create jobs where you always created them: in Easyflex. Fill the publication in carefully — text, hours, contract type, salary and location all travel with it.
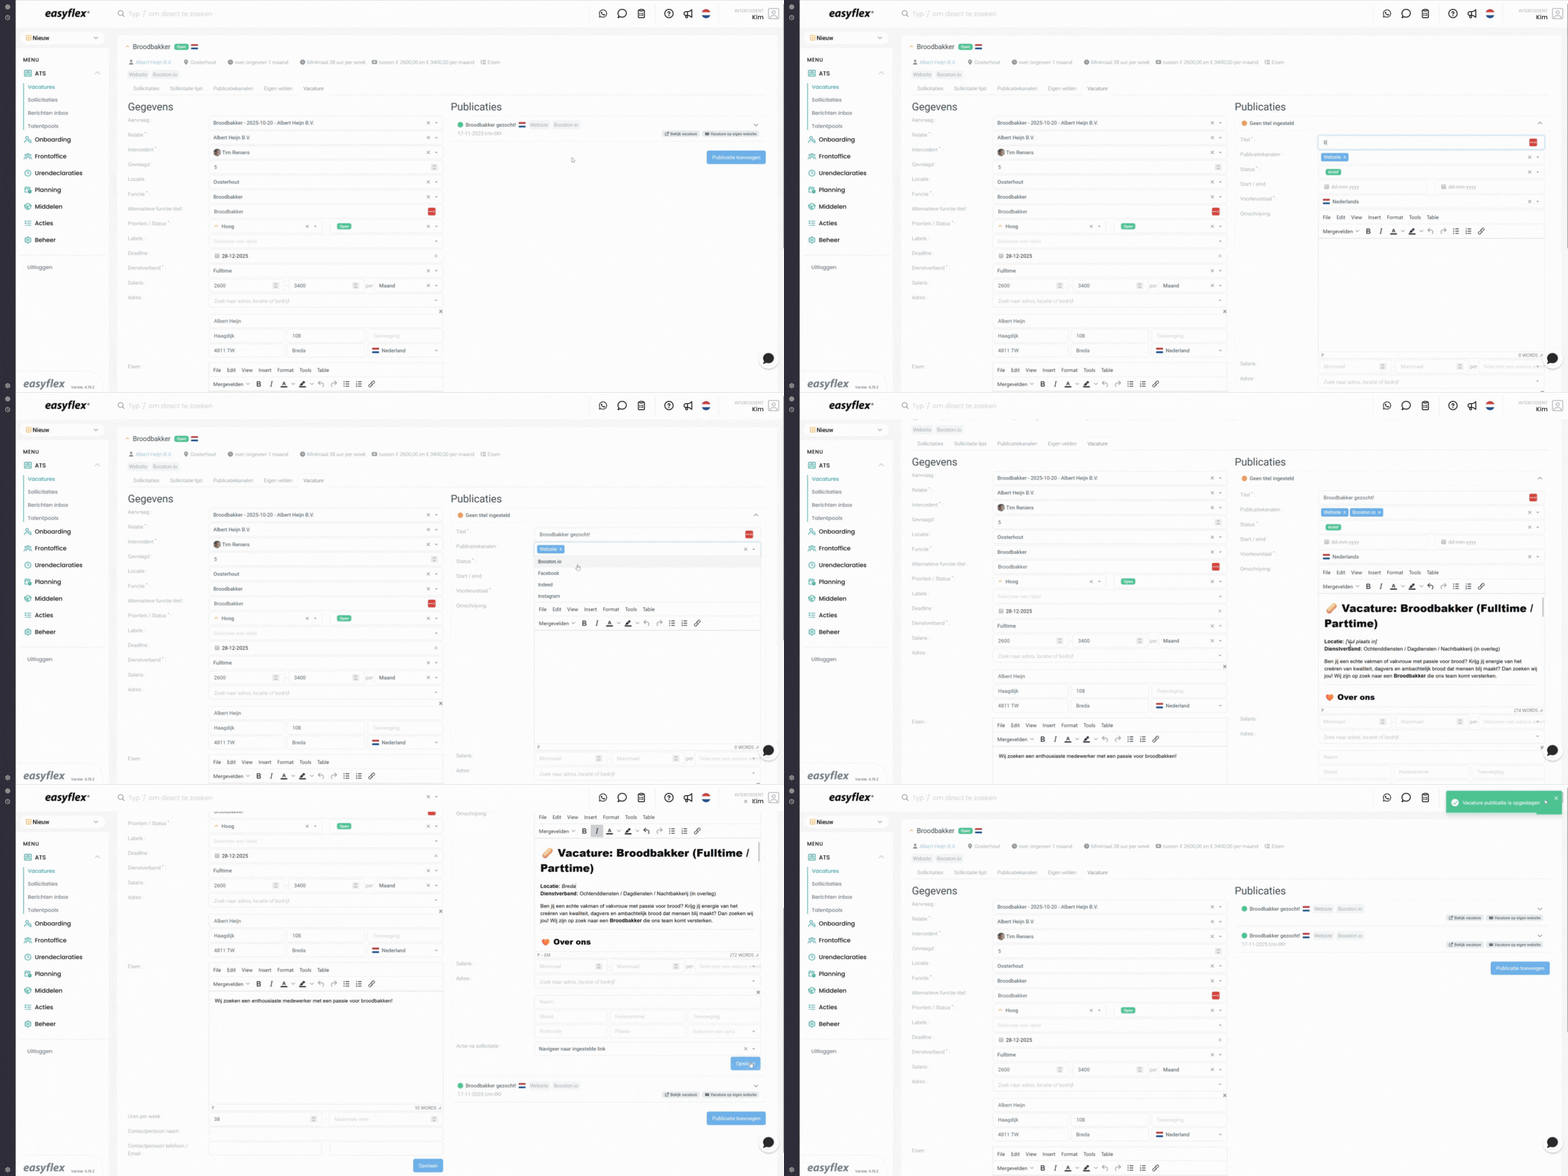
Then set the publication up the way you are used to:
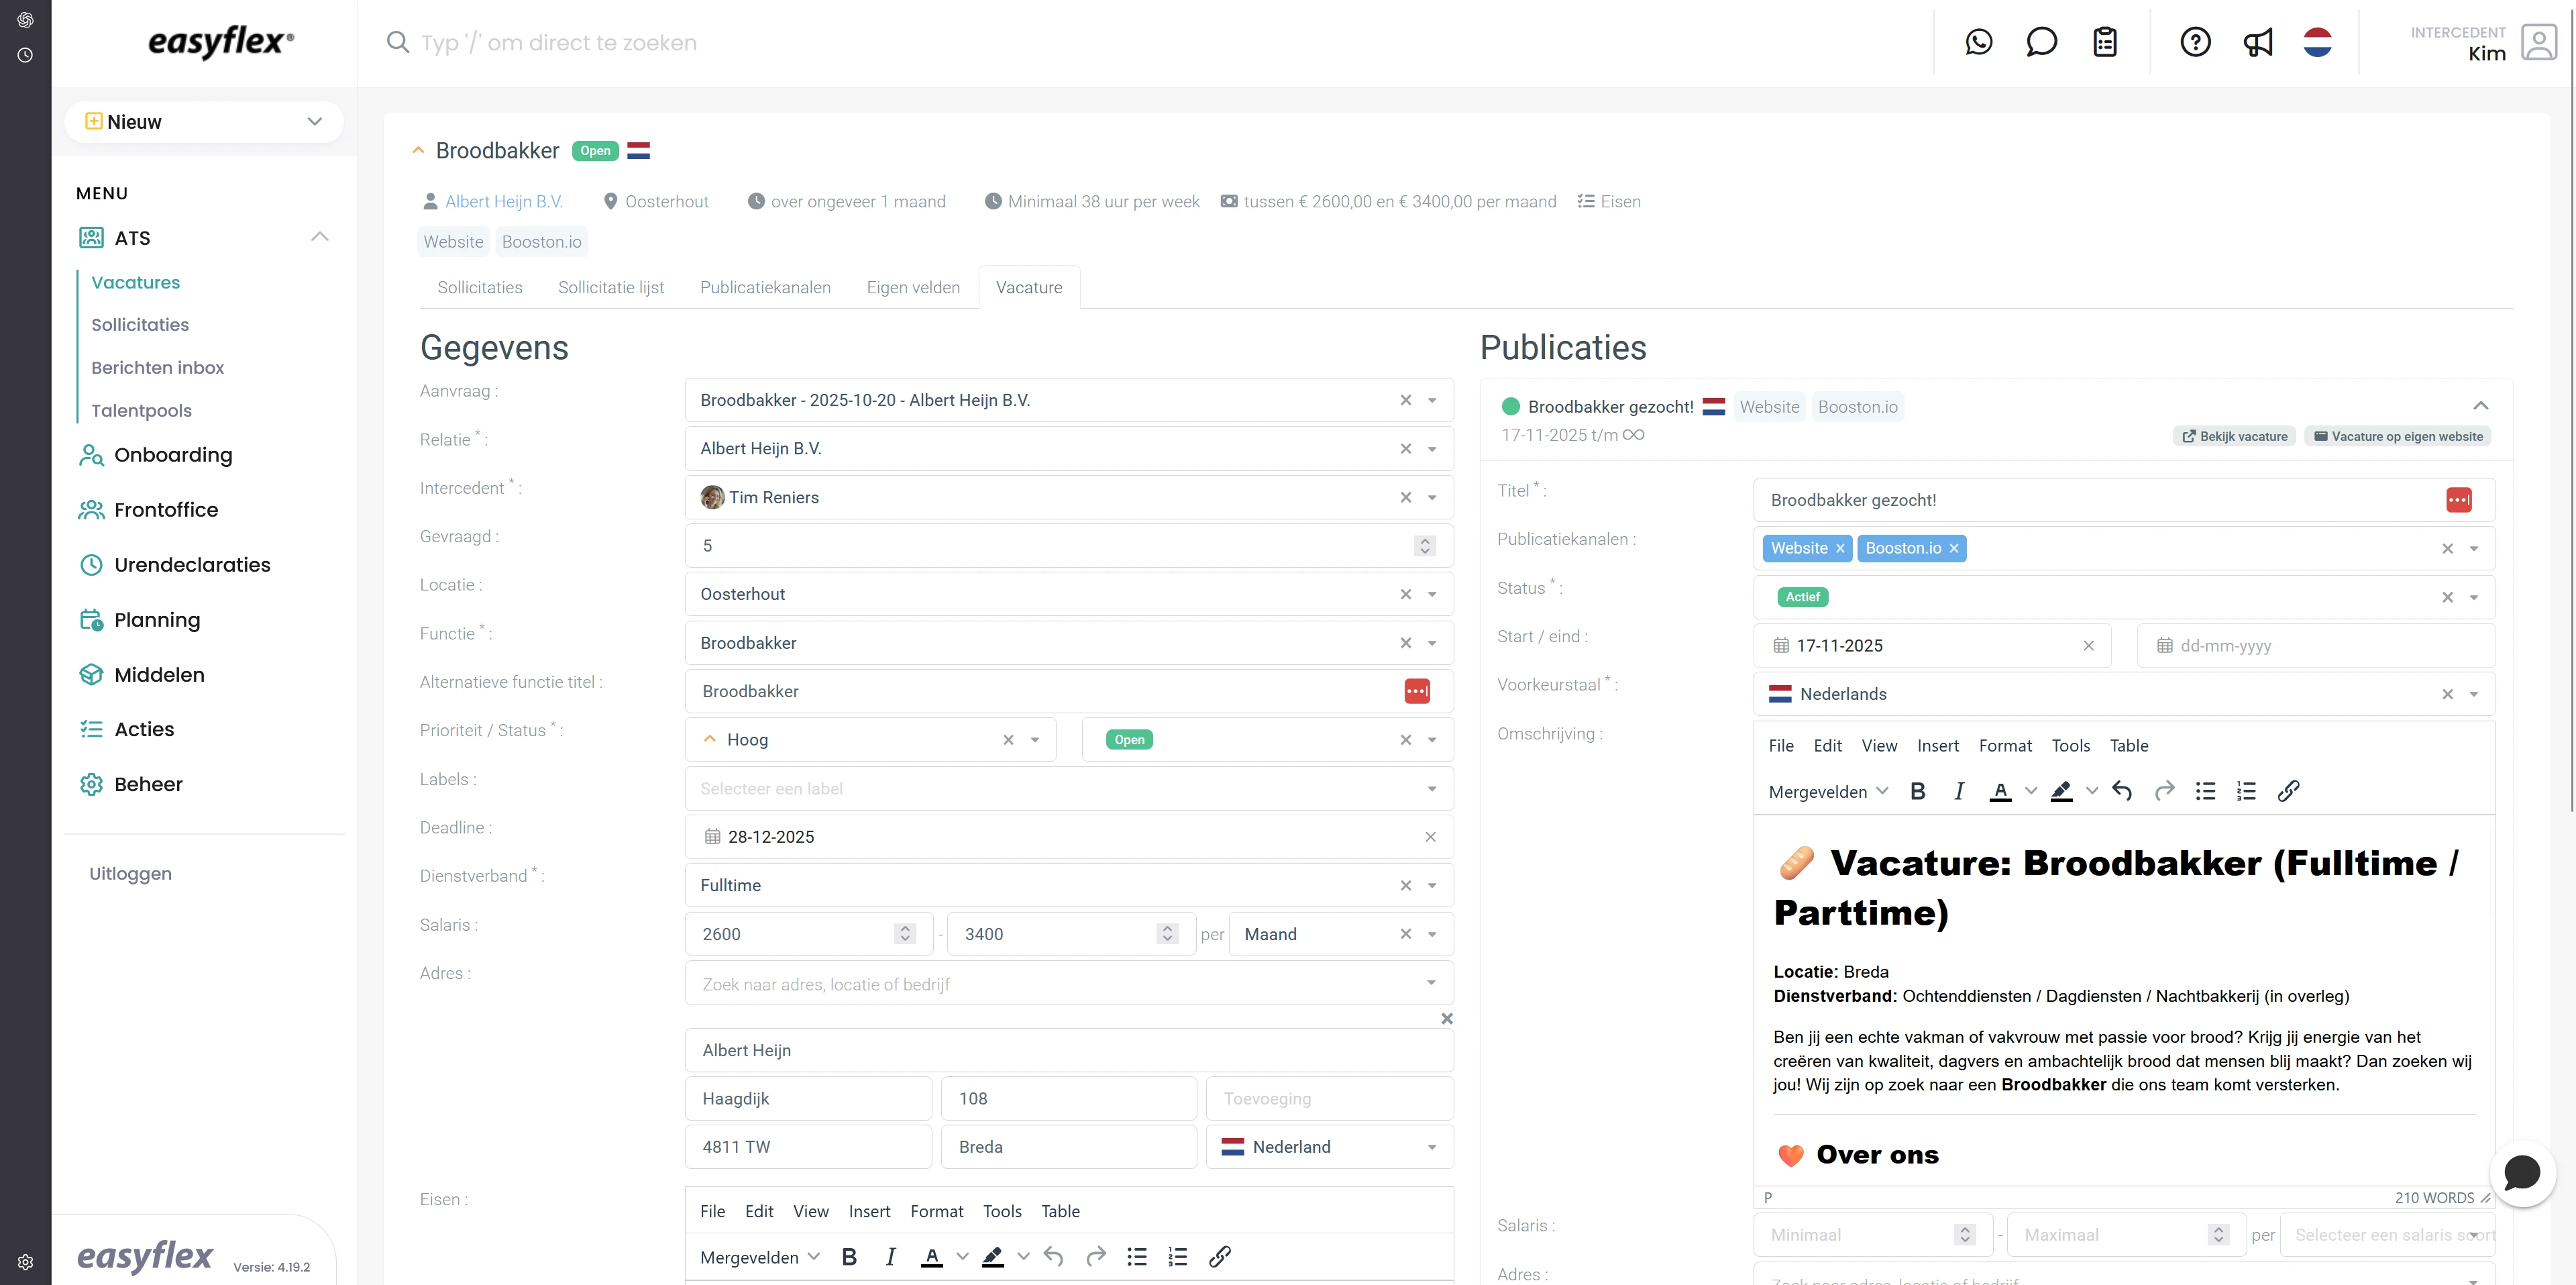
Watch the publication dates while you do. If you fill them in, make sure the end date is in the future and the start date is not — otherwise Booston politely waits for that start date and the job appears not to come in.
On the next round your job is in Booston, usually within about ten minutes. Check it under Menu → Recruitment → Jobs. From that moment the job joins in everywhere: on your website, in your Job feed and in your campaigns on the Jobboard network.
Applicants and statuses
When someone applies through your Booston website or through a campaign, this happens automatically:
- The candidate is created in Easyflex with first name, insertion, last name, initials, email address and phone number.
- The candidate is attached to the publication they responded to. With an open application that does not happen: it arrives in Easyflex as an open application, without a job.
- The CV and the cover letter are first uploaded to Easyflex as files and then attached to the candidate.
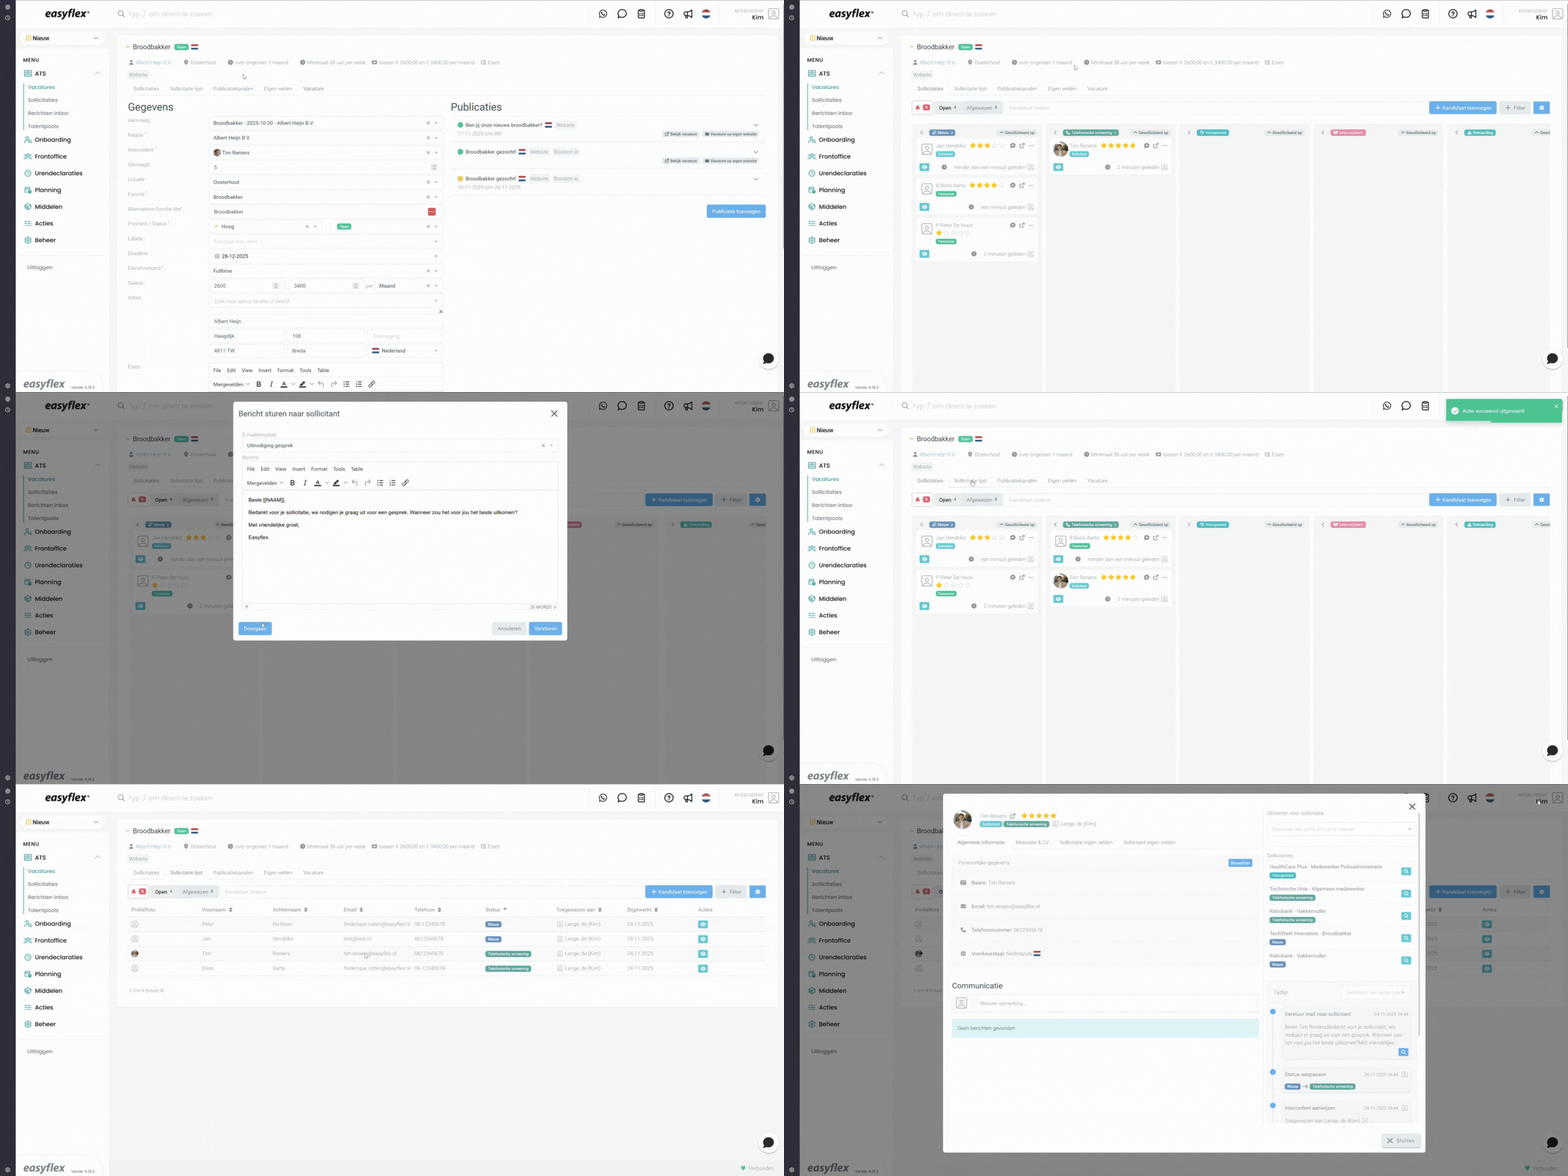
An application goes through to Easyflex straight away, not on the next round. If that does not work immediately, Booston tries again every hour, up to three times. If it keeps failing, our helpdesk is notified.
Move the candidate to a next stage in Easyflex afterwards and Booston takes that status over overnight. This is how Booston translates the Easyflex stages by default:
| Stage in Easyflex | Status in Booston |
|---|---|
| Nieuw | Contact |
| In Behandeling | Contact |
| Aanbod Uitgebracht | Presented to client |
| Aanbod Geaccepteerd | Presented to team |
| Aanbod Geweigerd | Candidate withdraw |
| In Dienst | Hired |
| Afgewezen | Rejected by team |
Review scores in both directions
Besides the stage, the connection also synchronises the review score: the rating from 1 to 5 stars on a candidate. That works both ways.
- From Easyflex to Booston. If a colleague rates a candidate in Easyflex, you see that rating back on the candidate in Booston.
- From Booston to Easyflex. When a candidate is exported, Booston sends the score along. If there is a manual rating, that one travels; if there is not, the AI match score travels instead.
What you switch on for this:
- Switch on Candidate review score and status import on the Functionality step, as in Step 4: choose what the connection does.
- Go to Menu → Settings → Attributes → Candidate attributes and find the Score attribute.
- Switch Sync with ATS on there.
Booston inside Easyflex: the Booston tab
Alongside the connection running in the background, a second way of working together is on its way: Booston will open as a tab inside Easyflex itself. You click Booston on a job and land straight — without logging in separately — on the Boost tab of exactly that job. From there you switch your campaigns on in a few clicks.
How that works:
- Easyflex builds the button in their own system. We then switch it on for your environment.
- The first time a colleague clicks through, Booston creates a user automatically, based on the name and email address from Easyflex.
- Whether that colleague can get to work straight away depends on one setting: Auto-activate iFrame / SSO users under Settings → Users & Permissions. If it is off, they come in as an inactive user and someone with the Manager role has to activate them first. So if your colleague sees the message User has been paused. Please contact a Booston manager., nothing is broken.
- What a colleague is allowed to do in Booston is set by their role. How you configure that is described in Users: giving access, choosing roles and signing in through your ATS.
Changing the connection later
Go to Menu → Settings → Connect → Ats. Once the connection is live you see two cards:
- ATS with the text You are connected and the Disconnect button.
- Settings, with the Main Settings and Ats Functions blocks that you fold open and closed.
Change what you need and click Save. Unlike the first-time setup, the four switches from Step 5: activate the connection do not appear here, so an ordinary change never accidentally throws your jobs away.
What you cannot arrange yourself
- The translation of Easyflex stages into Booston statuses. The default translation is in Applicants and statuses. If you work with your own stages, let us know which stage you use and which Booston status you expect.
- The frequency of the synchronisation. That is fixed for your whole environment and cannot be set per client.
- Switching the connection on. If the Ats tab is not in your menu, the module is not active for your environment. The helpdesk arranges that.
- Switching on the Booston tab in Easyflex. We do that, as soon as Easyflex has made it available for your environment.
- Changing Auto-activate iFrame / SSO users. Email support@booston.io with the setting you want.
Troubleshooting
No jobs come in at all
Usually the Url is wrong or the token has expired or been revoked. Check that the address has the form https://<yourenvironment>.easyflex2go.nl, without a trailing slash, and that there really are publications ready in Easyflex.
One job is missing, the rest are there
Look at the publication dates of that publication in Easyflex: a start date in the future or an end date in the past holds it back. Then check that the publication is actually set to active in Easyflex.
Jobs come in, but fields stay empty
Then the attribute has Status on but Sync with ATS off. Switch it on under Menu → Settings → Attributes → Job attributes; the field is filled on the next round. If Easyflex does not supply the field at all, it stays empty — see Which fields come across.
The job text is empty or incomplete
Easyflex works with a single text field. If the text in Easyflex is spread over separate fields that are not in the publication description, only the description travels. Put the full text in the description of the publication.
Applicants do not arrive in Easyflex
Check that Candidate export is on under Ats Functions. If it keeps failing, the token has often been renewed on the Easyflex side. Request a new token and fill it in again under Password.
The review score does not come back
Switch on Candidate review score and status import on the Functionality step and Sync with ATS on the Score candidate attribute. Both have to be on; see Review scores in both directions.
Frequently asked questions
Can I create jobs in Booston instead of in Easyflex?
You can, but it is not what this connection is for. Everything set to Sync with ATS is overwritten by the value from Easyflex on the next round. If you want to manage a field in Booston, switch Sync with ATS off for that attribute.
Does the connection work with more than one language?
Not yet. The connection currently pulls in one language version per publication. We are working on multilingual support; see Coming soon.
Does an open application arrive in Easyflex too?
Yes. An open application is created in Easyflex as an open application, so without being attached to a publication. The CV and cover letter travel with it as normal.
Does the Easyflex connection cost extra at Easyflex?
The connection needs no OAuth client, publication filter or extra licence. What Easyflex itself charges for access to their API is a question for them.
What happens if I delete a publication in Easyflex?
On the next round that publication is no longer in the list Easyflex returns, and the job disappears from Booston and from your website as well.
Is the connection GDPR-proof?
Yes. Only the data needed to handle the application travels, and the retention period in Booston is set to two years by default.
Coming soon
- More than one language per publication. Booston will pull in several language versions per Easyflex publication, so you can put your jobs on your site in German or English as well without typing them over.
- More candidate fields in the export. Besides name, email address, phone number, CV and cover letter, the preferred language and the motivation text from the application form will travel to Easyflex too.
- Booston as a tab in Easyflex. Easyflex is building the button that lets you work in Booston straight from a job, without logging in separately. We will update this article as soon as it is live.
Need help?
Cannot work it out, or unsure which setting suits your situation? Email support@booston.io or call 085 0044 215 and mention:
- the name of your environment;
- what you want to achieve;
- the message you see, if there is an error message.
Would you rather go through the settings together? Book a free 30-minute online demo — then we will walk through it with you. Job Done!


