Your job is in ForceFlow. Then the retyping starts: the same text again on the careers site, again on the job boards, and when someone applies you paste the details and the CV back into ForceFlow. Every change is made twice, and by Friday afternoon you no longer know which version is the right one.
With the ForceFlow connection you do the work once. You set the job to Gepubliceerd in ForceFlow and tick Booston.io; Booston picks the job up, puts it on your website and can run campaigns on it. Applications come back into ForceFlow complete with CV, cover letter and source, and statuses and review scores stay the same on both sides. The end goal: ForceFlow remains your only point of entry, and everything that happens outside it comes back together there by itself.
After reading this article you know which data goes back and forth, how to set the connection up yourself using the setup wizard, how to configure your job texts and attributes, and how to carry on working in Booston straight from ForceFlow without logging in again. You will find the screen under Menu → Settings → Connect → Ats.
Before you start
- The ATS connector module is switched on for your environment. If it is off, you will not see the Connect screen.
- You have a ForceFlow API key. It is included in your ForceFlow subscription; there are no extra costs attached to it.
- Your user role has access to Settings. Roles and permissions are covered in Users: granting access, choosing roles and signing in through your ATS.
- There is at least one published job in ForceFlow. Without a published job there is nothing to check.
- You know which languages your environment uses. ForceFlow delivers jobs per language; which languages Booston fetches is set in the wizard.
What the connection gives you
The connection is not a one-off import but a continuous exchange in two directions. That gives you five things:
- One point of entry. You enter the job in ForceFlow and nowhere else. Change it there and it changes everywhere.
- Online and in campaigns straight away. A published job appears on your website and can be included in your campaigns on job boards and social media.
- Complete applications back. Name, contact details, CV, cover letter and the source of the applicant all end up as a candidate in ForceFlow.
- Statuses and scores in step. When a recruiter moves a candidate to the next phase in ForceFlow, Booston sees it too — so your reporting stays correct.
- Click through without logging in again. From a job in ForceFlow you jump to that same job in Booston in one click, already signed in. See Clicking through from ForceFlow to Booston.
On top of that the connection is multilingual: ForceFlow delivers a job per language and Booston keeps those languages apart, without you entering anything twice.
Which data goes back and forth
Below is exactly what travels over the line, in which direction, and what switches it on. The names in the Setting column are the switches you will meet in Step 4: choose which data flows are switched on.
From ForceFlow to Booston
| What | When | Setting |
|---|---|---|
| Jobs — title, texts, publication status, start and end date, address and coordinates | Every 10 minutes, or almost instantly through the webhook | Job, job attribute and recruiter import |
| Job attributes — category, role, industry, contract type, education, language, salary, location, region | Together with the job | Job, job attribute and recruiter import |
| Recruiters — the internal contact person on the job | Together with the job | Job, job attribute and recruiter import |
| Candidate status — the phase the candidate is in within ForceFlow | On every synchronisation run | Candidate review score and status import |
| Review score — 1 to 5 stars | On every synchronisation run | Candidate review score and status import |
From Booston to ForceFlow
| What | When | Setting |
|---|---|---|
| Applicant — name, e-mail, phone, the job applied for | Immediately on application | Candidate export |
| CV and cover letter — as a file on the candidate | Immediately on application | Candidate export |
| Source — the source plus the full UTM data, so which campaign and which channel the applicant came through | Immediately on application | Candidate export |
| Review score — the score or Booston's AI match score | With the candidate export | Candidate export |
| Retry — an export that failed earlier is offered again | Every hour | Candidate export retry |
| Job URL — the link to the job on your own website | After the job has been imported | Postback job URL export |
How fast it goes
- With a webhook Booston processes a change almost instantly. ForceFlow only reports that something changed and which job it concerns; Booston then fetches the full, current record itself through the API. That way the content is always the content of that moment.
- Without a webhook Booston fetches all jobs every 10 minutes. With a large job portfolio, processing them can take a little longer after that.
- Applications are not part of that run: they are exported the moment they come in. If that fails — because ForceFlow is briefly unreachable, for example — Booston tries again every hour.
Step 1: request your ForceFlow API key
The connection works with a personal API key from ForceFlow.
- Request your API key from your contact person or account manager at ForceFlow.
- Store the key somewhere safe. You will enter it in Booston yourself and do not need to share it with anyone else.
The API key is included in your ForceFlow subscription. There are no extra costs attached to it.
Step 2: start the connection and pick ForceFlow
From here on you work in Booston. The setup runs through a four-step wizard; you can go back at any point and nothing is actually saved until the last step.
- Go to Menu → Settings → Connect → Ats. As long as nothing is connected, it says Ats is not connected.
- Click Connect. The wizard opens on the first step, Select ATS.
- Under Select Ats, choose Forceflow. The list is searchable and shows the logo for each system.
- Click Next.
Step 3: fill in the Main settings
On the Main settings step you tell Booston where your ForceFlow environment is and what it may sign in with.
| Field | What you enter |
|---|---|
| Username | The user name you received from ForceFlow. |
| Password | Your ForceFlow API key from Step 1: request your ForceFlow API key. The field never shows the value, not even after saving. |
| Url | The API address of your ForceFlow environment. |
| Qualifier | Leave empty. ForceFlow filters on its own side which jobs go to Booston. |
| Multilingual | On if you publish jobs in more than one language. Booston then fetches the job separately for each configured language. |
Then click Next.
Step 4: choose which data flows are switched on
On the Functionality step you switch on what may run between ForceFlow and Booston. The options sit in two blocks.
Under Sync are the data flows themselves:
| Setting | What it does | Advice |
|---|---|---|
| Job, job attribute and recruiter import | Fetches jobs, job attributes and recruiters from ForceFlow. | On. Without this option nothing comes in. |
| Skip job import on zero results | Skips the import if ForceFlow returns zero jobs, instead of setting everything in Booston to inactive. | On. This is your safety net if something breaks on the ForceFlow side. |
| Candidate export | Sends applicants with CV, cover letter and source to ForceFlow. | On. |
| Candidate export retry | Offers a failed export again every hour. | On. Only works if Candidate export is on. |
| Candidate review score and status import | Fetches candidate statuses and review scores from ForceFlow. | On if you work with phases and stars in ForceFlow. |
| Postback job URL export | Writes the job URL of your own website back to ForceFlow. | On. Your recruiters can then open the job straight from ForceFlow. |
Under Real time connection settings you decide what Booston does with an incoming webhook message:
| Setting | What it does |
|---|---|
| Activate webhooks | The master switch. With this off, Booston ignores all webhook messages and only the ten-minute run remains. |
| Job import | Processes a message about a changed, published or withdrawn job. |
| Candidate progression import | Processes a message about a changed candidate status. |
| Candidate score import | Processes a message about a changed review score. |
Click Next.
Step 5: activate the connection
The last step is called Activation. There is a red warning here, and rightly so: the switches on this step overwrite existing settings and take effect across your whole environment, including your website and your campaigns.
| Switch | What it does | When to switch it on |
|---|---|---|
| Apply default attribute settings for this ATS | Sets every default attribute setting for ForceFlow correctly in one go: active, correctly labelled and linked to the right ForceFlow field. | On a first setup. This saves you the most manual work. |
| Purge existing jobs and reload from ATS | Deletes the existing jobs in Booston and fetches them again. | Only if you have jobs from an earlier connection that are not right. |
| Purge exisiting job attribute values and reload from ATS | Deletes the existing attribute values and fetches them again. | Only if your attribute values have become polluted. |
| Purge all recruiters and reload from ATS | Deletes all recruiters and fetches them again from ForceFlow. | Only if your recruiter list is no longer correct. |
- Switch Apply default attribute settings for this ATS on if this is your first setup.
- Leave the three Purge switches off, unless you deliberately want to start over.
- Click Save.
Booston then shows Synchronization in progress and fetches your jobs. When that is done, the overview appears with You are connected.
Step 6: switch the webhook on in ForceFlow
You set the webhook itself up in ForceFlow, not in Booston. You tell ForceFlow which address to send a message to as soon as something on a job changes.
- In ForceFlow, go to Instellingen → Koppelingen.
- On the Booston.io key, tick Gebruik Booston.io.
- On the right of that row, click the webhook icon.
- At Webhook URL, enter your Booston domain with
/webhook/processafter it. For example:https://yourcompany.booston.io/webhook/process. - Leave Taal on Automatisch.
- Click Test. If the setting is correct, Status 200 appears at the bottom.
- Click Aanpassen to save.
From now on ForceFlow sends a message on every publication, withdrawal or content change of a job. That message contains only the ID of the job; Booston then fetches the full record itself.
Step 7: set up your job texts
The connection now knows where to fetch the job. Next you decide which texts from ForceFlow end up where in Booston.
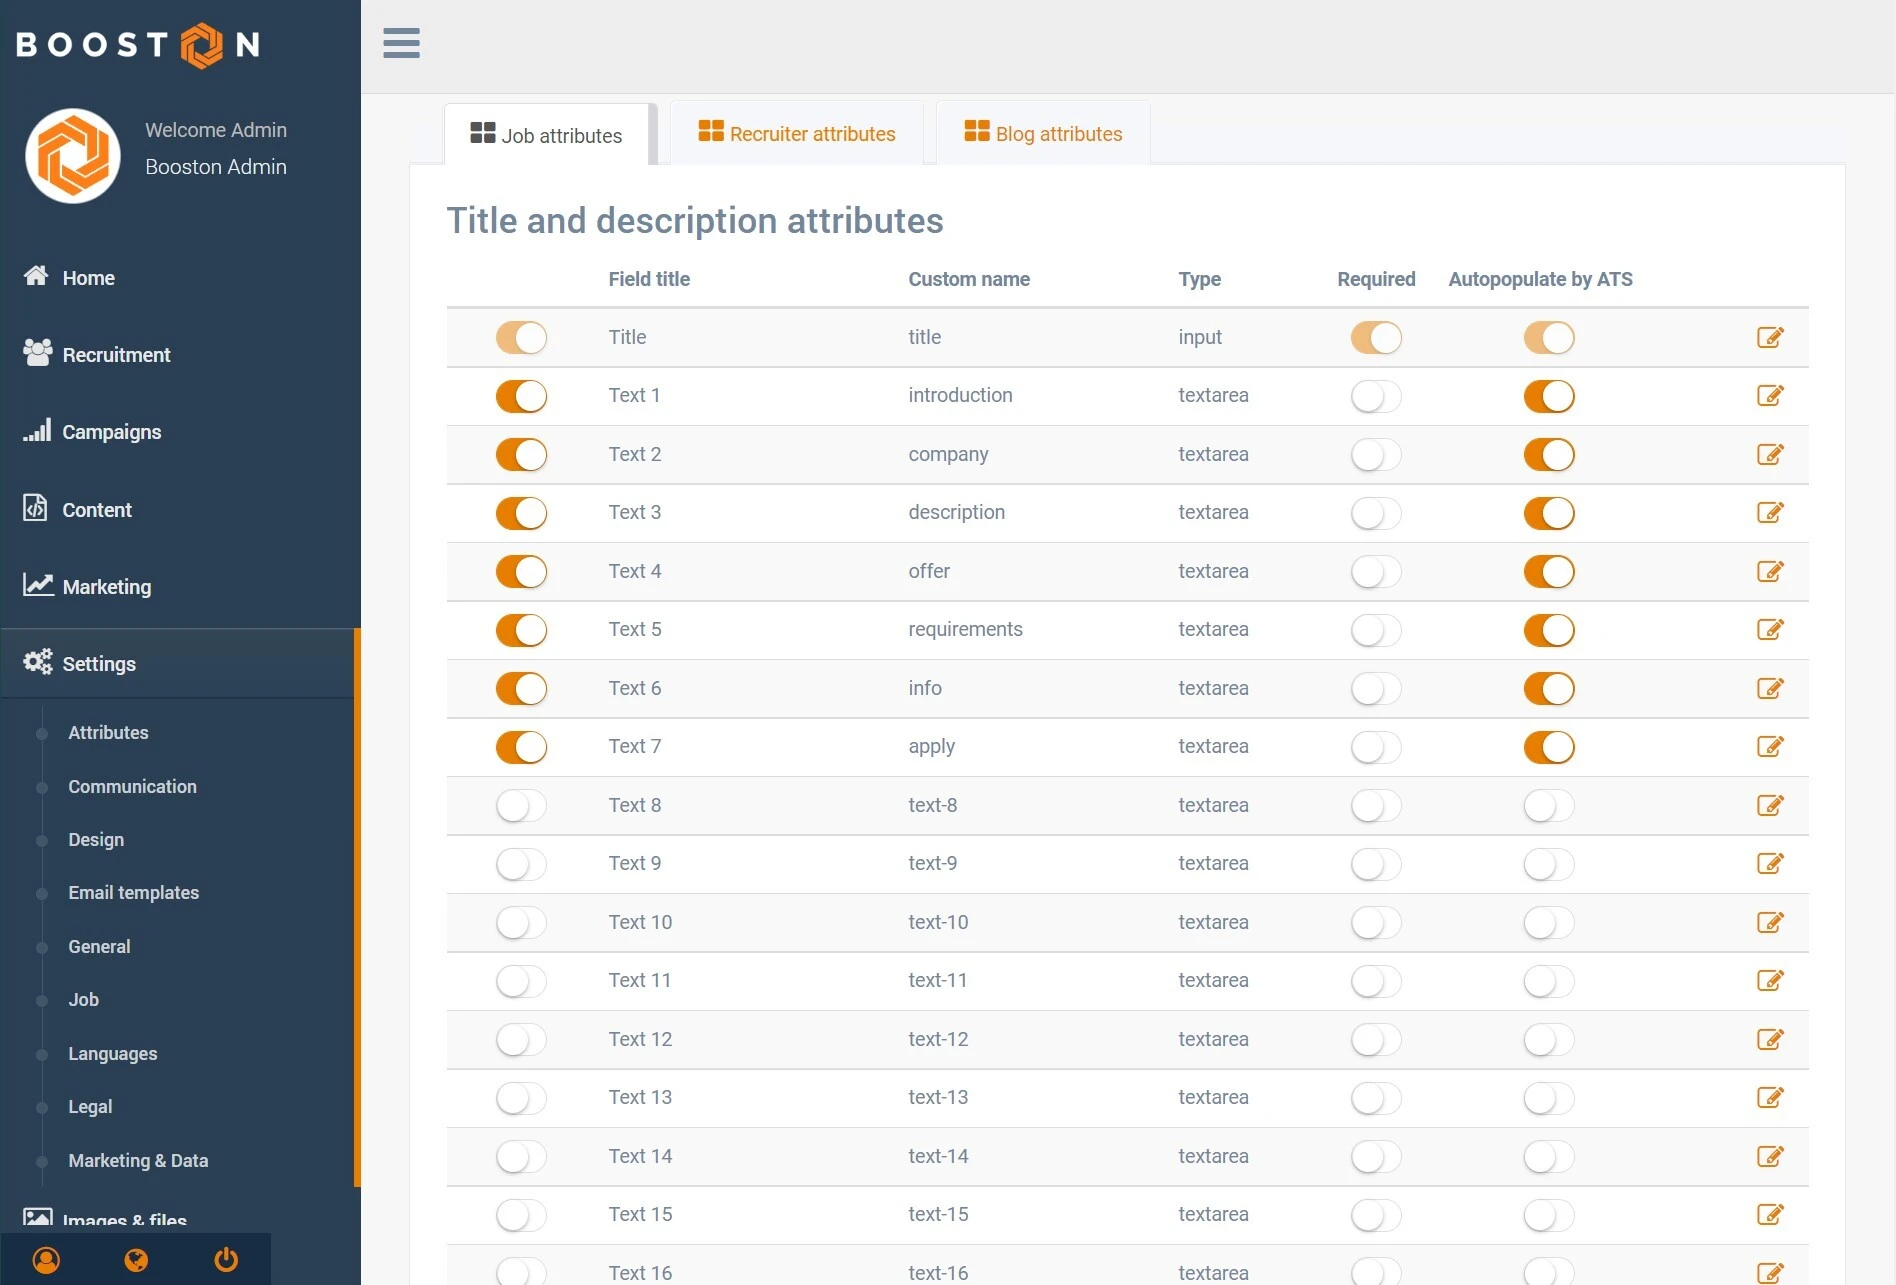
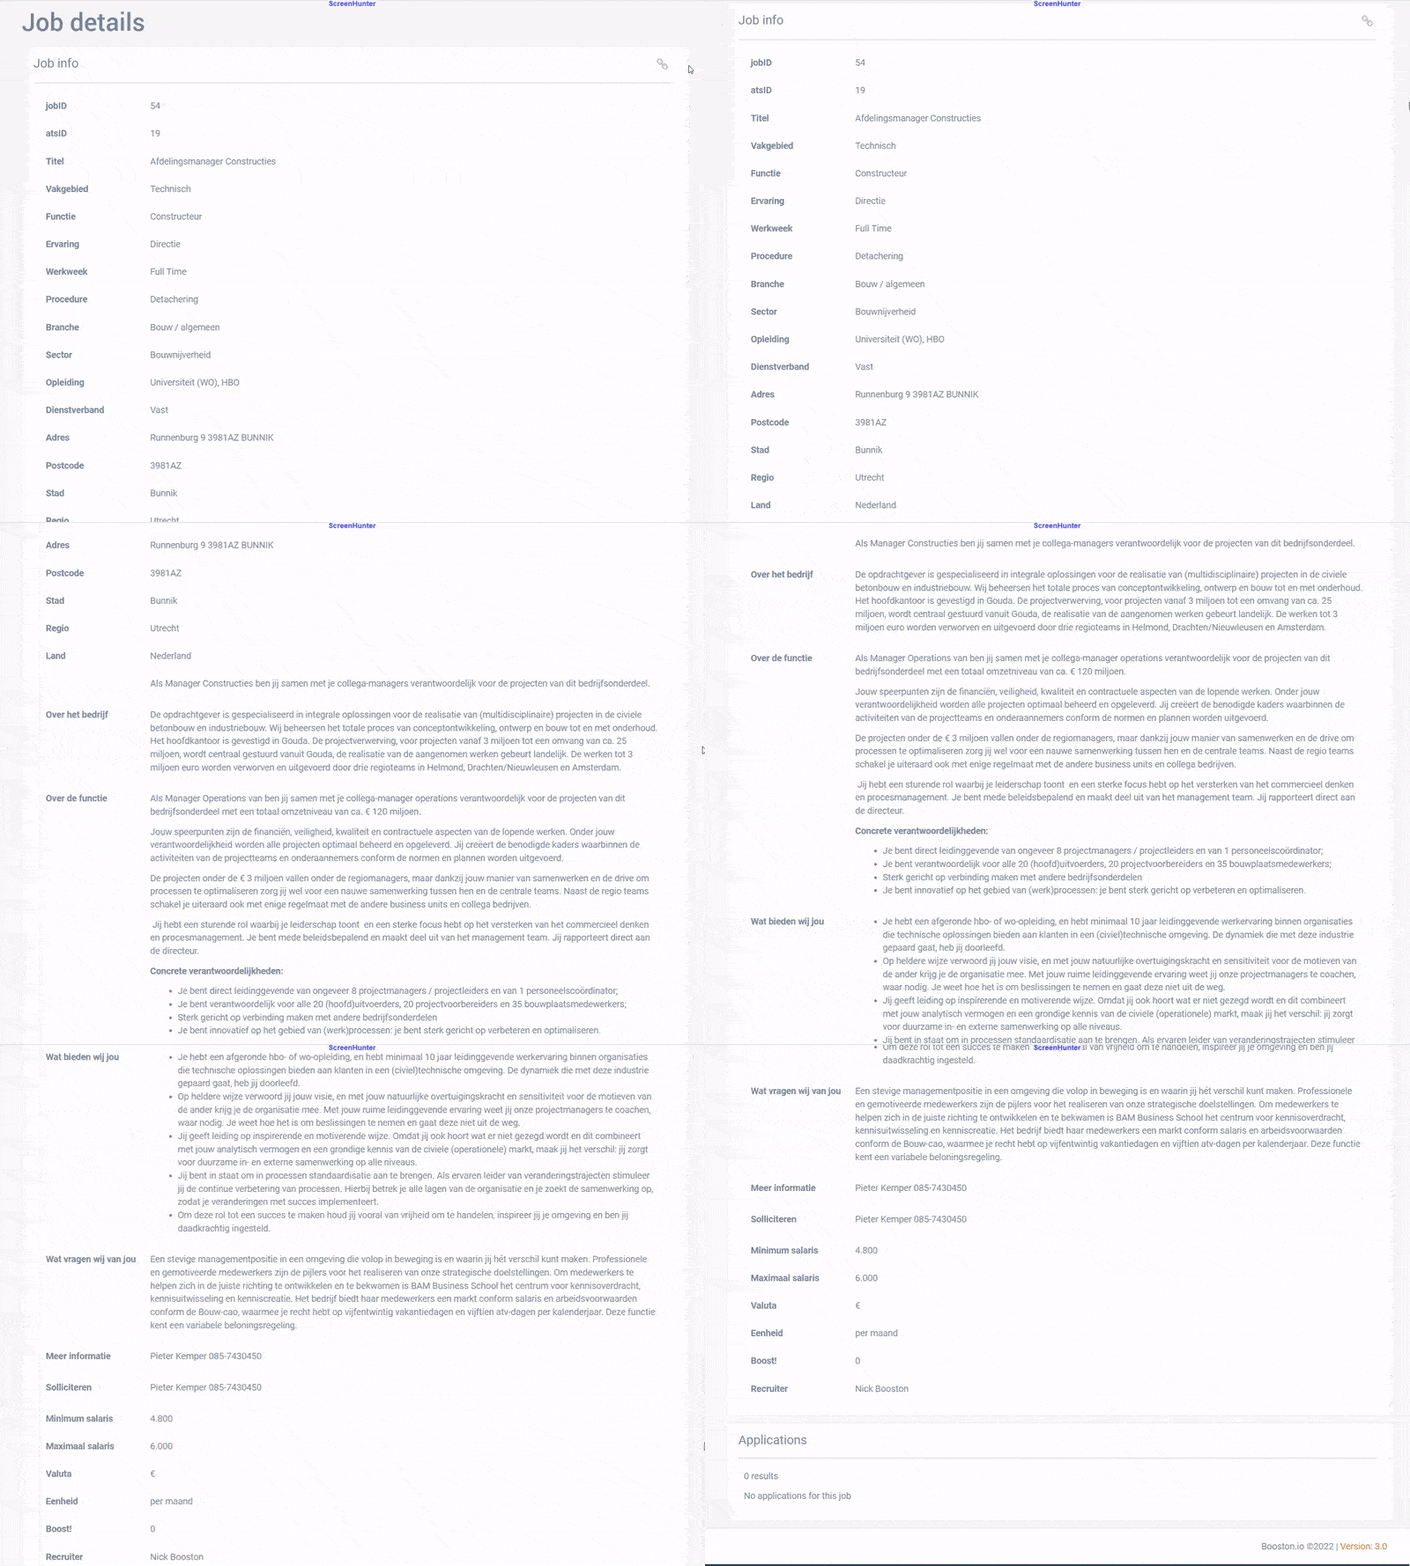
Go to Menu → Settings → Attributes → Job attributes. At the top is the Title and description attributes block: the title plus a series of text fields, each linked to a text field in ForceFlow.
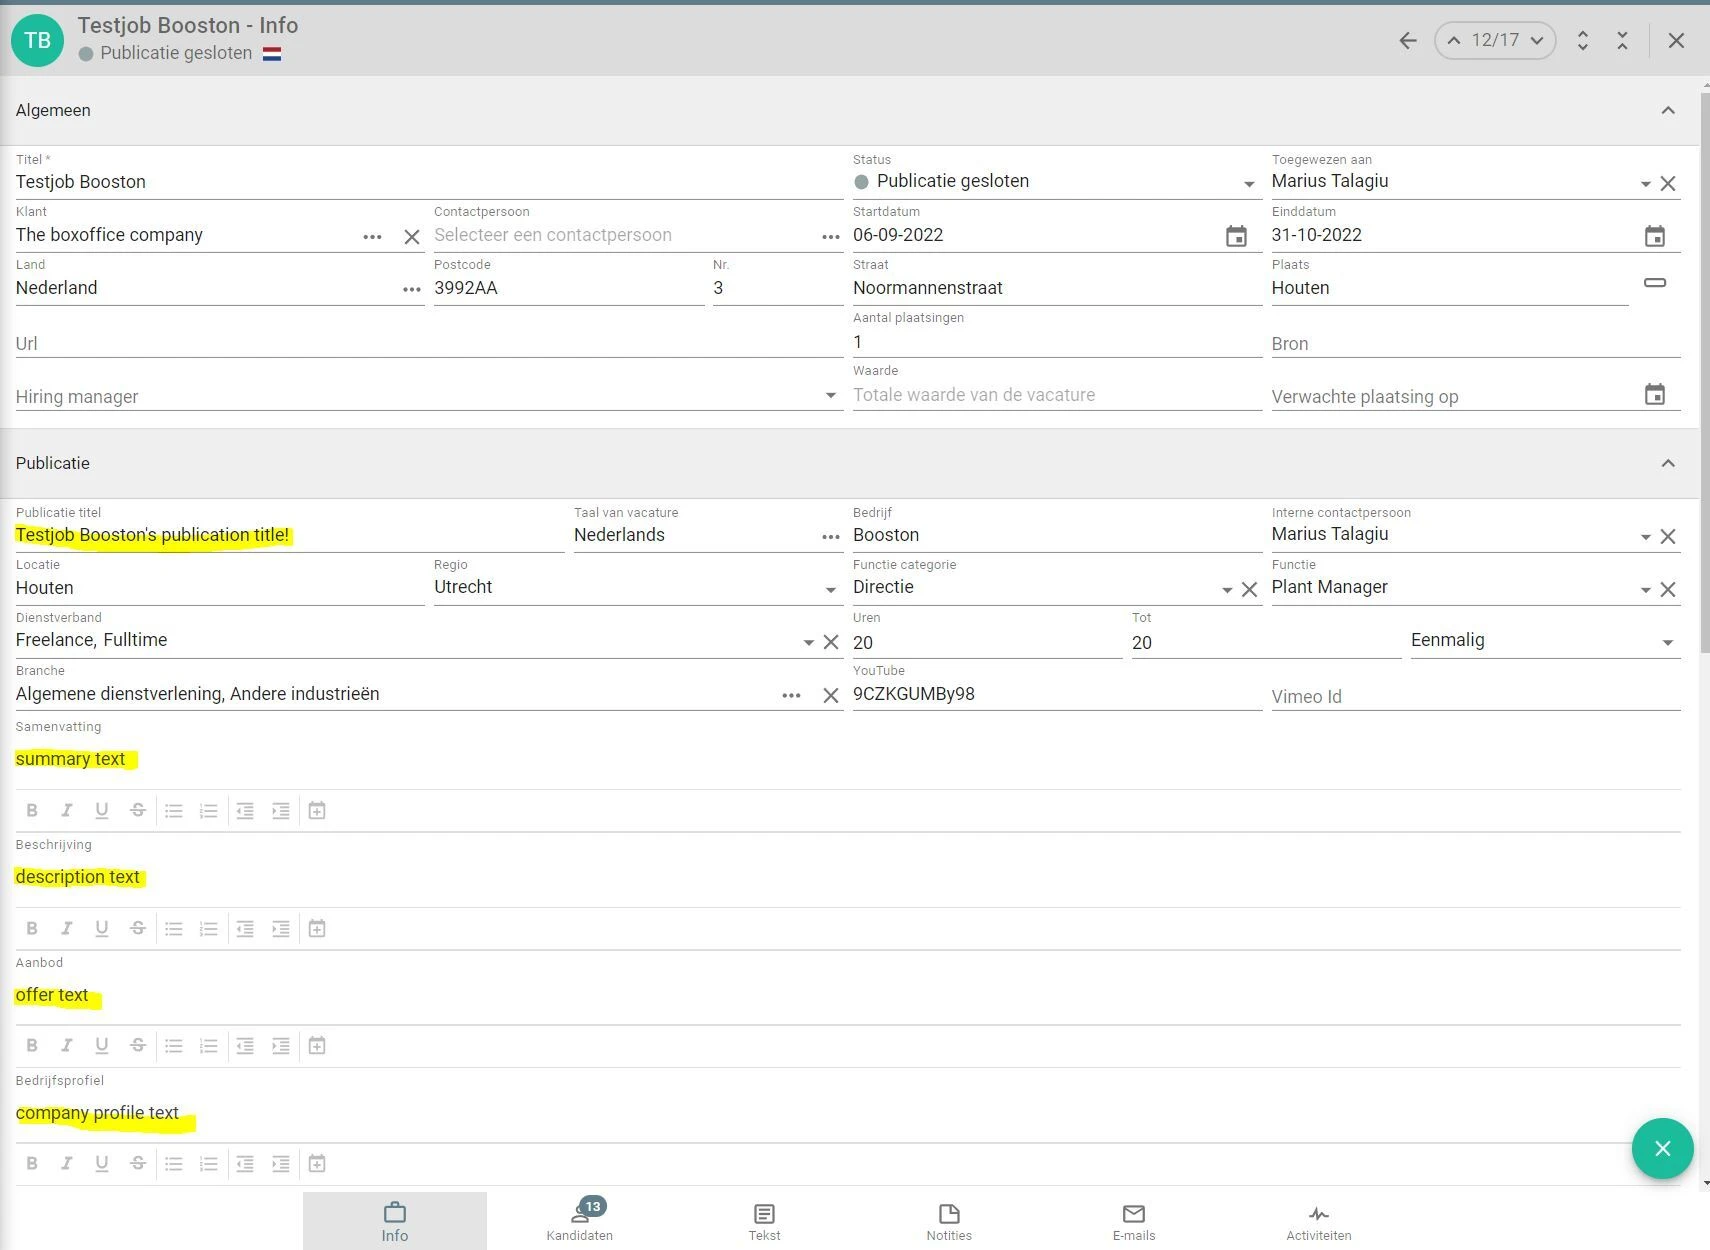
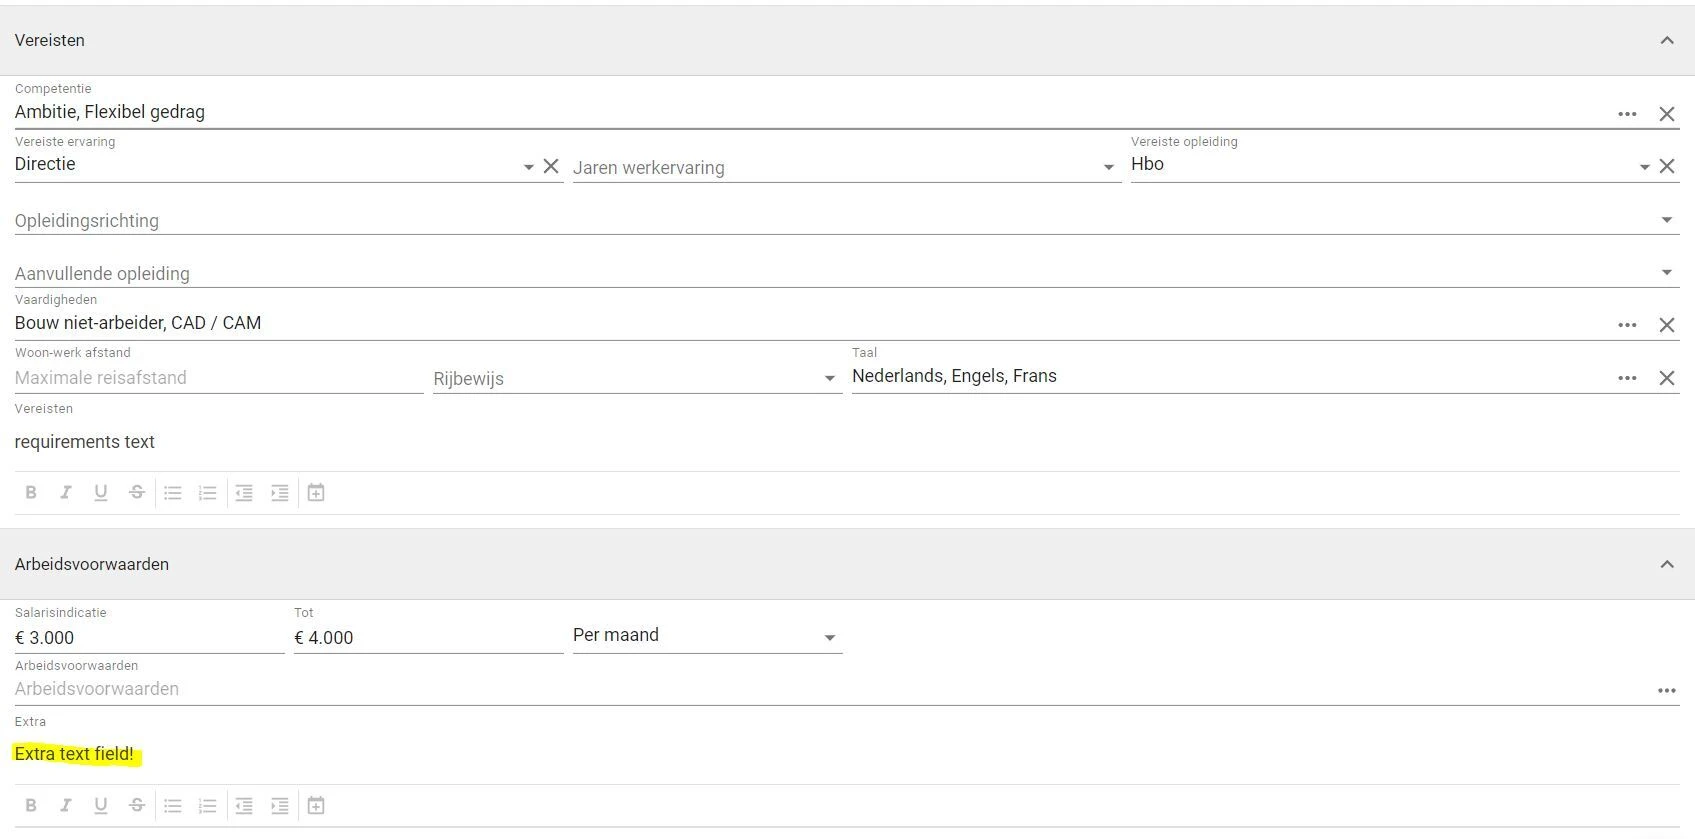
On the ForceFlow side these are the fields that come along: the publication title, the summary, the description, the offer, the company profile, the requirements and the extra text field.
On the Booston side you decide per text attribute what happens to it. There are three positions:
- Attribute off. Booston does not import the linked ForceFlow field.
- Attribute on with Autopopulate by ATS on. ForceFlow fills the text, and overwrites it on every change.
- Attribute on with Autopopulate by ATS off. You write the text yourself in Booston, and ForceFlow leaves it alone.
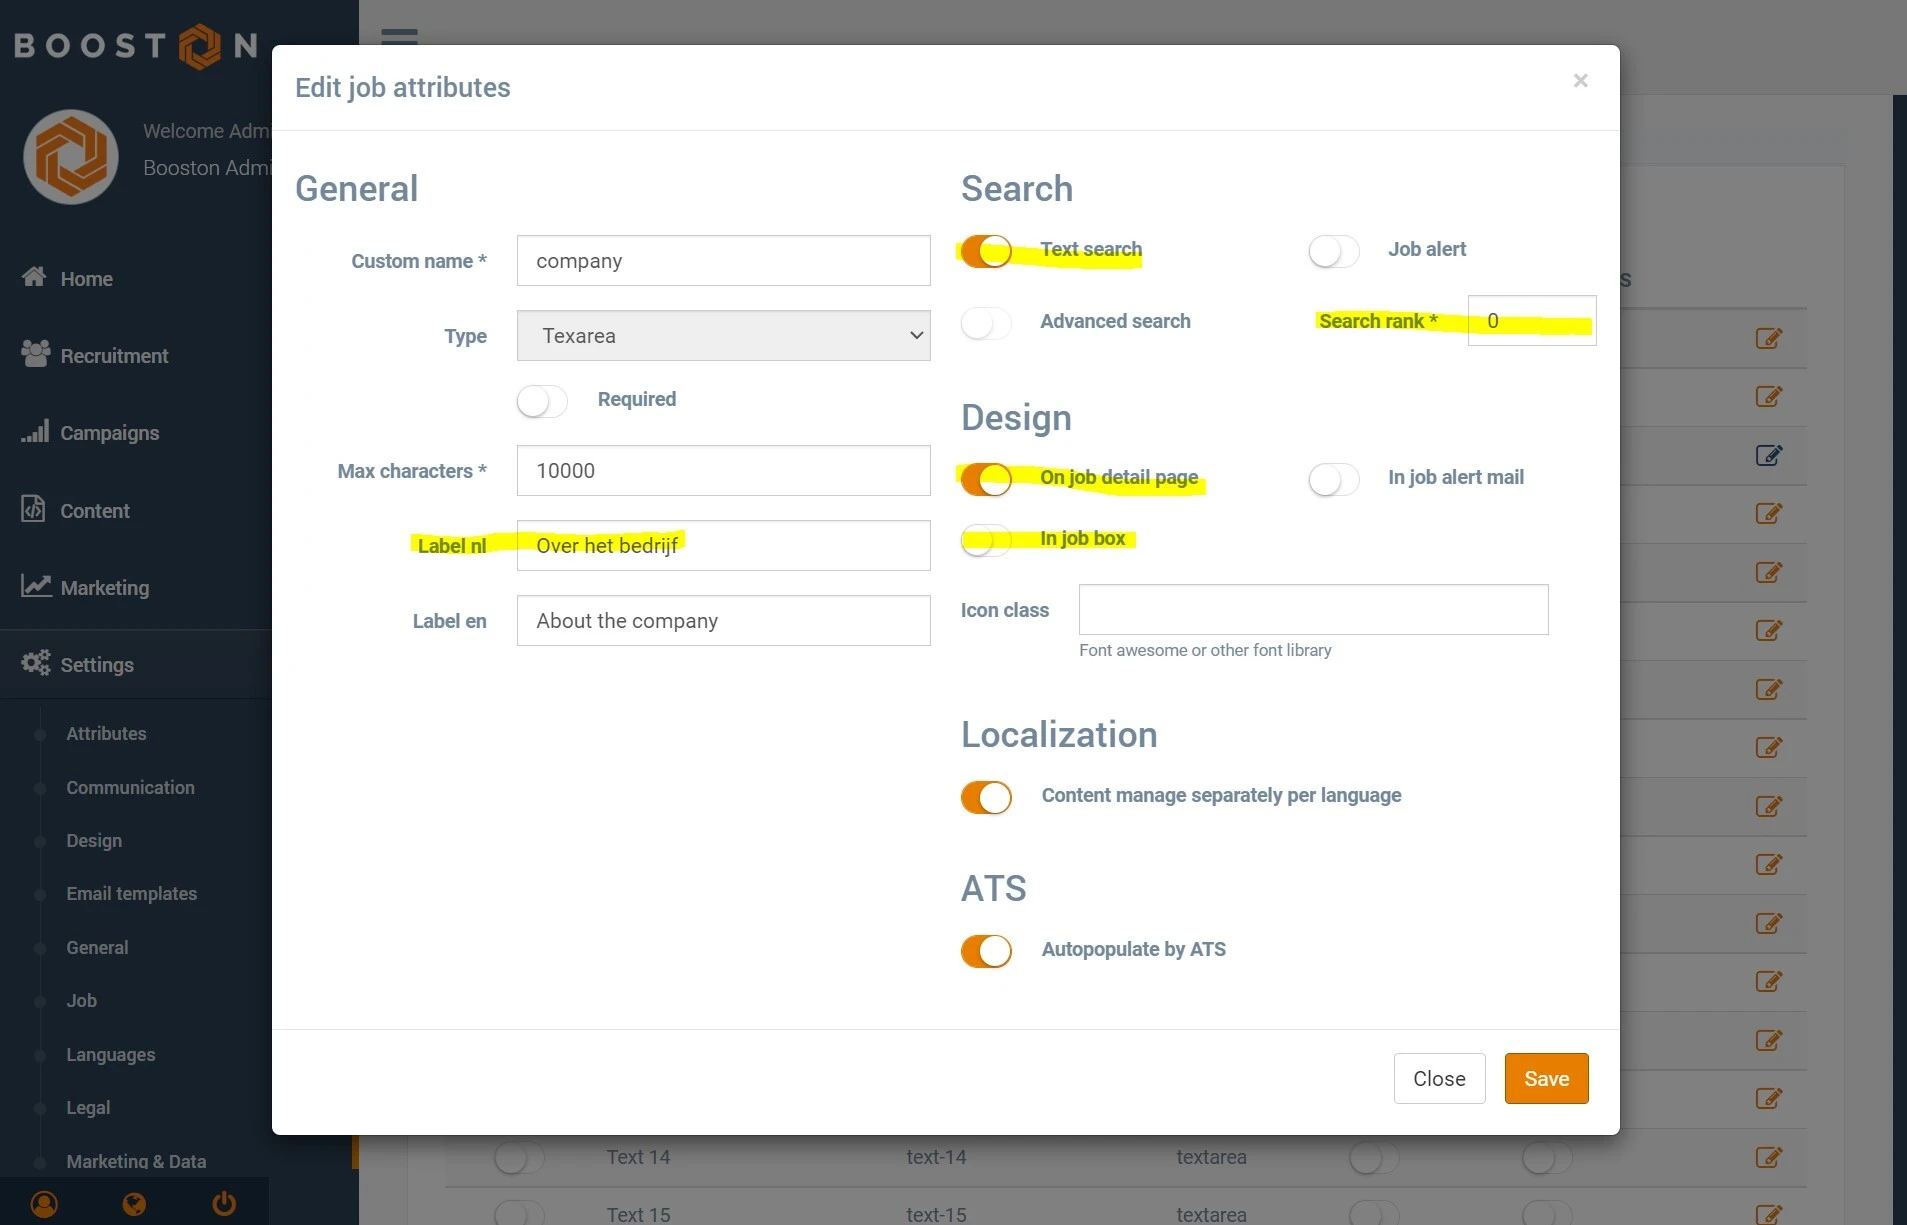
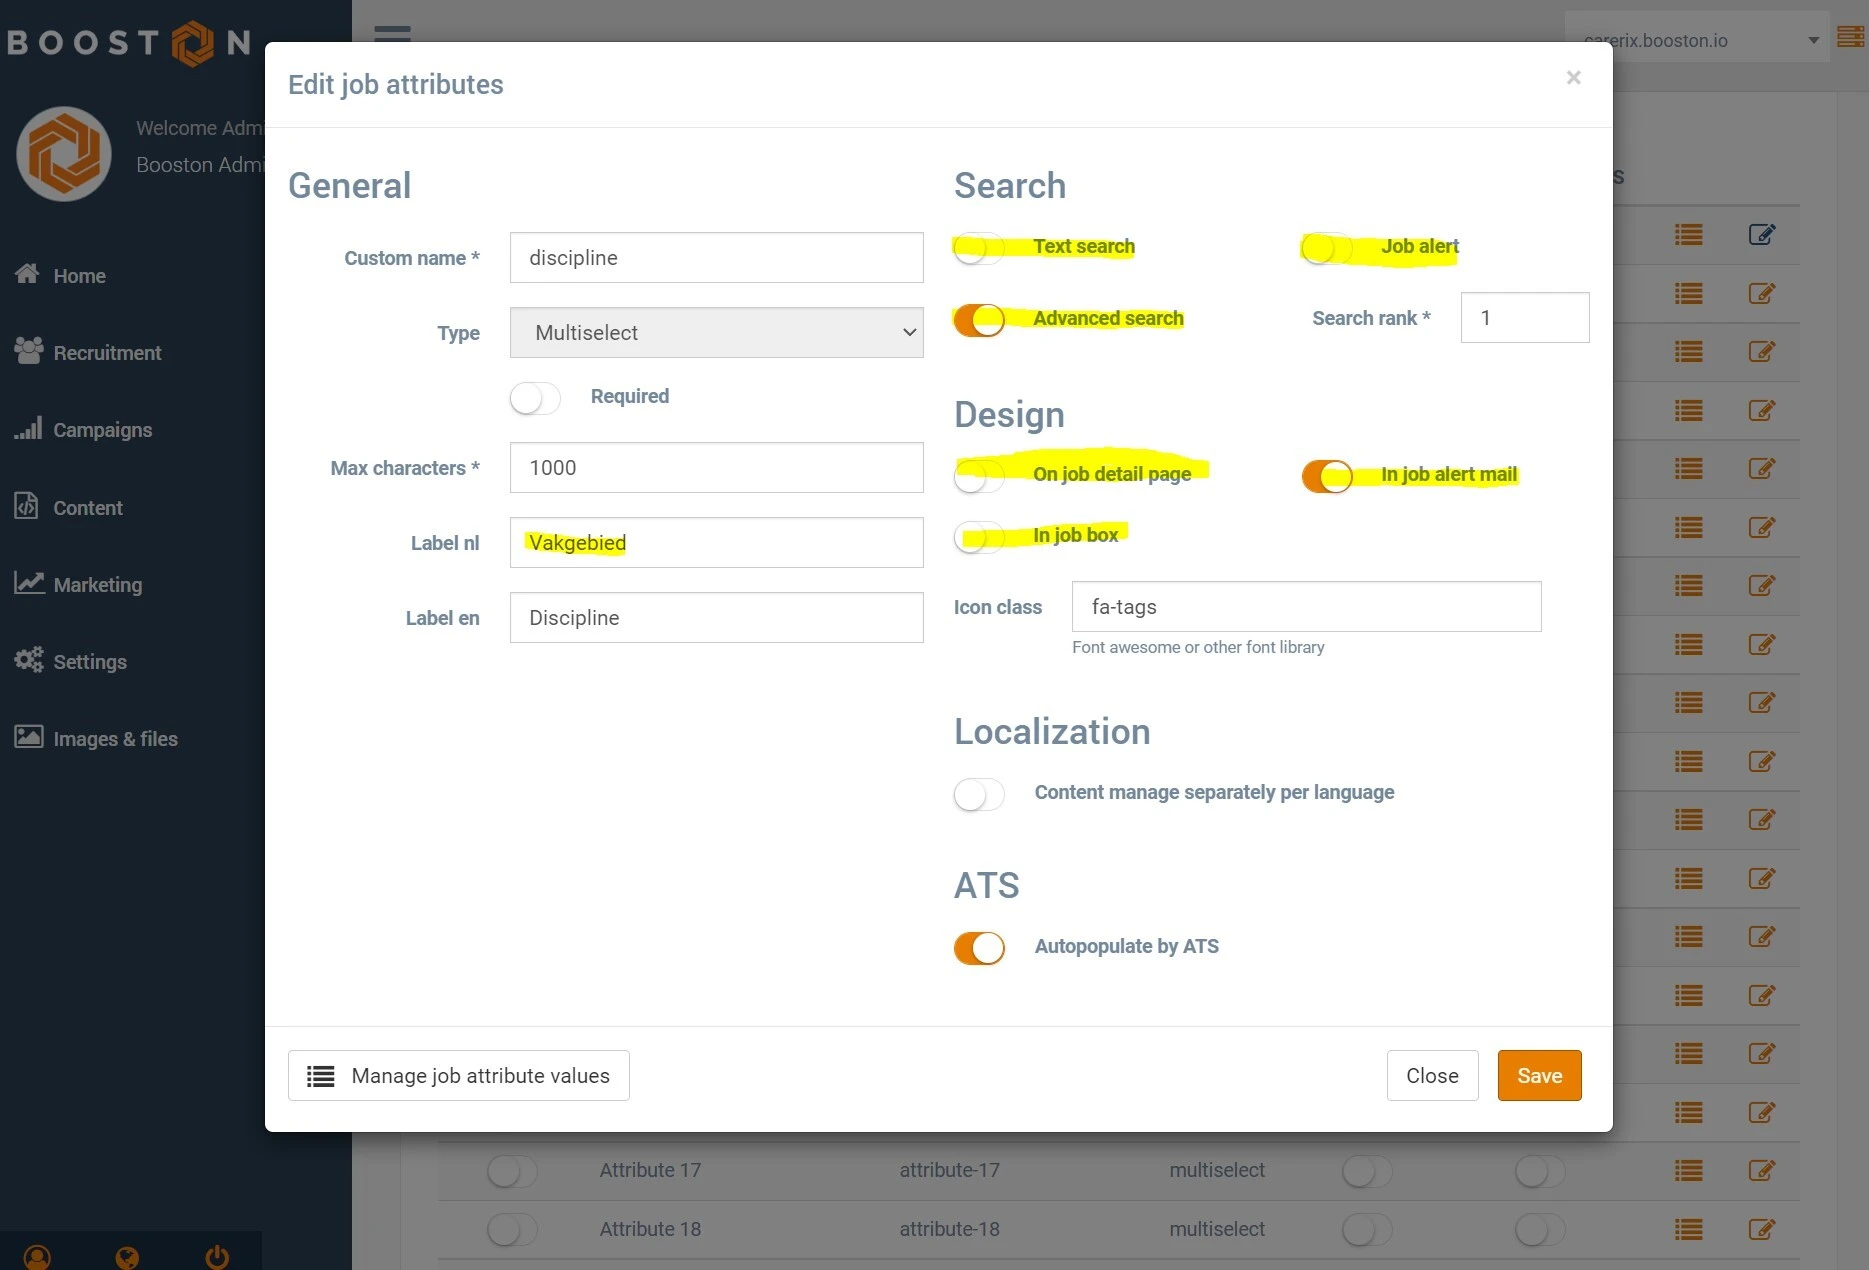
Click the edit icon behind an attribute to configure it:
| Field | What it decides |
|---|---|
| Label nl / Label en | The heading shown above the text on your website, per language. |
| Text search | Whether this text counts towards a search on your website. |
| Search rank | The order in which the attributes are shown. |
| On job detail page | Whether the text is visible on the job page. |
| In job box | Whether the text is used as the introduction in a job list. |
| Autopopulate by ATS | Whether ForceFlow fills this field. |
Check the result under Menu → Recruitment → Jobs and open a job.
Step 8: set up the other job attributes
Below the text block are the other job attributes: category, role, industry, contract type, education level, language, salary, location and region. These are not individual texts but attribute values — the values a job picks from, and the ones a candidate filters on across your website.
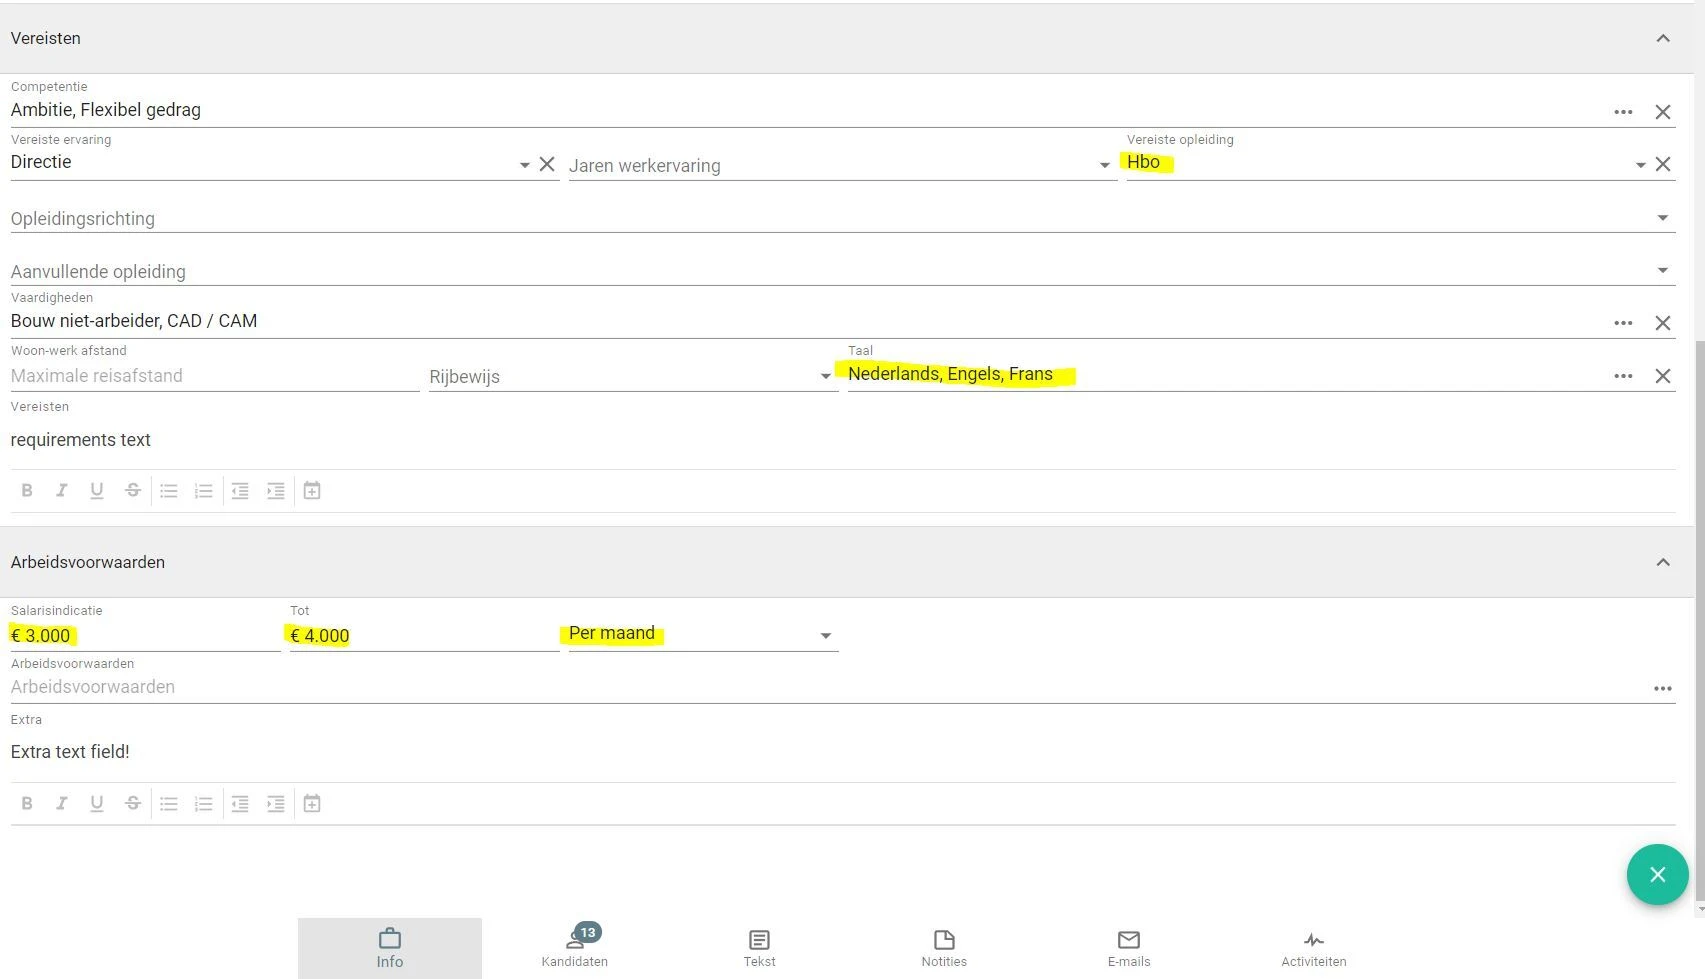
It works the same way as with the texts: if an attribute is off, Booston does not import the value. If you want ForceFlow to fill it, switch Autopopulate by ATS on. If the attribute is on but Autopopulate by ATS is off, you fill the value yourself under Menu → Recruitment → Jobs by editing the job.
These attributes add two settings compared with the text fields:
| Field | What it decides |
|---|---|
| Job alert | Whether the attribute value is available in the job alert form. |
| In job alert mail | Whether the attribute value is mentioned in the job alert mail to candidates. |
You can see which values are coming in from ForceFlow under Manage job attribute values. There you give every value a label per language, optionally link it to a category for Google for Jobs and add an image to it.
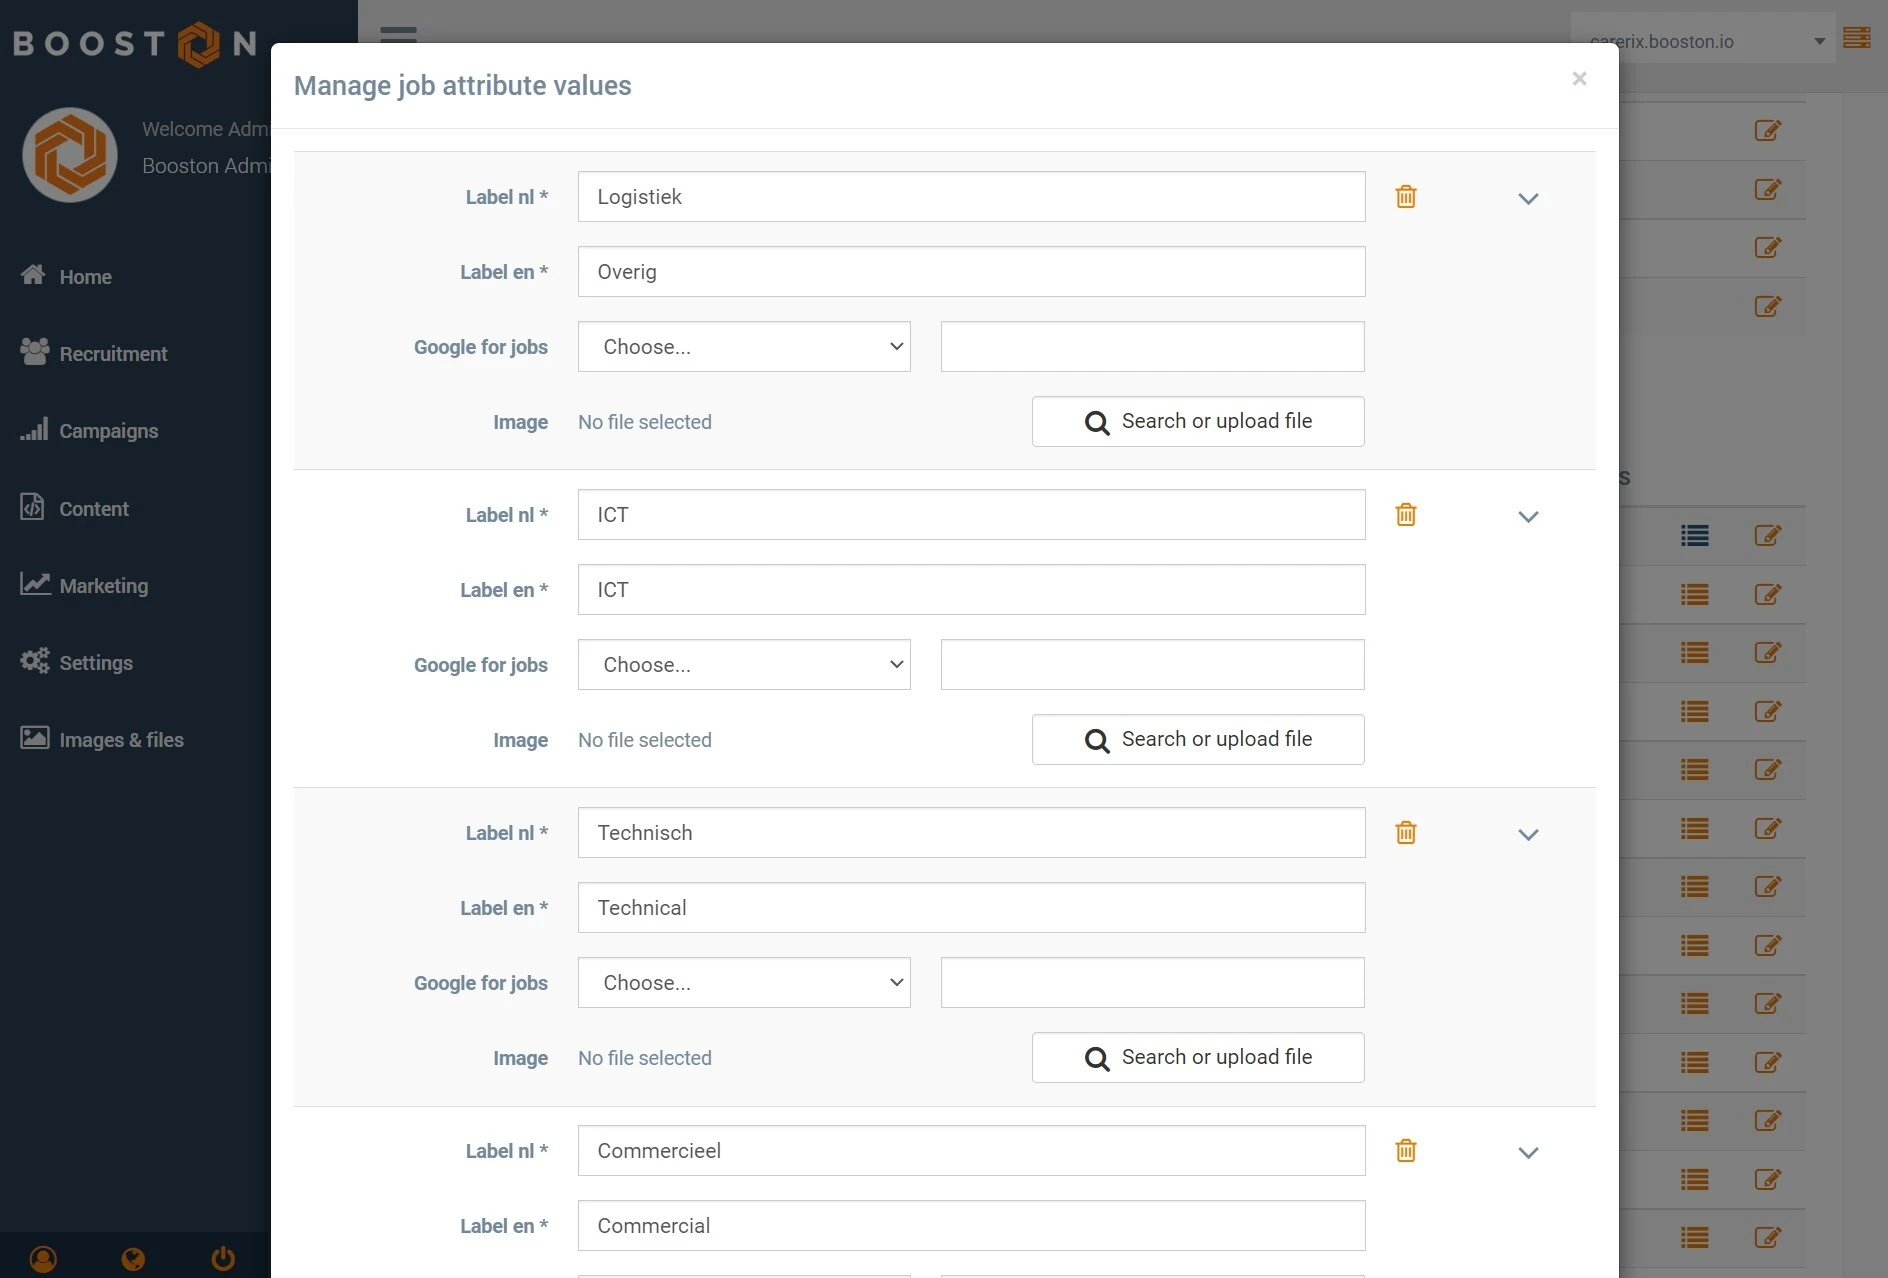
New values are added by themselves: as soon as ForceFlow sends a job with a value Booston does not know yet, that value is added. You can then rewrite it independently of ForceFlow — your translation or your tidier wording stays put.
Publishing jobs from ForceFlow
The connection is in place. From now on, publishing is something you do in ForceFlow.
- Create the job in ForceFlow and fill in the fields you switched on in Booston.
- Set Status to Gepubliceerd.
- Check the date range. The Startdatum must be in the past if you want the job to be fetched straight away; the Einddatum must be in the future.
- Under Gepubliceerd op, tick Booston.io.
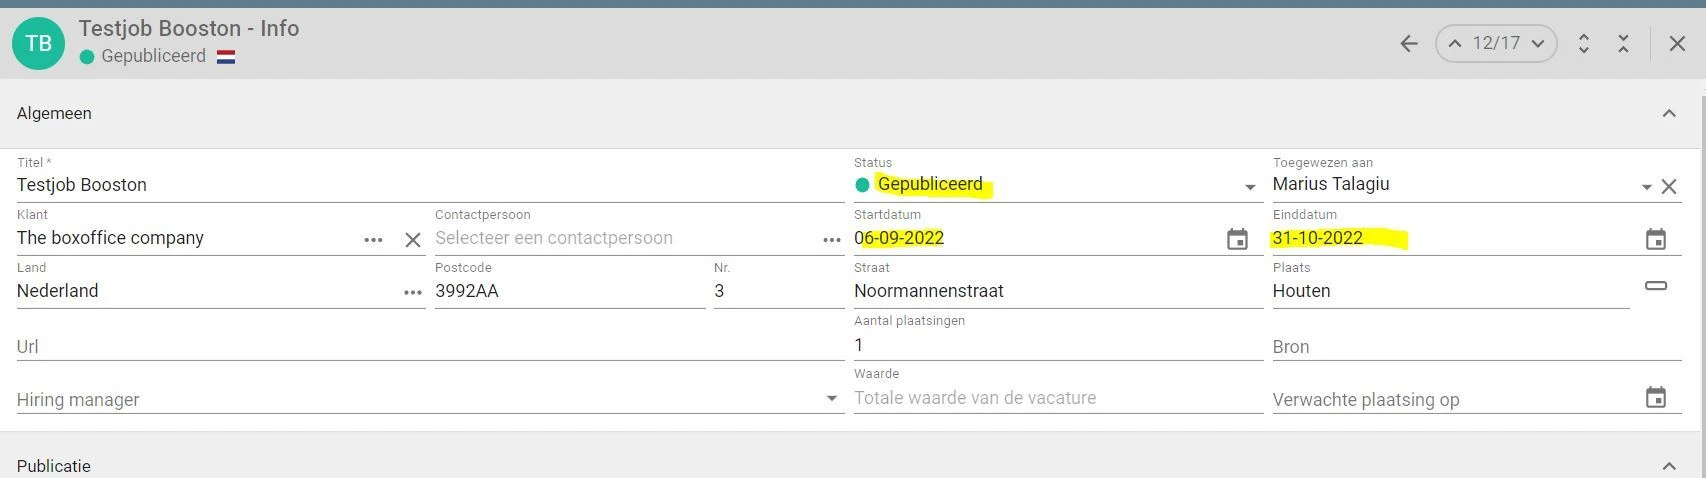
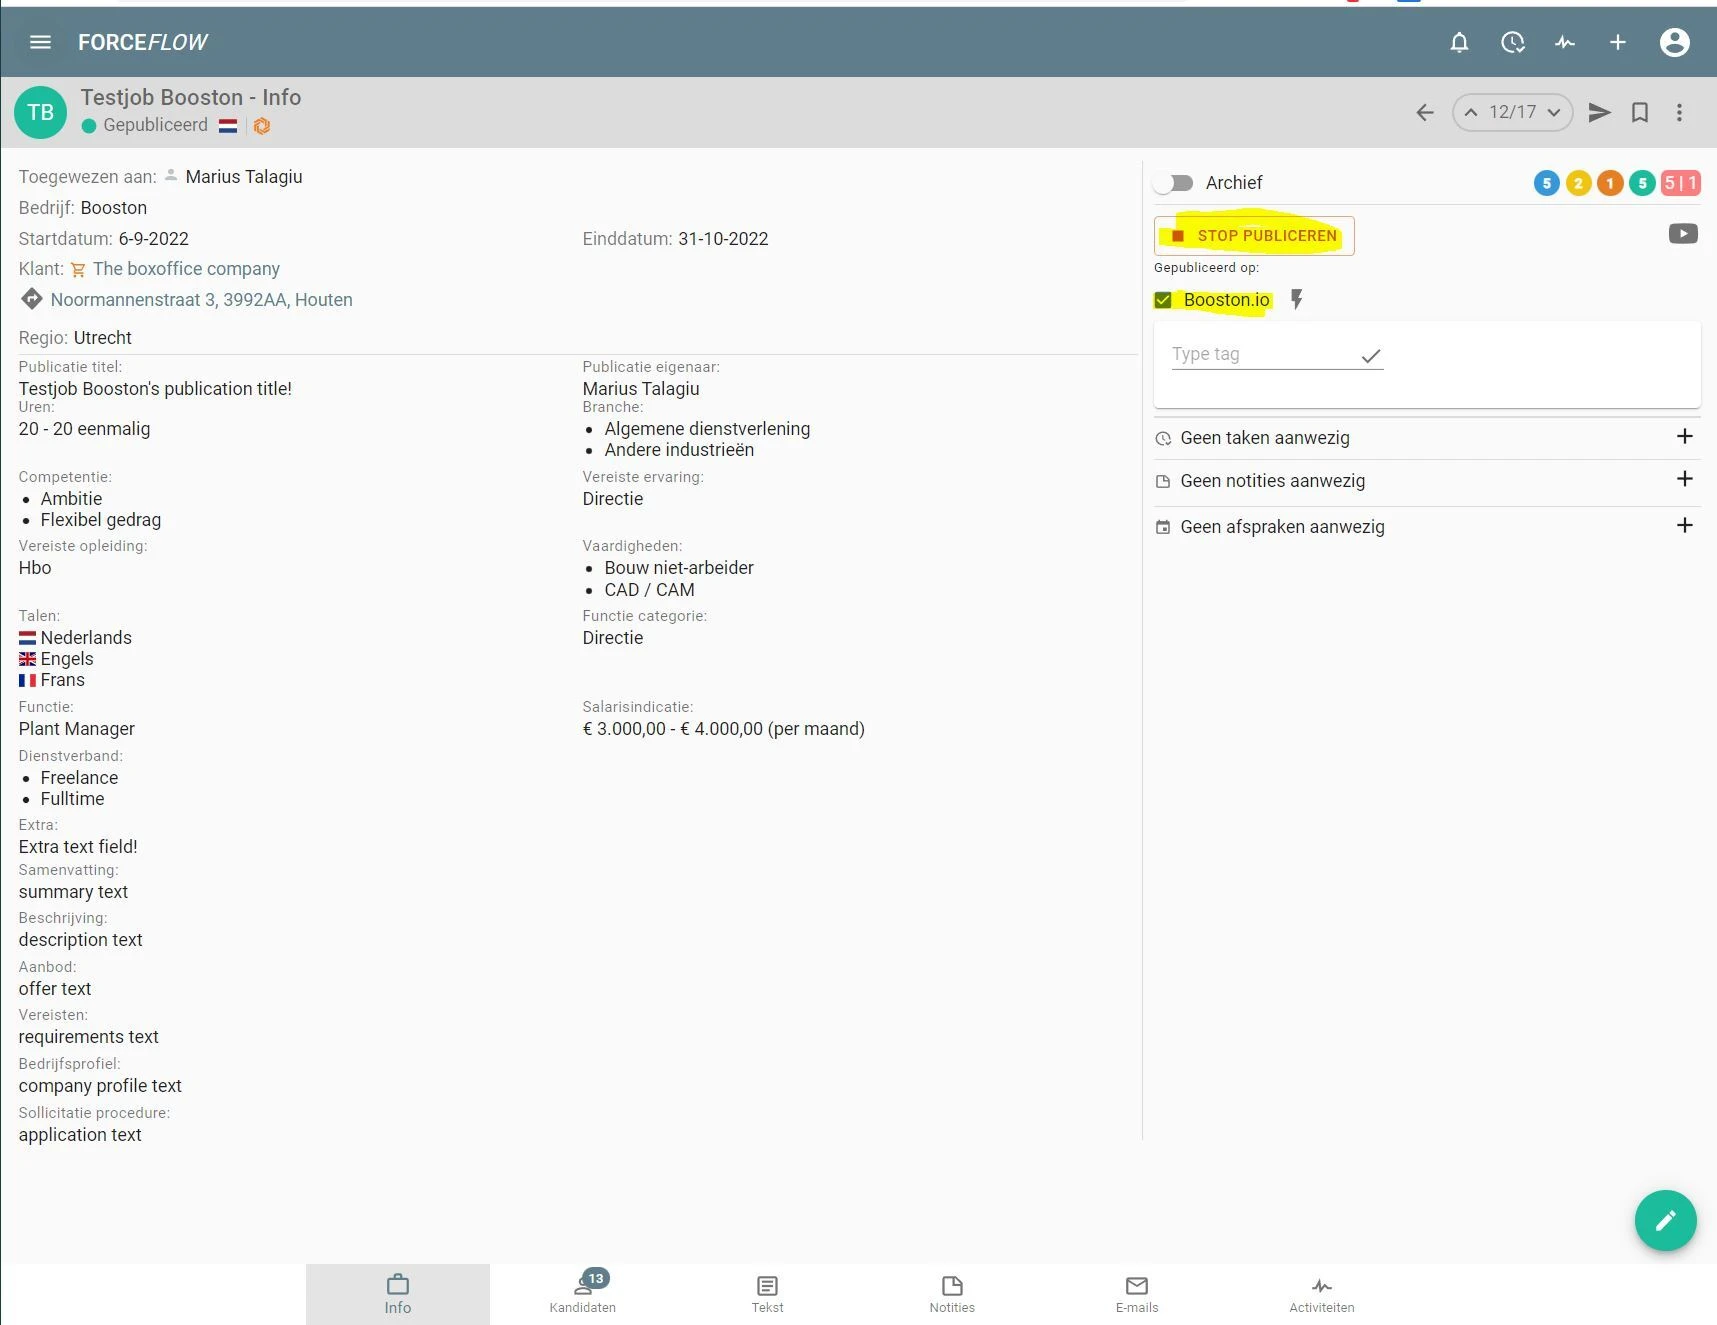
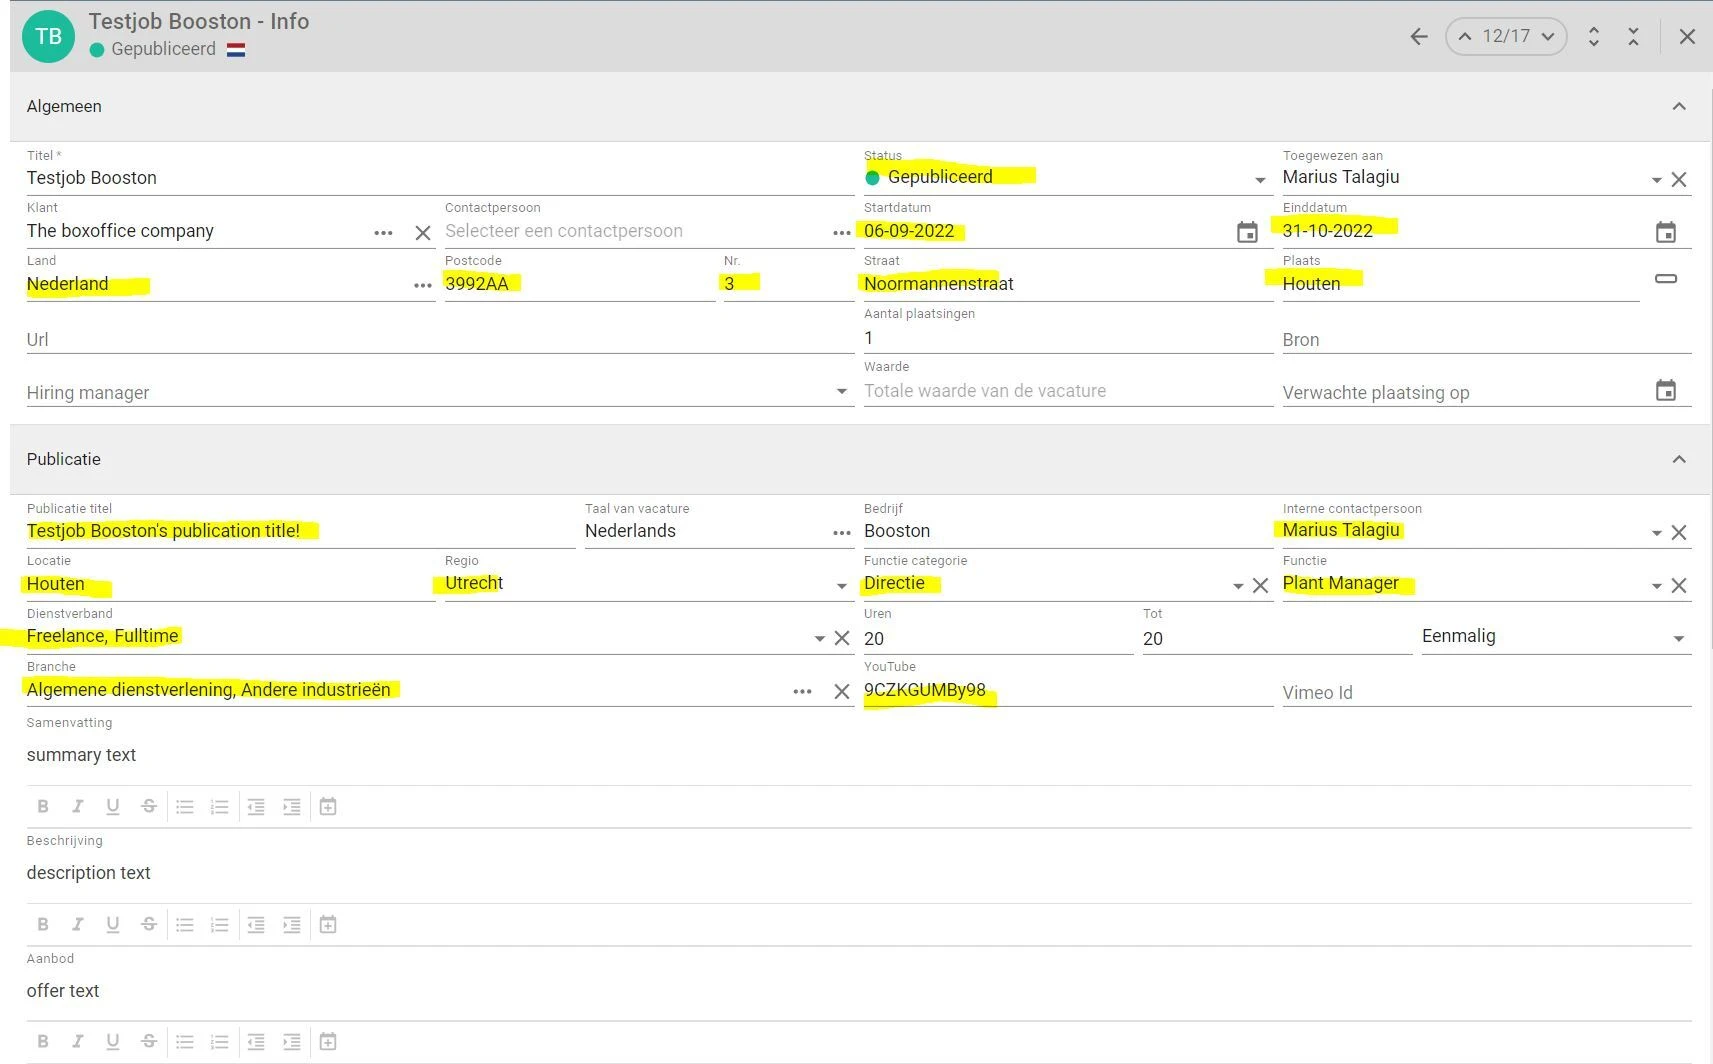
These are the fields that come across to Booston on publication: status, start and end date, address and town, publication title, the internal contact person as recruiter, location, region, job category, role, contract type, industry and the YouTube id.
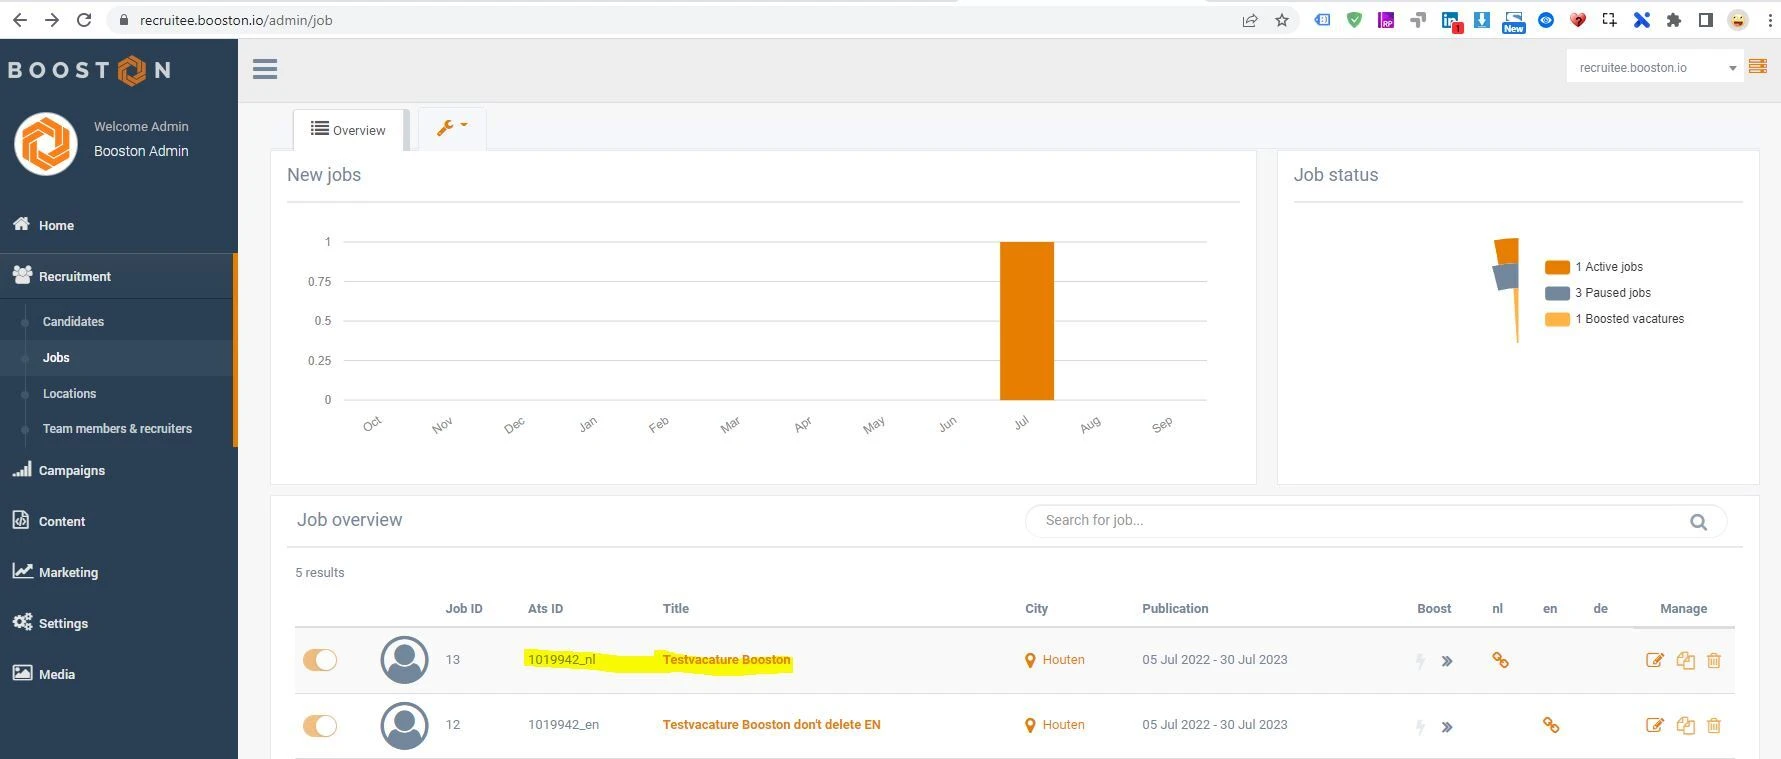
At the next synchronisation — or immediately through the webhook — the job is in Booston. Check it under Menu → Recruitment → Jobs. In the Ats ID column you will see a separate row per language, for example 1039942_nl and 1039942_en: those are the two language versions of the same ForceFlow job.
If you set the job in ForceFlow to anything other than published, or the end date passes, Booston takes it off your website. So there is nothing for you to clean up.
Receiving applications and sending them back
When someone applies to a job that is online through Booston — on your website, through a job board or through an ad on social media — this is what happens:
- Booston records the application with personal and contact details, CV and cover letter.
- Booston determines a match score from 1 to 5 stars, if you use the AI module.
- The candidate goes straight to ForceFlow, including CV, cover letter, source and the full UTM data of the campaign the application came from.
- Your recruiter carries on in ForceFlow. Status changes come back into Booston, so your reporting stays correct.
Because the UTM data travels along, you see in ForceFlow not only that someone applied but also through which campaign and which channel. That is exactly the information you need to decide where your budget is best spent — in the Jobboard network, for example.
If an export fails, because ForceFlow is temporarily unreachable for instance, the candidate stays in Booston and Booston tries again every hour, as long as Candidate export retry is on. So you never lose an application.
Syncing review scores and statuses
The connection keeps a candidate's review the same on both sides, on a scale of 1 to 5 stars.
- Import. If a recruiter gives a candidate three stars in ForceFlow, Booston takes that score over.
- Export. The score — or Booston's AI match score — goes along to ForceFlow with the candidate export.
This runs through the score candidate attribute. Switch Autopopulate by ATS on for it, and make sure Candidate review score and status import is on under the Functionality step.
A score a recruiter has given by hand is not simply overwritten, and the AI score and the ATS do not end up updating each other in a loop. How the AI match score is produced and what it costs is covered in Switching AI on, setting it up and tracking your costs.
Clicking through from ForceFlow to Booston
This is the newest addition to the connection: your recruiters no longer have to sign in separately. From a job in ForceFlow you click through to Booston and you are already signed in — in the right environment, on the right job.
What happens under the hood:
- ForceFlow requests a one-off sign-in link from Booston, with the name and e-mail address of the recruiter clicking.
- That link is usable once and valid for five minutes. Use it again after that and it no longer works.
- Booston opens the job you came from, straight on the Boost tab — where you switch on campaigns for job boards and social media. If you click through without a specific job, you land in the job overview.
Who gets in and who does not
The first time someone clicks through, Booston looks for a user matching that e-mail address. If there is none, Booston creates one automatically with the role Manager, and a password link goes out to that person so they can also sign in directly later on.
Whether that new user can work straight away depends on one setting: Auto-activate iFrame / SSO users, under Settings → Users & Permissions in the iFrame / SSO user activation card.
| Position | What happens with a new click-through user |
|---|---|
| On | The user is created as active and gets in straight away. |
| Off | The user is created as inactive and gets no access until you set them to active in the overview. |
You cannot flip that switch yourself; it is only visible to Booston. Mail support@booston.io with the position you want. Everything about roles, activation and what you can do with a user created through SSO is in Users: granting access, choosing roles and signing in through your ATS.
Changing the connection later
Once the connection is in place, the wizard disappears. Under Menu → Settings → Connect → Ats you then see You are connected with two expandable blocks below it: Main Settings and Ats Functions. Those are the same fields as in the wizard.
- Expand the block you want to change.
- Adjust the setting.
- Click Save.
If you want to stop the connection altogether, click Disconnect. The exchange stops; your jobs and candidates in Booston stay where they are.
What you cannot arrange yourself
- Auto-activate iFrame / SSO users — decides whether someone clicking through from ForceFlow has access straight away. Mail support@booston.io with the position you want.
- The mapping of a ForceFlow field to a Booston attribute — which ForceFlow fields go onto which attributes is fixed per ATS. If you need to deviate from it, mail support@booston.io.
- The setup of the click-through from ForceFlow — the technical arrangement between ForceFlow and Booston is something we arrange together with ForceFlow.
Troubleshooting
No jobs are coming in
First check in ForceFlow whether the job is set to Gepubliceerd, whether Booston.io is ticked and whether the date range is right. If that is all correct, check in Booston whether Job, job attribute and recruiter import is on and whether your API key is still valid.
The job is there, but texts or attributes are missing
Then the matching attribute is off, or Autopopulate by ATS is off. See Step 7: set up your job texts and Step 8: set up the other job attributes.
Only the Dutch version comes in
Multilingual is off, or the second language is not set up in your environment. See Step 3: fill in the Main settings.
Changes only come through much later
The webhook is not doing anything. Check in ForceFlow whether the webhook URL is correct and whether Test returns a Status 200, and check in Booston whether Activate webhooks and Job import are on.
An application is in Booston but not in ForceFlow
Check whether Candidate export is on. If it is, the export probably failed and is retried every hour as long as Candidate export retry is on. If it keeps going wrong, mail support@booston.io with the name of the candidate and the job.
A colleague cannot get in from ForceFlow
Look them up under Settings → Users & Permissions and check whether their Status is active. If not, switch it on.
Frequently asked questions
Does the ForceFlow API key cost extra?
No. The API key is part of your ForceFlow subscription.
Can I edit a job text in Booston without ForceFlow overwriting it?
Yes. Switch Autopopulate by ATS off for that attribute. Booston then leaves the field alone and you write it yourself.
What happens to a job I delete in ForceFlow?
It disappears from your website at the next synchronisation. Applications that already came in on it simply stay.
Does the connection also work without a webhook?
Yes. Without a webhook Booston fetches everything every ten minutes. You only give up speed, not functionality.
Can I connect several ForceFlow environments to one Booston environment?
No, one Booston environment connects to one ATS environment. If you work with several brands or branches, mail support@booston.io — we solve that with several environments.
Why is my job listed twice?
Those are the language versions. Look at the Ats ID column: if it shows the same number with _nl and _en after it, it is one ForceFlow job in two languages.
Coming soon
- The ATS step in the guided setup. New customers will soon go through one guided flow when setting up their environment, in which connecting your ATS is a fixed step. You will no longer have to work out for yourself in which order to set things up.
- Pre-filled settings for new ForceFlow customers. If you come in as a new customer through ForceFlow, the fixed ForceFlow settings will already be there. You only add your own details.
- Clicking through always lands on the Boost step. The click-through from ForceFlow will soon open the Boost tab of the job directly in every case.
As soon as this is live, we will update this article.
Need help?
Stuck during setup — on the API key, the webhook or the attribute settings? Mail support@booston.io or call 085 0044 215 and include:
- the name of your environment;
- what you want to achieve;
- the message you see, if there is an error message.
Would you rather go through the settings together? Book a free 30-minute online demo — then we will walk through it with you. Job Done!


