You are looking for the logo that was on last year's job page. Or the team photo a colleague uploaded at some point, except nobody remembers where. Meanwhile a campaign is ready to go and still needs an image. As long as files live on laptops and in mailboxes, every image costs time all over again — and the result on your website is as inconsistent as the file sizes.
Booston keeps every image, video and document of your environment in one library: the file browser, found in the menu under Media. Anything you upload there can be picked again anywhere in the dashboard — on a job, on a website page, in a Meta job ad or in an email template. And you never have to crop or shrink anything yourself: Booston creates the right, optimised version for each placement automatically.
The end goal: one library where your team finds the same material, where every image appears on your site sharp, small and correctly cropped, and where nobody accidentally deletes a file that is still live somewhere.
After this article you will know how to upload, what a focal point does, what happens to your image automatically, how to work in batches and — important once you give colleagues access — who sees which files and why. You will find the screen via Menu → Media.
Before you start
- You need the Media module. If it is off for your role, you will not see Media in the menu and you cannot upload, rename or delete anything. Picking an existing image inside another module keeps working.
- With the Manager role you always see the whole library. With the Recruiter role it depends on a single setting on the user account — see Who sees which files.
- The maximum file size, the allowed file types and the four fixed top-level folders are set platform-wide. What that means is in What you cannot set yourself.
How the library is organised
The file browser always shows one folder: folders first, files below, both sorted by name. At the top is the breadcrumb with a house icon, which takes you back up a level. The Back button does the same thing, one step at a time.
Every environment starts with four fixed top-level folders. You cannot rename or delete them — which is why the pencil and the bin are missing on those.
| Folder | What for | Examples of what belongs there |
|---|---|---|
| images | All images | logos, job images, page and blog images, portraits |
| videos | Video files | the video on a Meta job ad, an atmosphere film on a page |
| files | Documents | a PDF with terms of employment, a brochure |
| users | One personal folder per user account | files of a colleague who may only see their own folder |
Inside images there are standard subfolders that mirror the rest of the dashboard: blog, emails, facebook, features, identity, job_images, job_posting, locations, pages, recruiters and users. You are not obliged to use them, but it saves searching if everyone sticks to them: imagery for a website page in pages, portraits in recruiters, your logo and brand imagery in identity.
Files of 0 bytes are not shown. Those are almost always uploads that broke off halfway; they are unusable and would only get in the way.
Uploading an image
Uploading always happens in the folder you are currently in. So walk to the right folder first, then upload.
- Go to Menu → Media and open the folder where the file belongs.
- Click Upload at the top right, or click the card with the plus sign between the files.
- Drag one or more files into the area, or click it and pick them on your computer.
- Wait until the progress bar is full and click Back to see the updated folder.
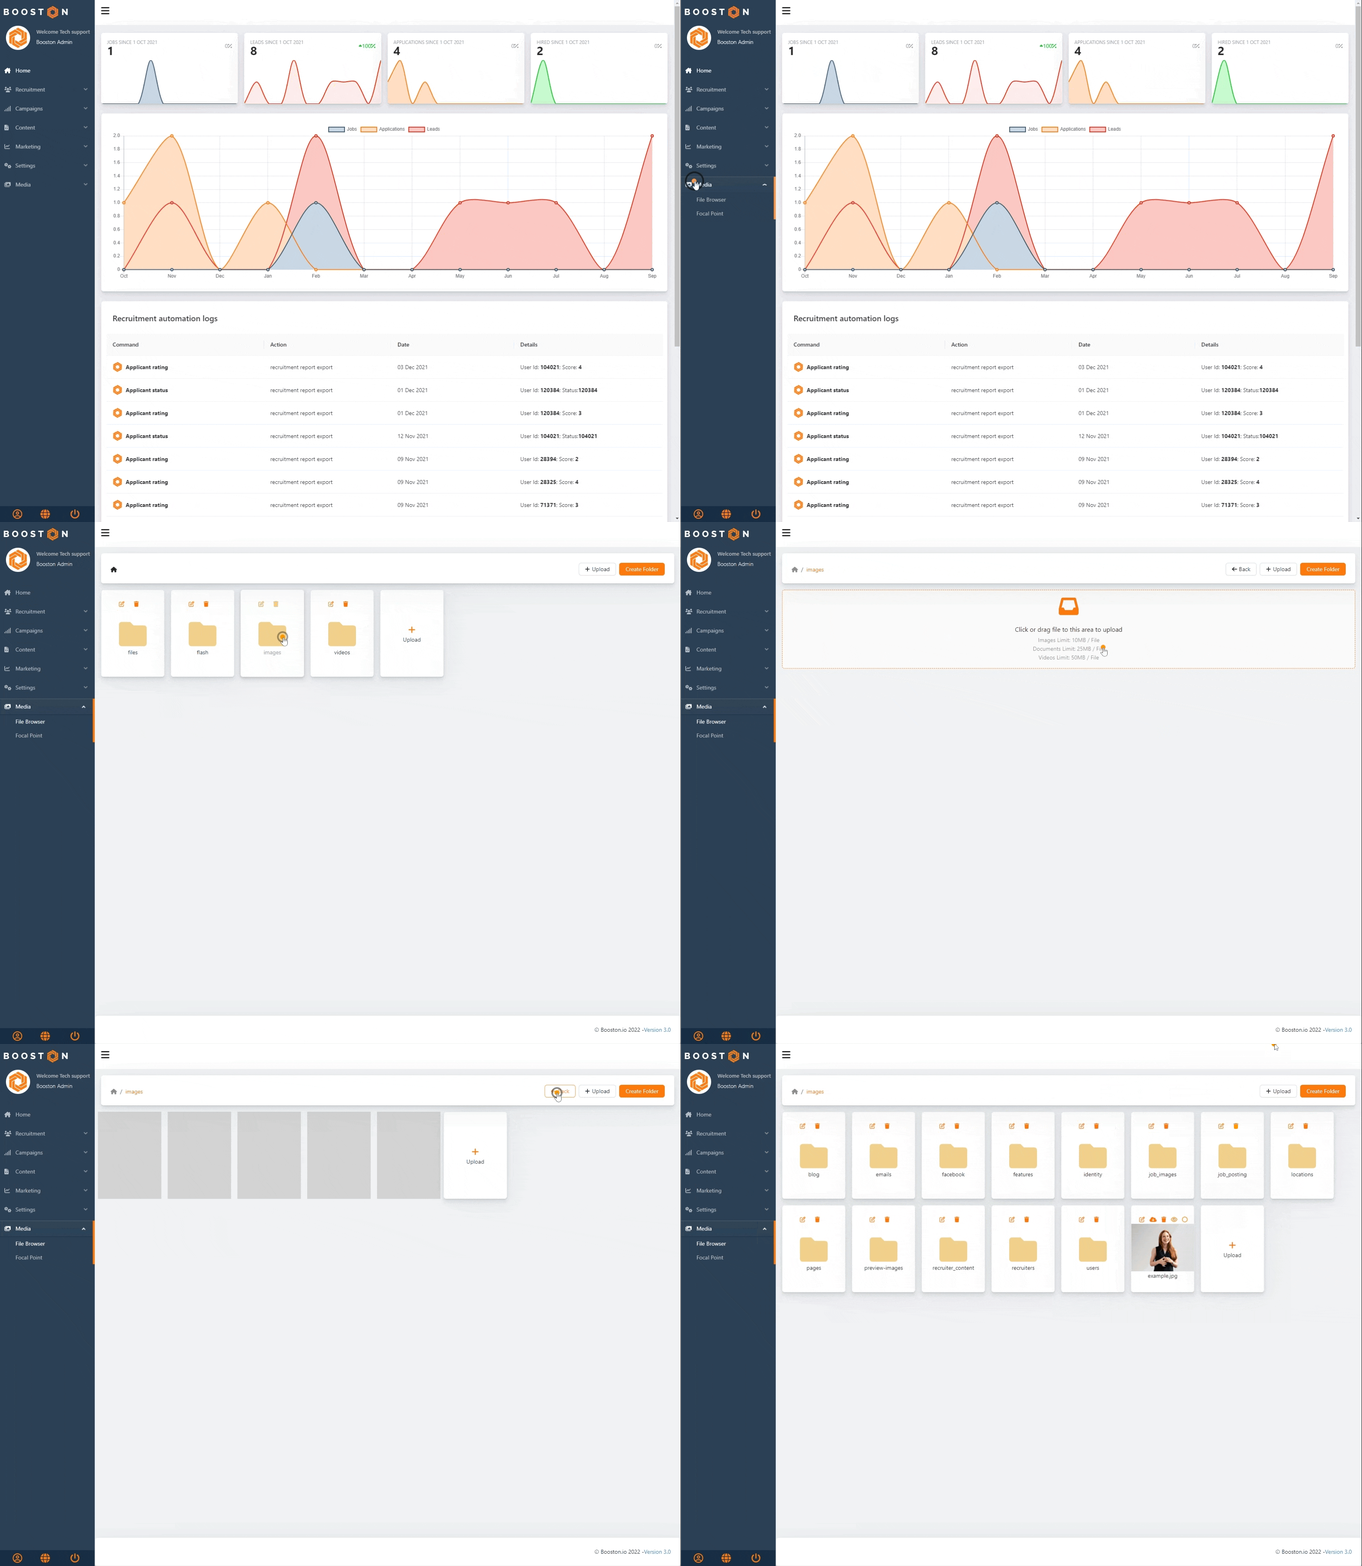
You can also skip this: everywhere in the dashboard where you pick an image, the same file browser opens and you can upload right there. See Picking an image for use.
Which files you can store
| Kind | Allowed extensions | Standard maximum |
|---|---|---|
| Image | jpg, jpeg, png, webp, svg, wbmp | 10 MB |
| Video and audio | mp4, webm, mkv, ogv, m4v, flv, gif, mp3, wav, ogg, m4a, mid | 50 MB |
| Document | pdf, doc, docx, xls, xlsx, ppt, pptx, odt, ods, odp | 25 MB |
On top of all this there is a hard limit of 50 MB per file. The uploader checks the size before anything is sent, so an oversized file costs you no waiting time.
What happens to the file name
Booston turns every file name into a clean, safe one: capitals become lower case, spaces and accents become hyphens, and odd characters disappear. So Photo Team Utrecht (final).JPG becomes photo-team-utrecht-final.JPG. The extension is left alone. The name may be at most 200 characters long.
Fixing your subject with a focal point
An image is rarely shown at the size you upload it. Booston automatically creates smaller, cropped versions for every placement: a small square in a list, a wide banner above a job, a portrait-shaped image in a page element. Cropping takes off the edges — and you do not want your colleague's head to be the part that disappears.
With the focal point you state once which point must always stay in view. From then on that applies to every format, everywhere.
- Hover over the image and click the circle Focal Point.
- In the window you see your image with previews at various sizes — that is what it looks like without a focal point.
- Drag the dot to the most important spot in the photo, for example a face or a logo. The previews move along immediately.
- Click Done.
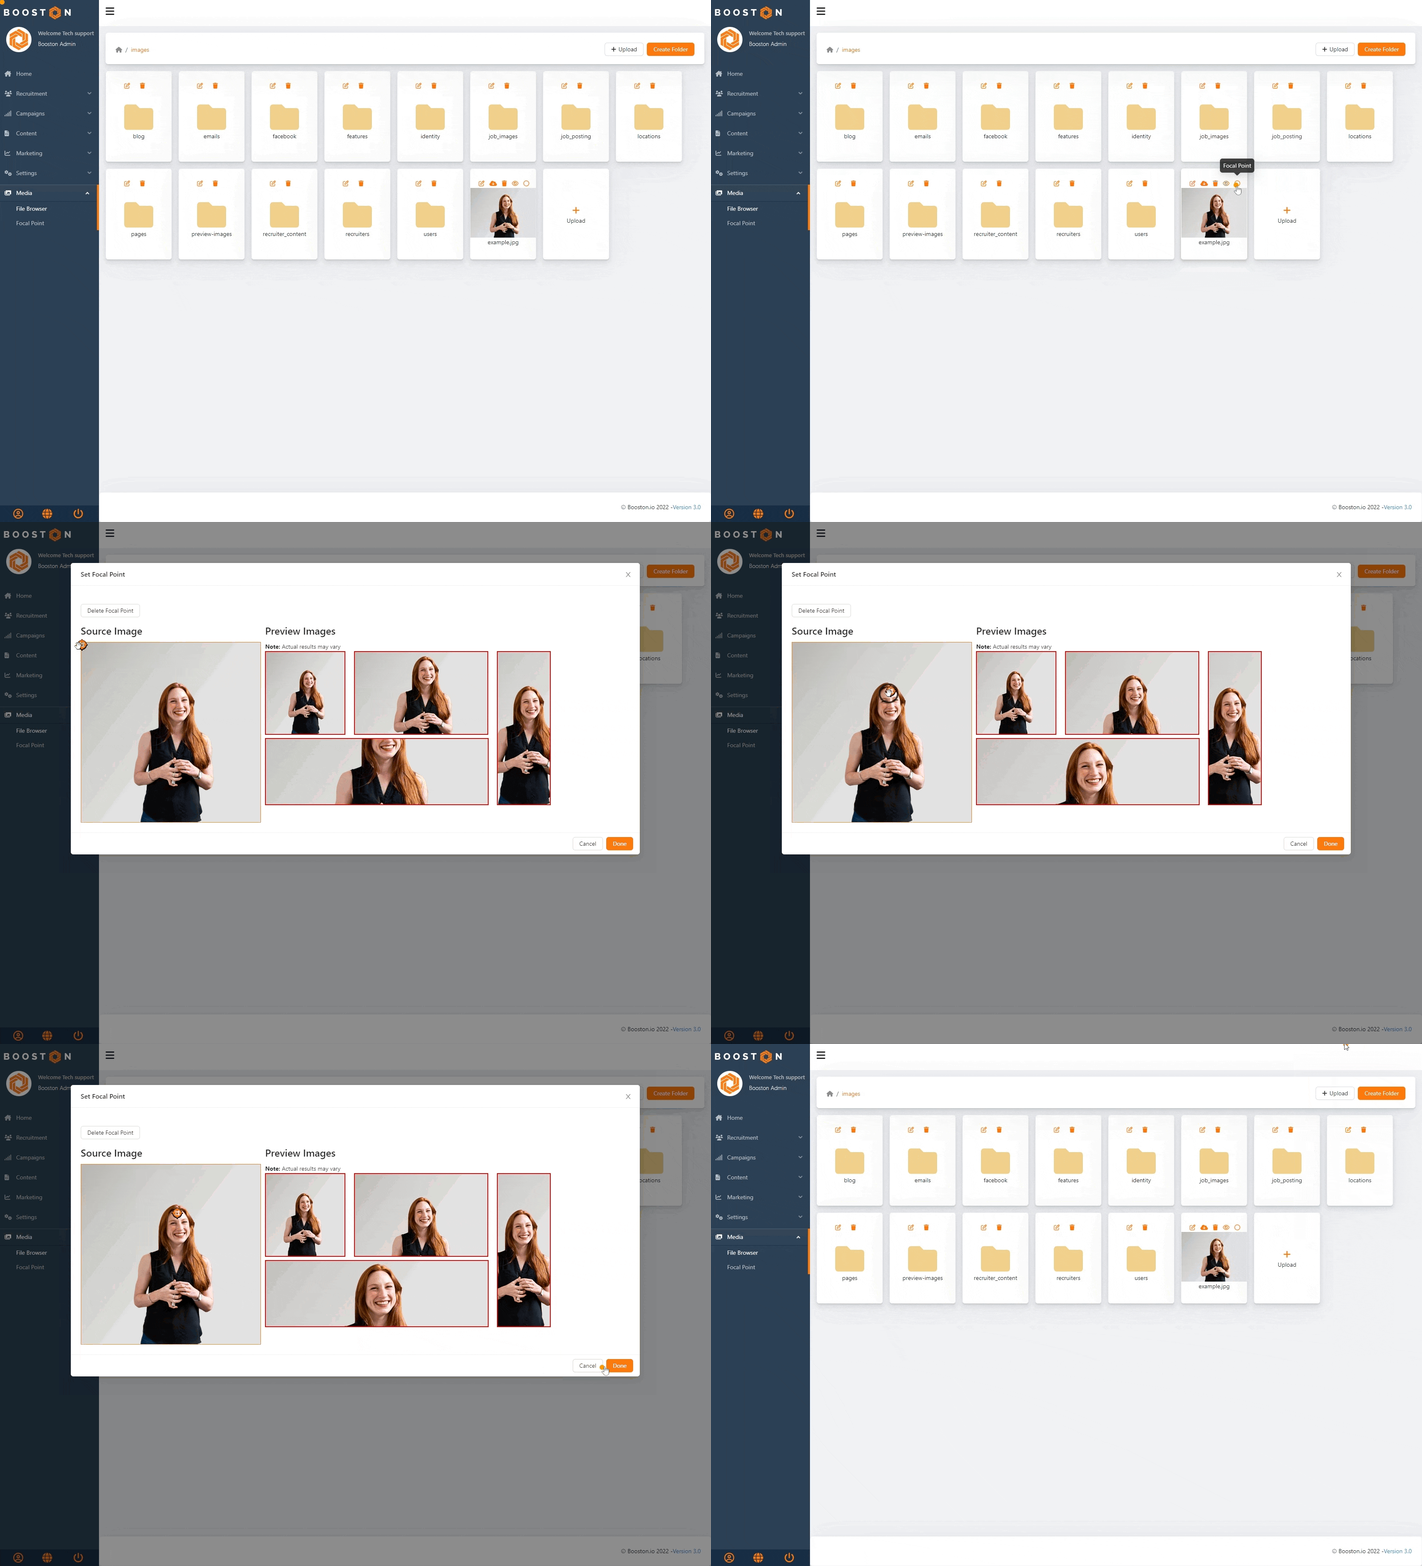
A filled target on the card means there is already a focal point. After saving, Booston discards the crops it made earlier and recreates them around the new point.
Delete the image and the focal point disappears with it. So there is nothing to clean up separately.
Picking an image for use
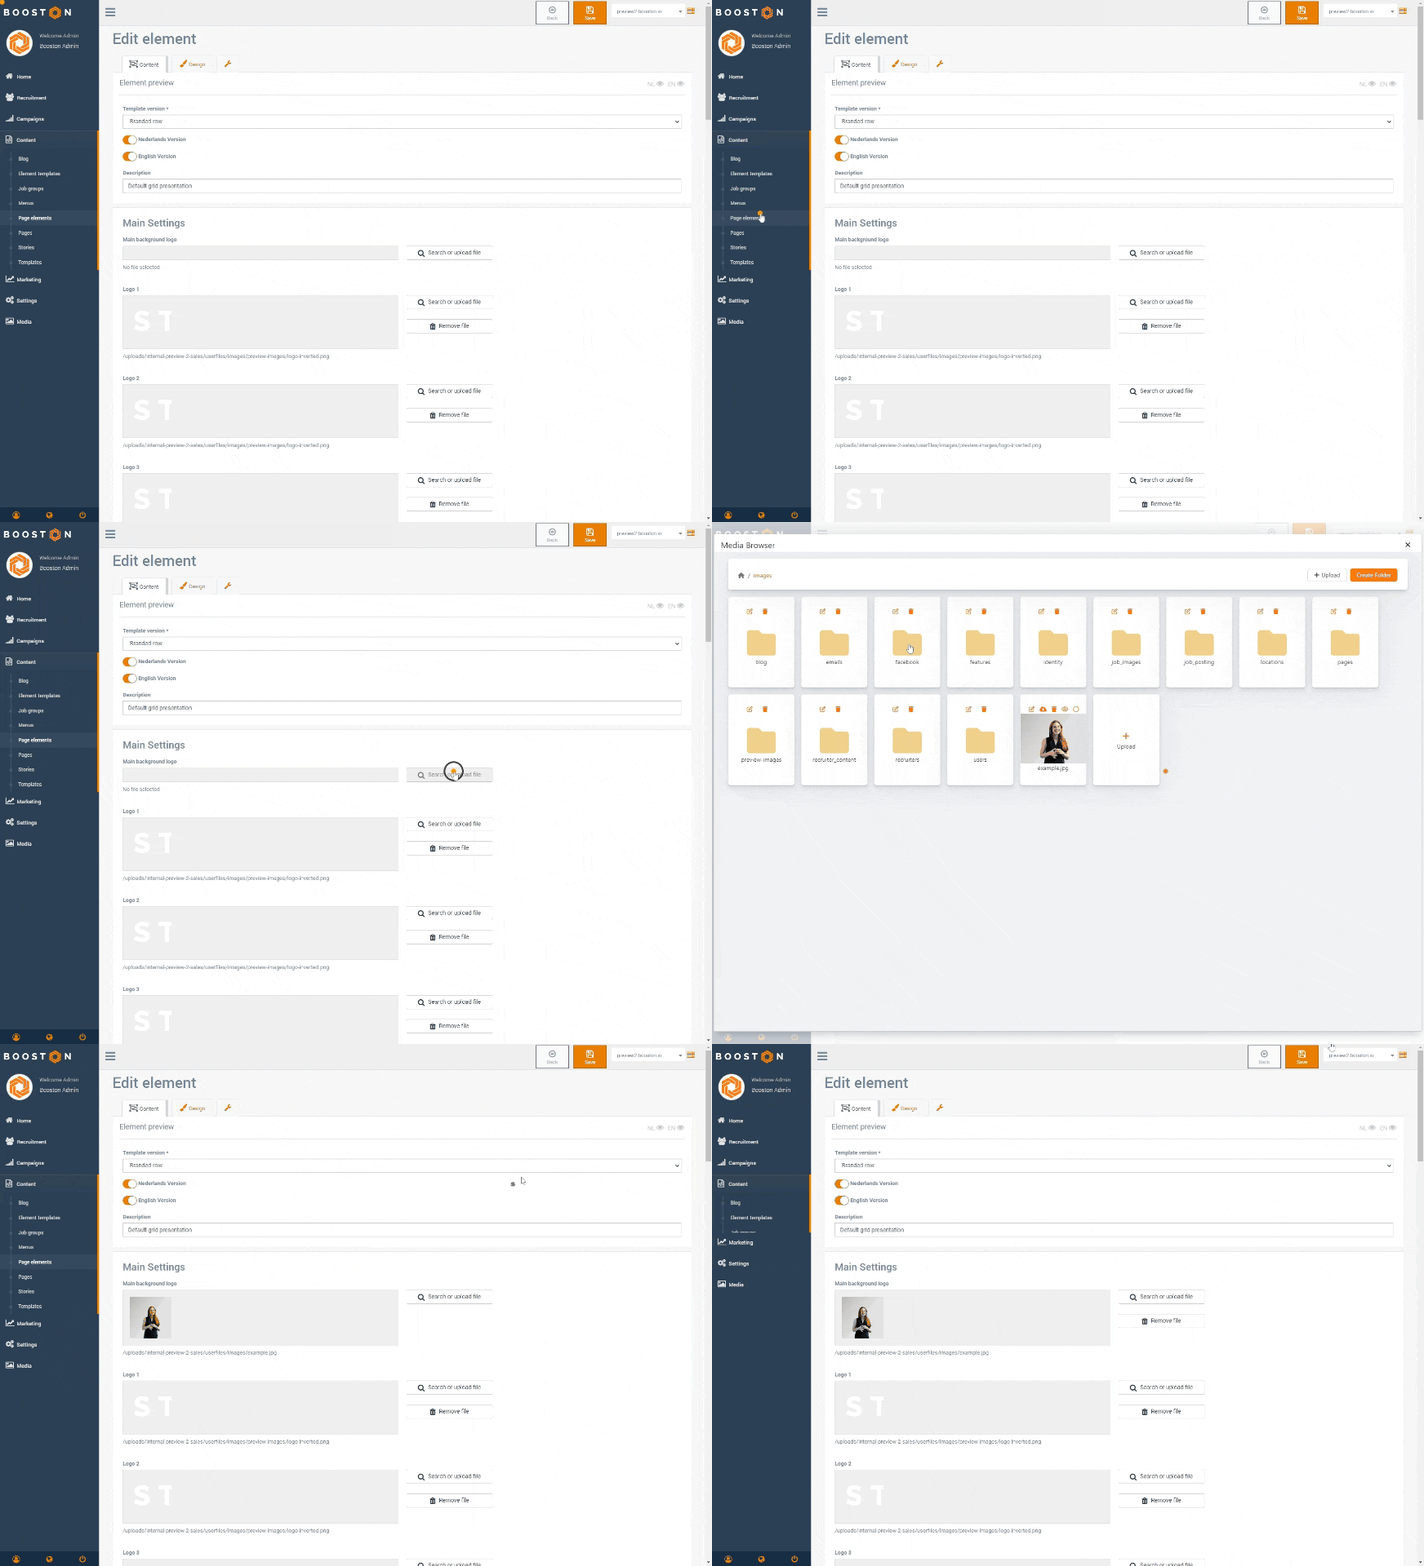
An image in the library does nothing yet. You link it to a placement: a page element on your website, a job, an advert, a team member. It works the same way everywhere — a window opens with the same folders, the same upload button and the same actions.
- Go to the screen where the image should appear, for example a page element on your website.
- At the image field, click the button to find or upload a file.
- Walk to the right folder, click the image and pick it through the eye Preview or by clicking it.
- Save the screen with Save.
What Booston does with your image automatically
As soon as an image is used somewhere, Booston creates a version of it that fits that exact placement. This happens without you doing anything.
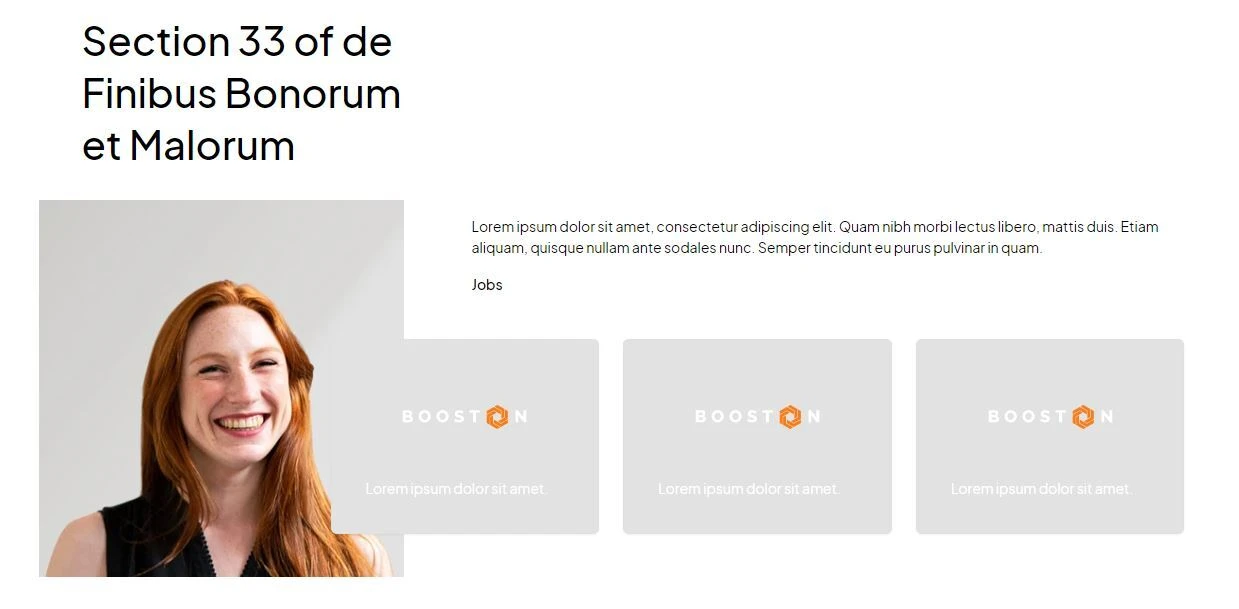
- Cropping around the focal point. Unused parts come off, and what remains is centred on the point you picked. Put the same image somewhere else in a portrait-shaped frame and it is cropped differently — each placement gets its own version.
- Resizing to the size needed. An image shown at 348 × 377 pixels is prepared at exactly that size, while the original was, say, 1200 × 1200.
- Converting to webP. That format gives a much smaller file with no visible loss of quality.
- Lazy loading. Images are only loaded once they come into view, so the page opens faster.
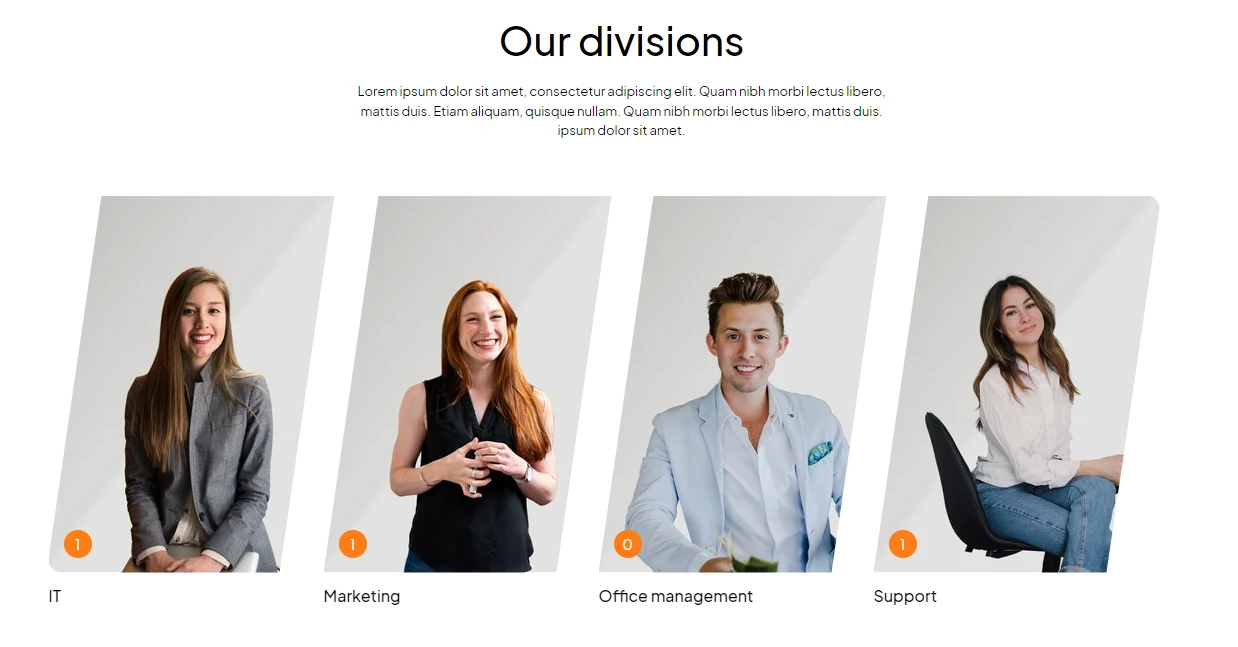
Together that makes an enormous difference. In the example above a file of roughly 2 MB came down to about 12 kB — a reduction of around 97%. For mobile, even smaller variants are prepared. You notice it in loading time, in the experience of candidates on a slow connection, and in how well you rank in Google.
Adjusting the quality or switching optimisation off
If you already supply perfectly optimised images yourself, you can switch the automatic optimisation off. Under Settings → General you will find the Images block with the quality setting. Set it to off and Booston leaves your files untouched and shows them exactly as you uploaded them.
Pro tip: working in batches
Do you have a series from a photo shoot or a new set of job images? Then setting the focal points one after another is the fastest route.
- Upload all the images into the same folder in one go.
- On the first image click Focal Point, drag the dot and click Done.
- Move straight on to the next image and repeat.
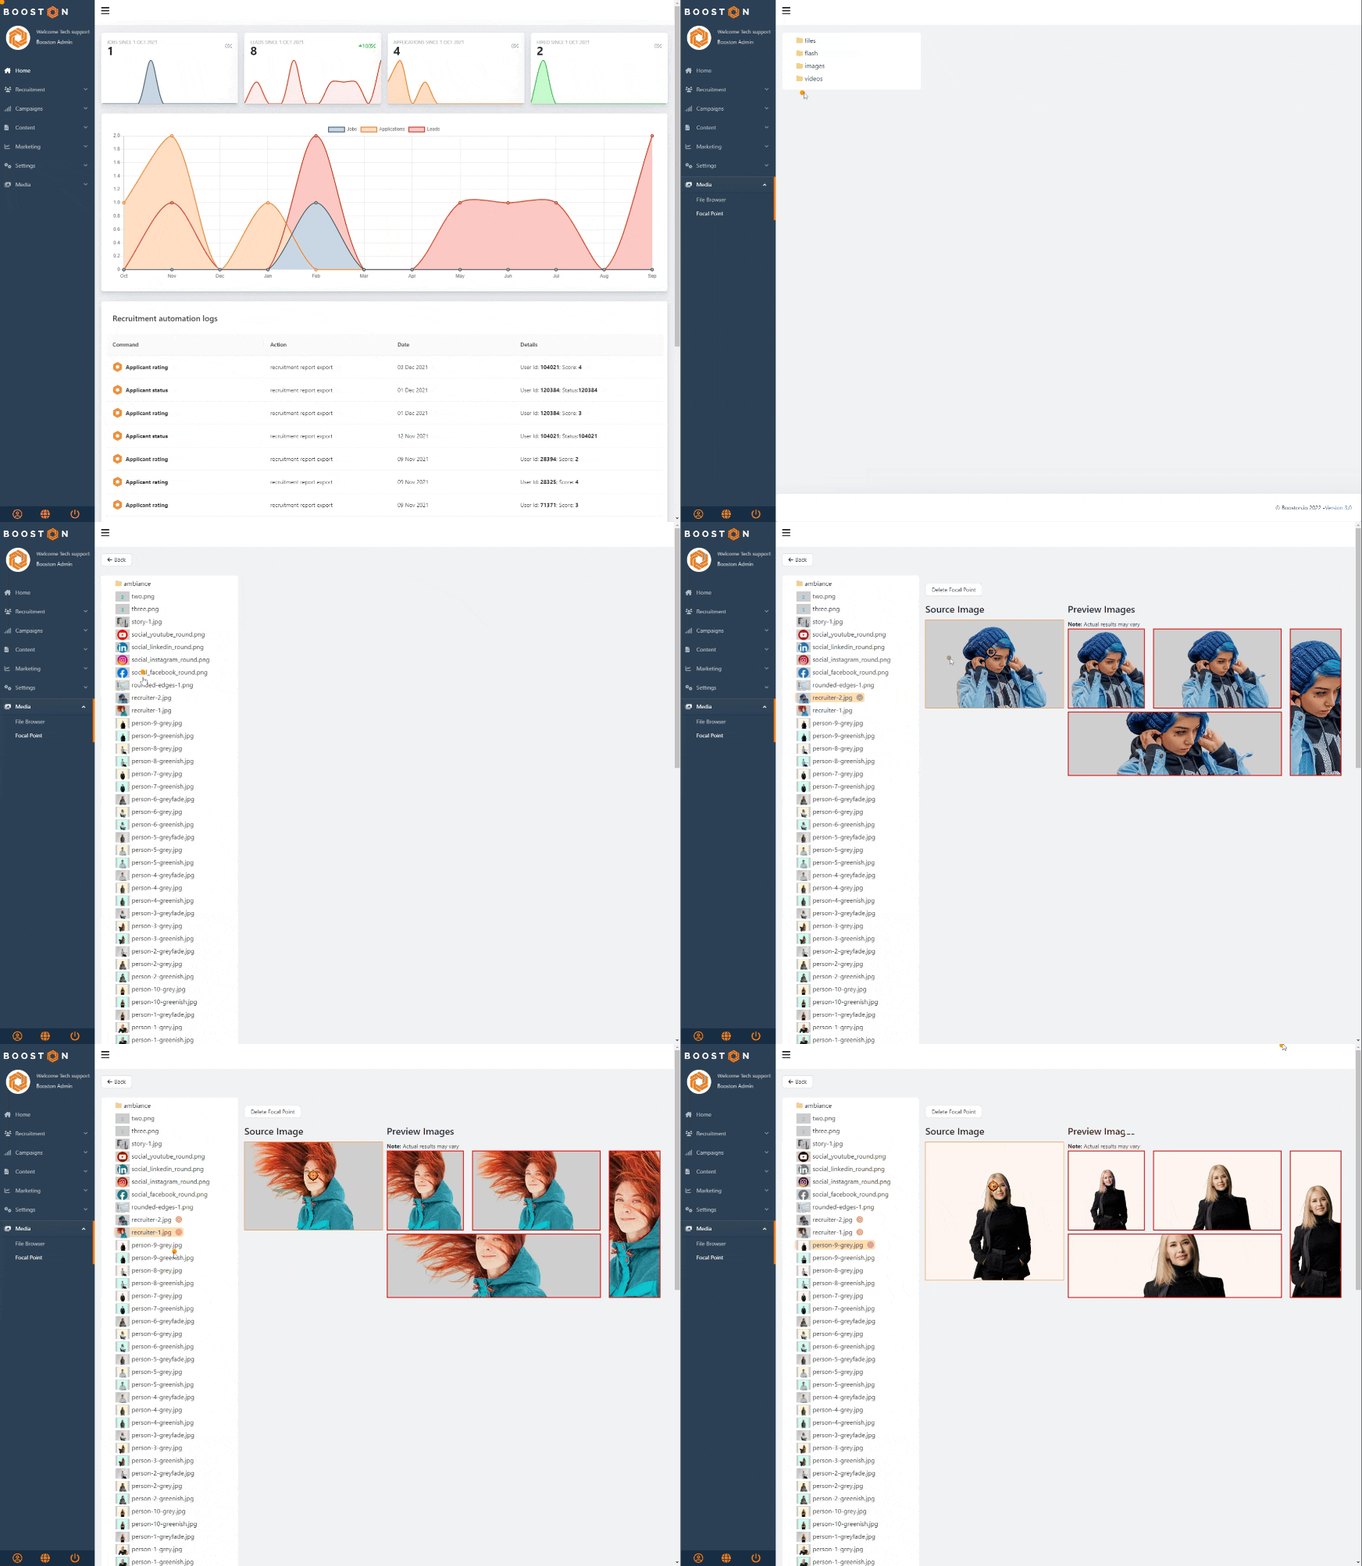
That way your whole folder is set in a few minutes. Add an image to a campaign or page afterwards and there is nothing left to do: it is already configured.
Working with folders and files
Hover over a card and the actions appear at the top. Which ones you see depends on the type: a folder has no preview or focal point button, a document has no focal point.
| Icon | Action | What it does |
|---|---|---|
| Pencil | Rename | Renames the folder or the file. |
| Cloud | Download | Downloads the file to your computer. |
| Bin | Delete | Deletes the folder or the file permanently. |
| Eye | Preview | Shows the image large, with the button to pick it. |
| Circle or target | Focal Point | Sets the focal point of an image. Filled means there already is one. |
Creating or renaming a folder
- Go to the folder where the new folder should live.
- Click Create Folder at the top right.
- Fill in a name at Folder Name — letters, digits, spaces, full stop, hyphen and underscore are allowed.
- Click OK.
Renaming goes through the pencil on the card and follows the same rules.
Renaming a file
When renaming you only change the name; the extension is fixed. Turning a .png into a .jpg is therefore not possible — convert the file on your own computer and upload it again. Here too Booston turns it into a clean name.
Deleting something
Deleting is permanent: there is no bin to restore anything from. With a folder, everything inside disappears as well.
Replacing an image
Upload a file with a name that already exists in the same folder and you overwrite the old file. The crops made earlier stay in the cache, which means you temporarily see the old image on the website. Two ways to solve that:
- Give the new version a new name and pick it in the place where the image is shown. This is the preferred route.
- Or empty the cache: Settings → General → Images → Delete images cache. All the resized versions are then recreated.
Who sees which files
This chapter is the heart of it once you give colleagues access. Two things together decide what someone can do in the file browser: the Media module in the rights of their role, and one switch on their user account.
The Media module in the roles
Under Settings → Users & Permissions you will find Roles & Permissions at the top. There you set the Media module to visible and active per role.
- Media on — the colleague sees Media in the menu and can upload, create folders, rename, delete and set focal points.
- Media off — no Media in the menu and no management actions. Picking an existing image from another screen, for example on a job or a page, does keep working: those pickers only fetch what is already there. That way someone who does not manage the library can still do their job.
The personal folder of a user
The moment you create a user under Settings → Users & Permissions, Booston creates a folder for that person under users, with a name derived from the name you entered. Sanne de Vries therefore becomes users/sanne-de-vries.
Three things to know about that folder:
- The name is fixed at creation. Change the user's name later and the folder name stays as it was. That is deliberate: paths to files that are already on your website must not change on their own.
- As long as the user exists, you cannot rename or delete their folder. Booston reports that the user is still in the system. Delete the user first, then the folder.
- Delete a user and their files stay. So nothing breaks on your website. You clean up the folder by hand afterwards, once you are sure nothing from it is still in use.
The switch on the user account
On a user with the Recruiter role, the edit screen has the switch Show content entities not created by this user such as pages or files & images. It decides whether the colleague sees the whole library or only their own folder.
| Role and setting | What the colleague sees in the file browser |
|---|---|
| Manager | The complete library, all folders. The switch is not there and does not apply. |
| Recruiter, switch on | The complete library, just like a Manager. |
| Recruiter, switch off | Only their own folder users/<name>. That folder is both the starting point and the highest level: the breadcrumb goes no higher and uploads land there automatically. |
When do you switch it off?
Off makes sense in large teams where recruiters mainly use their own material and the shared brand folders must stay untouched. If you work with a small team that builds the website and campaigns together, leave it on — otherwise a colleague cannot even pick the shared logo.
Where else you meet the file browser
The file browser is rarely your destination: usually you open it from another screen to pick an image there. Whatever you upload in that window simply lands in the library.
| Module | Where in the dashboard | What comes from the library |
|---|---|---|
| Website — pages and blog | Content pages, blog posts, the text editor | Images in page elements and in body text. Belongs in images/pages and images/blog |
| Website — brand | Design settings | Logo, icon and the default header image. Belongs in images/identity |
| Website — locations | Locations | The image on a location, in images/locations |
| Website — team members | Recruiters | Portrait and extra images or video on a team member, in images/recruiters |
| Jobs | Job → image on the job | The job image. Pick nothing and Booston falls back on the image of an attribute value, and after that on the default header image |
| Attributes | Settings → Attributes | An image per attribute value, for example one per field of work or location |
| Meta job ads | Content of an advert and per carousel card | Both the image and the video of the advert, usually from images/facebook |
| Jobboard network | Settings of a campaign | The campaign logo |
| Job feed | Settings of a feed campaign | The campaign image |
| Users | Settings → Users & Permissions | The portrait photo on a user account |
| Email templates | Settings → Email templates | Images in the email body, usually from images/emails |
Two things that often get mixed up here:
- *CVs and motivation letters of candidates are not in the file browser.* They belong to the candidate and are only visible in the candidate record. That is deliberate: the library is meant for material that may be shown publicly, application documents are not.
- An image you pick in a module is not copied. The module refers to the same file in the library. Replace that file and it changes everywhere — and delete it and Booston blocks that for as long as a reference to it exists.
What you cannot set yourself
- The maximum file size and the allowed file types. These are set platform-wide. If you structurally need larger files, let us know through the helpdesk.
- The four top-level folders images, videos, files and users. They are part of how your environment is set up and cannot be renamed or deleted.
- Restoring deleted files. There is no bin. If you are not sure whether something is still in use, download it first.
- Moving files between folders. Dragging between folders is not possible. Download the file, upload it into the right folder and then update the place where it is used.
- Seeing which images are no longer used anywhere. That overview does not exist yet. You do know the reverse for certain: anything you can delete without a message is no longer attached to anything.
Solving problems
Cannot delete "…". Media item is in use / Cannot rename "…". Media item is in use
The file is still attached to a job, page, team member, location, advert, email template, campaign or attribute value. Find that spot and pick a different image there or clear the field. After that, deleting works. If you cannot find where the image is still attached, email the path from the breadcrumb plus the file name to the helpdesk.
Path not allowed
Your account may only work in its own folder, or you opened a link to a folder outside your environment. Go back to Menu → Media and start at the house icon. If the problem persists, have a Manager check the switch Show content entities not created by this user such as pages or files & images on your account.
Invalid type
The extension is not in the list of allowed file types. Save the file on your computer as one of the allowed formats and try again.
File must smaller than 10MB! (or 25MB / 50MB)
The file is too large for its kind. Shrink a photo before uploading: 1600 pixels wide is more than enough for virtually every placement on your website.
Filename too long
The file name is longer than 200 characters. Rename the file on your computer and upload it again.
I replaced an image but the website still shows the old one
You uploaded under the same name, so the crops made earlier still come from the cache. Upload the new version under a new name, or empty the cache via Settings → General → Images → Delete images cache.
My gif is not in the picker
A gif counts as a video. Pick it in a place that asks for a video, or use an mp4 or jpg where an image is asked for.
A file I just uploaded is not there
The upload broke off halfway; Booston hides such empty files. Try again and wait until the progress bar is completely full.
I cannot rename or delete a folder
It is one of the four fixed top-level folders, or it is the personal folder of a user who still exists. In the latter case, delete the user first under Settings → Users & Permissions.
Frequently asked questions
Which file formats are best?
jpg and png are optimal: they are cropped, resized and converted to webP automatically. svg and gif can be uploaded and used, but they are not optimised automatically. Use svg mainly for logos and icons.
Which dimensions should I use?
Supply the highest resolution you can and stay under 10 MB. Booston works out the right size per placement itself. Do set a focal point, so your subject stays in view in every crop.
Can I upload several files at once?
Yes. Drag them into the upload area together or select them all at once on your computer. They all land in the folder you are currently in.
Why does my file name look different from the one on my computer?
Booston turns every name into a web-safe variant without capitals, spaces and accents. That prevents broken links on your website.
Does the library count towards the storage of my environment?
Yes. So clean up old campaign imagery periodically — but only once you are sure it is no longer attached to anything.
Coming soon
- One image picker, the same everywhere. We are replacing the various image pickers in the dashboard with a single component that looks and works the same in every place, with tabs for your own choice, the image of the attribute value and the default image.
- Imagery that stays linked instead of pinned. Instead of a fixed reference per field, you will choose where the image should come from. Change the default image or the image on an attribute value later and everything referring to it follows automatically.
- A media step in the guided setup. New environments get their logo, icon, main image and team photo ready in one step, with the same picker and straight into the right folder.
As soon as these parts are live, we will update this article.
Need help?
Cannot work it out, or unsure which setting fits your situation? Email support@booston.io or call 085 0044 215 and mention:
- the name of your environment;
- what you want to achieve;
- the message you see, if there is an error message.
Would you rather walk through the settings together? Book a free 30-minute online demo — then we will go through it together. Job Done!


