Carerix ATS integration with Booston
In this article, we take a closer look at connecting Carerix with Booston through the current GraphQL v2 integration. We explain what the integration does, how to configure the connection, how to publish jobs, and how candidates and review scores are sent back.
Important: Carerix has moved from the old REST/XML API to the new GraphQL API (v2). This guide describes the current setup. The old REST integration has been phased out and is shown in Booston as “Carerix (Deprecated)”. Existing customers using the old integration will continue to work, but new integrations must always be set up through GraphQL.
Contents
- Features and specifications
- How does the integration work?
- Step 1: Obtain access in Carerix
- Step 2: Configure the integration in Booston
- Step 3: Configure publication texts
- Step 4: Configure other job attributes
- Publish jobs and receive candidates
- Synchronize review scores
- Optional: custom fields in Carerix
- Need help?
Features and specifications
Connection features
- Import jobs, job attributes and recruiters from Carerix
- Export applicants and application files to Carerix
- Import candidate statuses
- Synchronize review scores and Booston AI match scores
- Send the job URL back to Carerix
Job update frequency
- Updates are processed within a maximum of 10 minutes
- Synchronization runs periodically through polling/cron
- Carerix does not use webhooks
- Support for unlimited multilingual jobs
Mapping of job attributes
The Carerix GraphQL v2 integration supports standard mappings for jobs, job attributes, recruiters, candidates, candidate statuses and review scores. Deviating or customer-specific values can be connected through custom mappings. This requires a custom setup by the Booston development team. Additional costs may apply.
No costs for API usage
There are no additional costs for using the Carerix API. For the current GraphQL v2 integration, you create an OAuth2 client in Carerix.
Create an OAuth2 client
For the integration, you need a Client ID, Client Secret, ATS Base URL and ATS Customer. You retrieve these details through the Carerix admin panel and the OpenID Configuration.
How does the integration work?
The integration automatically exchanges jobs and candidates between Carerix and Booston:
- Create jobs: you create a job and publish it in Carerix.
- Import into Booston: the job is forwarded to Booston.
- Website and campaigns: Booston places the job on your website and can start campaigns on job boards and social media.
- Feedback: applications received through these channels are sent back to Carerix through Booston.
Step 1: Obtain access in Carerix
For the integration, you create an OAuth2 client in Carerix and retrieve two connection details.
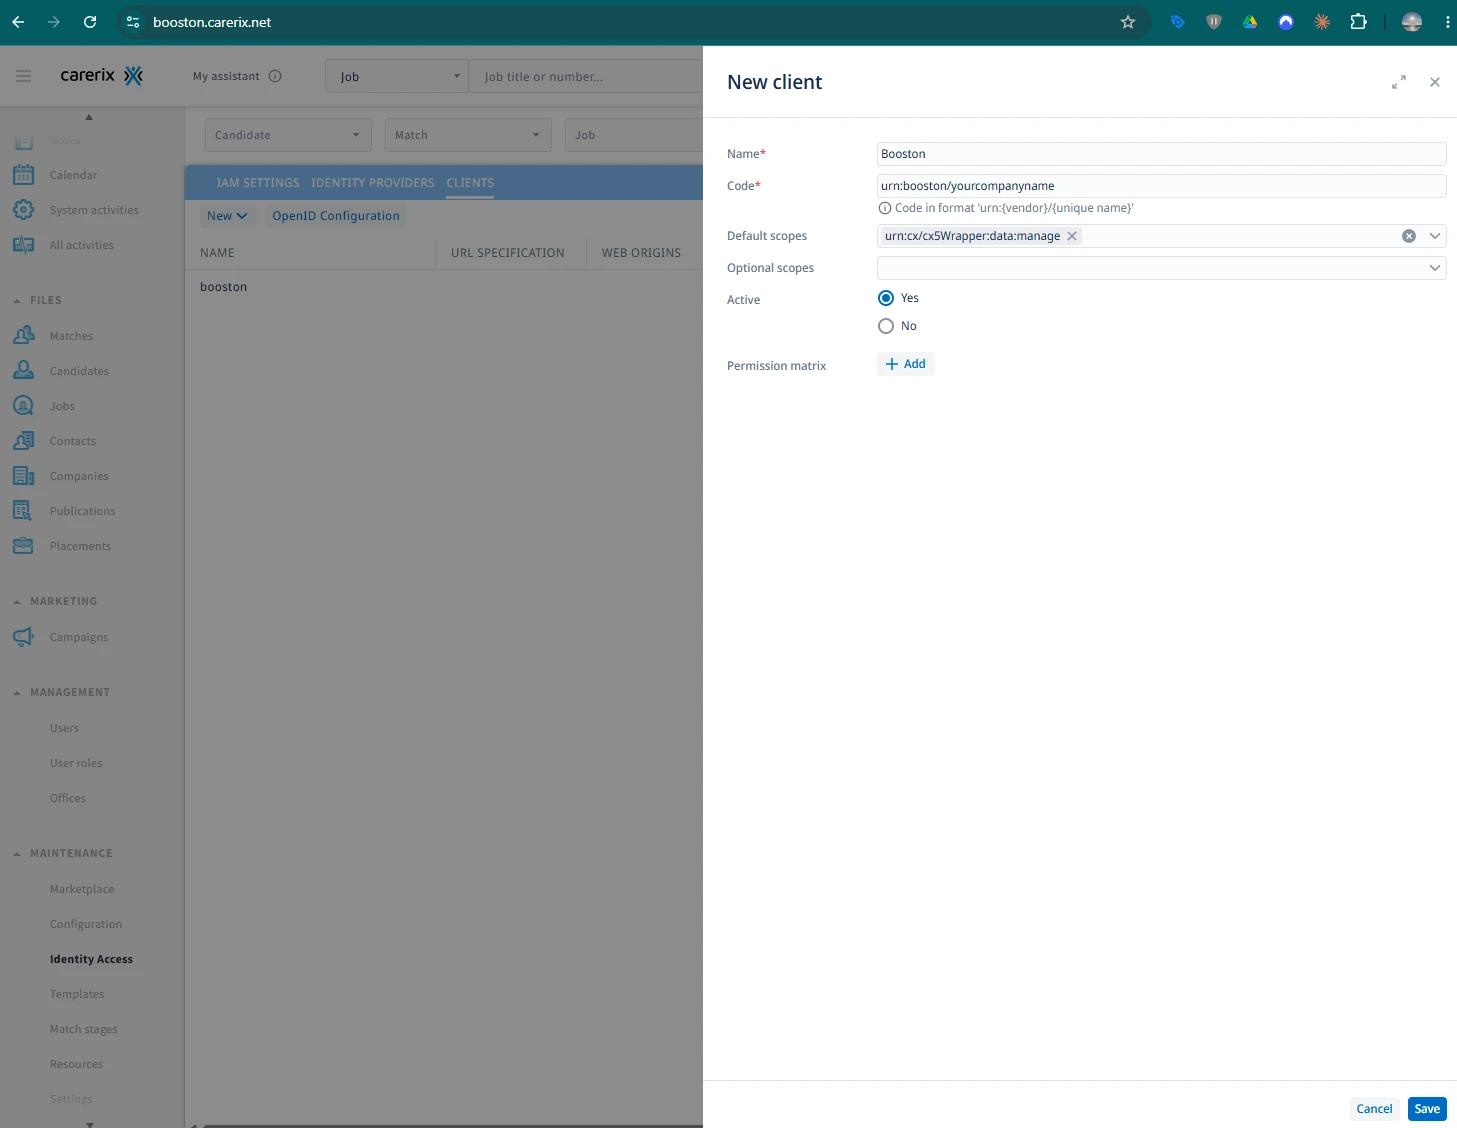
A) Create an OAuth2 client
- Open the Carerix admin panel.
- Go to Maintenance > Identity & Access.
- Create a new Confidential client.
- Give the client a name, for example “Booston”.
- Set the URN according to the required format.
- Enter the following value under Scope:
urn:cx/cx5Wrapper:data:manage
- Generate the client. Carerix will now provide you with a Client ID and Client Secret. Save these details, as you will need them in step 2.
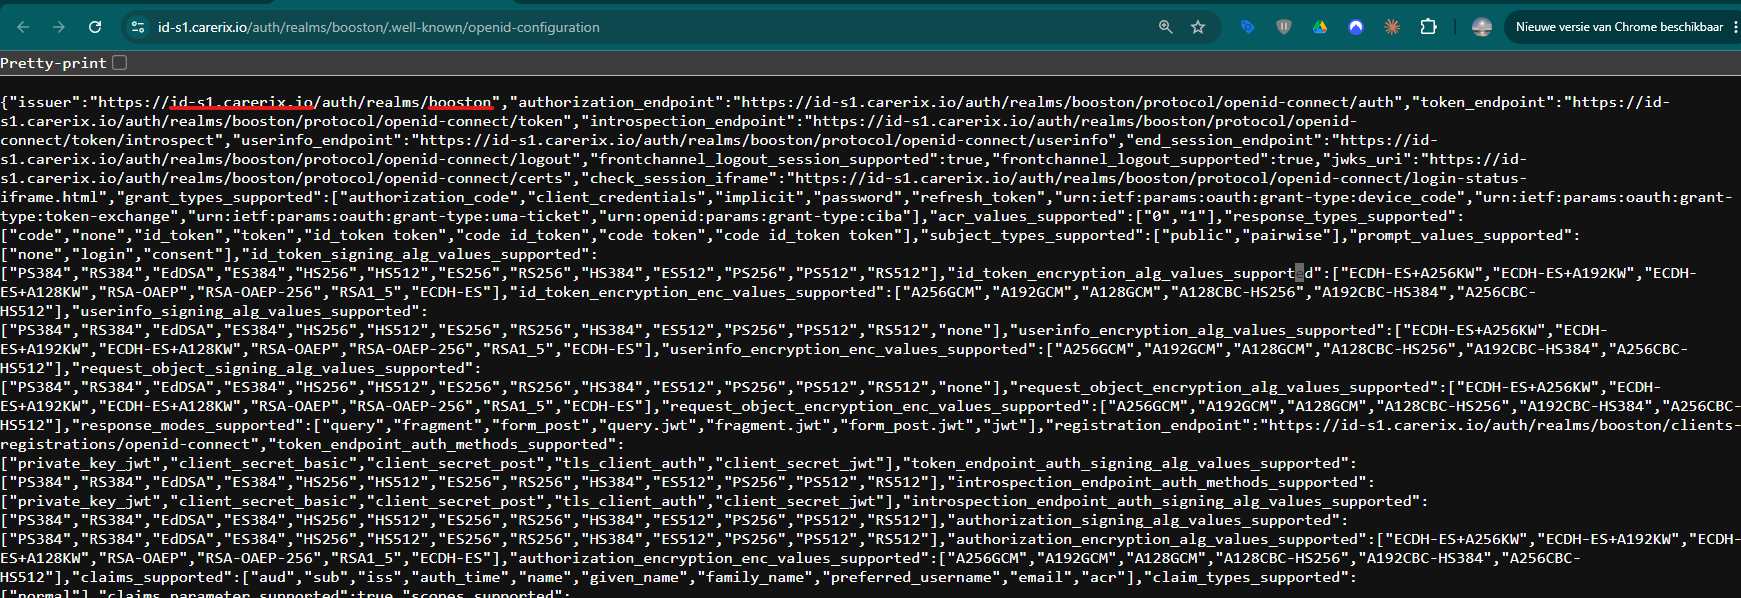
B) Connection details from the OpenID Configuration
After creating the client, click the OpenID Configuration link. A page in JSON format opens. The first value contains a key called issuer, for example:
"issuer": "https://id-s1.carerix.io/auth/realms/booston"
Extract two values from this:
- ATS Base URL: the host part, without
https://. For example:id-s1.carerix.io - ATS Customer: the last part of the path, after
/realms/. For example:booston
Step 2: Configure the integration in Booston
In Booston, go to Settings > Connect > Ats and choose Carerix. You will go through a five-step wizard:
- Select ATS
- Main settings
- Functionality
- Custom mappings
- Activation
Fill in main settings
| Field | Value |
| Username | Client ID from step 1 |
| Password | Client Secret from step 1 |
| ATS URL | https://api.carerix.com |
| ATS Base URL | For example id-s1.carerix.io |
| ATS Customer | For example booston |
| ATS Fields | The OAuth2 scope from step 1 |
| Qualifier | Publication filter, see explanation below |
| Multilingual | Enable this if you have publications in multiple languages |
Configure the qualifier
The Qualifier determines which publications from Carerix are imported into Booston. The mediumID refers to the channel in Carerix. In a standard Carerix installation, medium 1 is often the company website and is the correct choice in many cases.
Example:
publicationStart <= '%actual_date%'
AND (toMedium.mediumID = 1)
AND (publicationEnd >= '%actual_date%' OR publicationEnd = nil)
AND deleted = 0
Note: which mediumID is correct for your setup may differ per Carerix environment. An incorrectly configured qualifier is a common cause of import issues. Unsure? Contact us at support@booston.io.
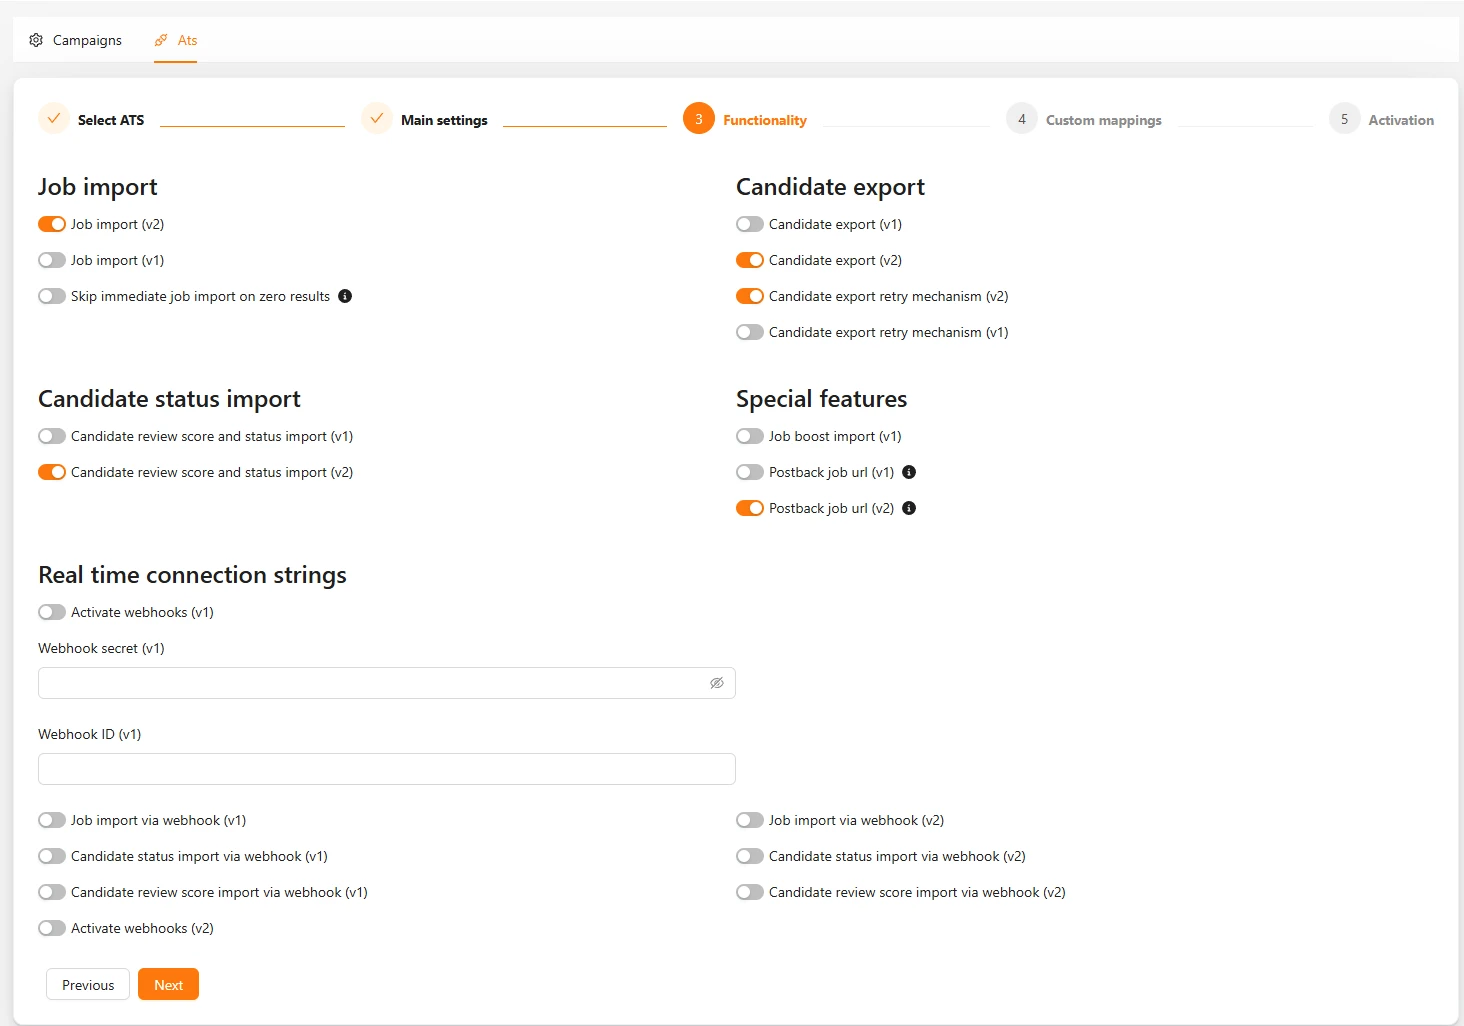
Configure the Functionality step
In the Functionality step of the wizard, you enable the required data flows. The options below determine what is exchanged between Carerix and Booston:
| Option | Available for Carerix |
| Job, job attribute and recruiter import | Yes |
| Skip job import on zero results | Yes |
| Candidate export | Yes |
| Candidate export retry | Yes |
| Candidate review score and status import | Yes |
| Postback job URL export | Yes |
| Job boost import | Legacy v1 |
Custom mappings and Activation
In the Custom mappings step, you connect deviating or customer-specific values. This requires a custom setup by the Booston development team. Additional costs may apply.
In the final wizard step, Activation, you will find the option Apply default attribute settings for this ATS. Preferably enable this option. This immediately activates all standard attribute settings for Carerix, labels them correctly and prepares them completely. After that, you can still adjust individual attributes as needed.
Finish with Save or Connect. The first synchronization will then start automatically.
Step 3: Configure publication texts
Go to Settings > Attributes. Configure the job text as desired in the title and description attributes section.
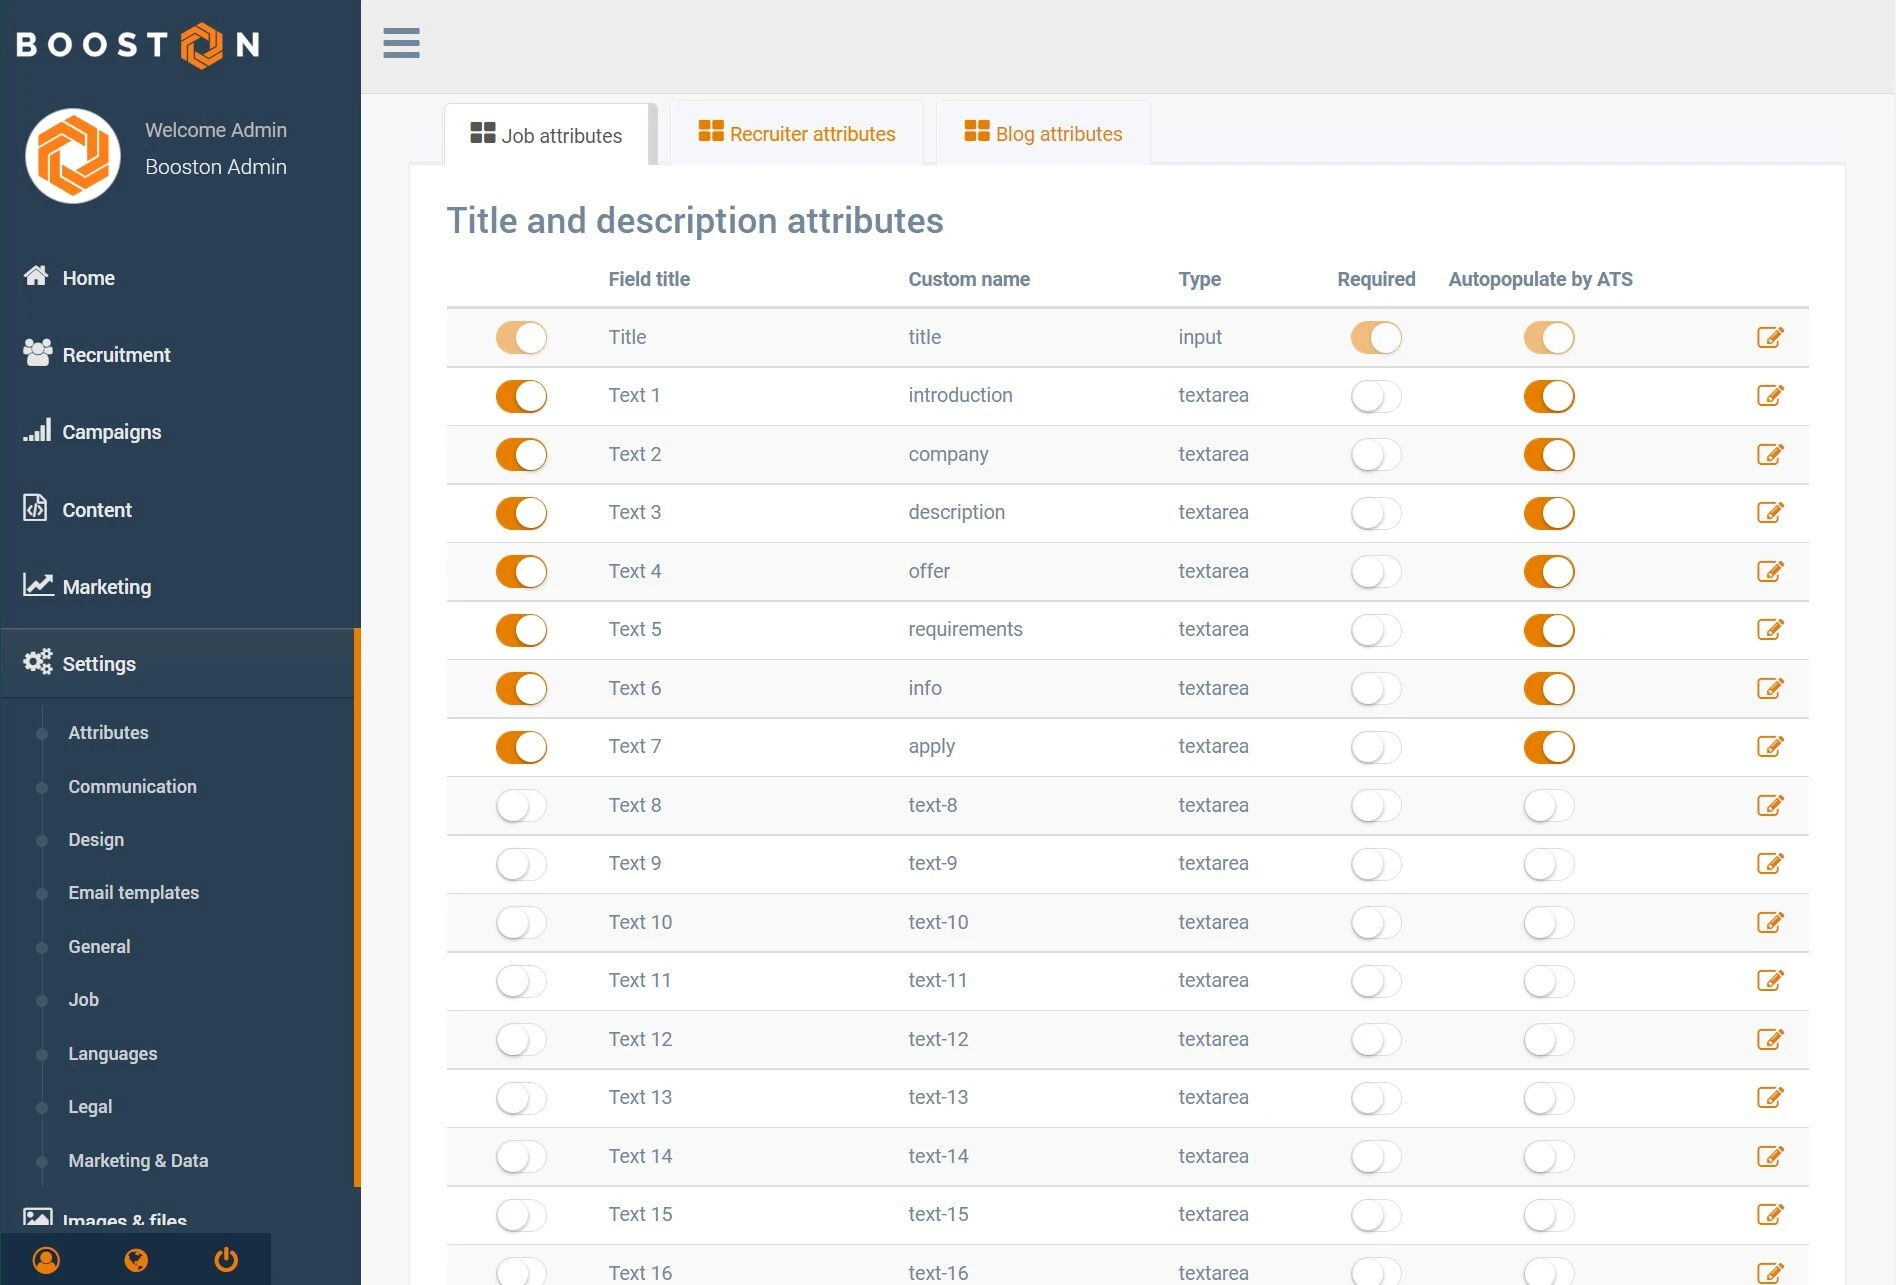
Did you enable Apply default attribute settings for this ATS in the Activation step? Then the standard attributes are already correctly labelled and fully prepared. The steps below are mainly intended for fine-tuning.
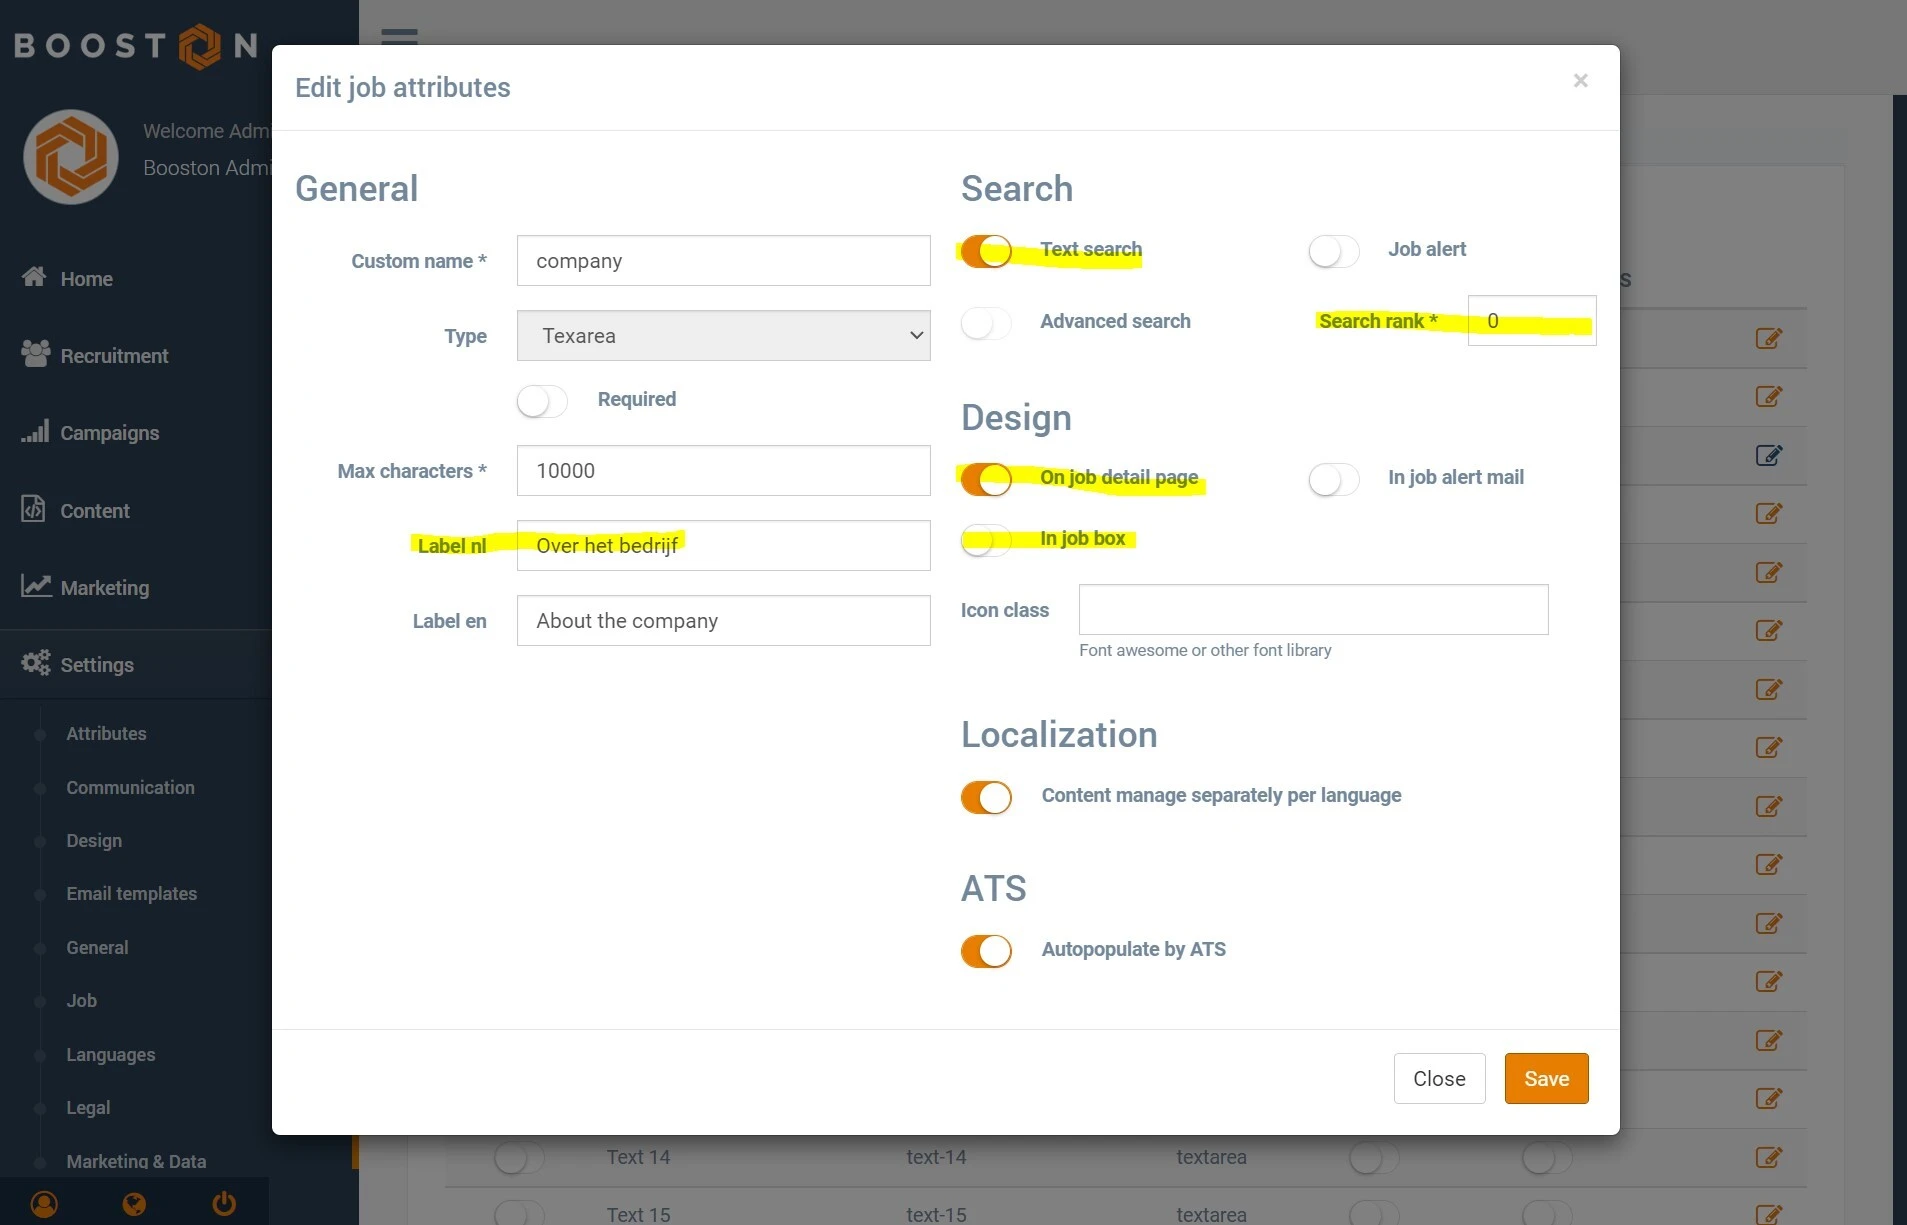
- Label: give the text attribute the desired heading.
- Search text: determine whether the text attribute is included in a search query on the website.
- Search order: determine the order in which the attributes are shown, for example on the job detail page.
- On the job detail page: determine whether the text is visible on the job page.
- In job box: determine whether the text is used as an introduction in a job list.
- Automatically filled by ATS: if this is enabled, Carerix fills the value automatically.
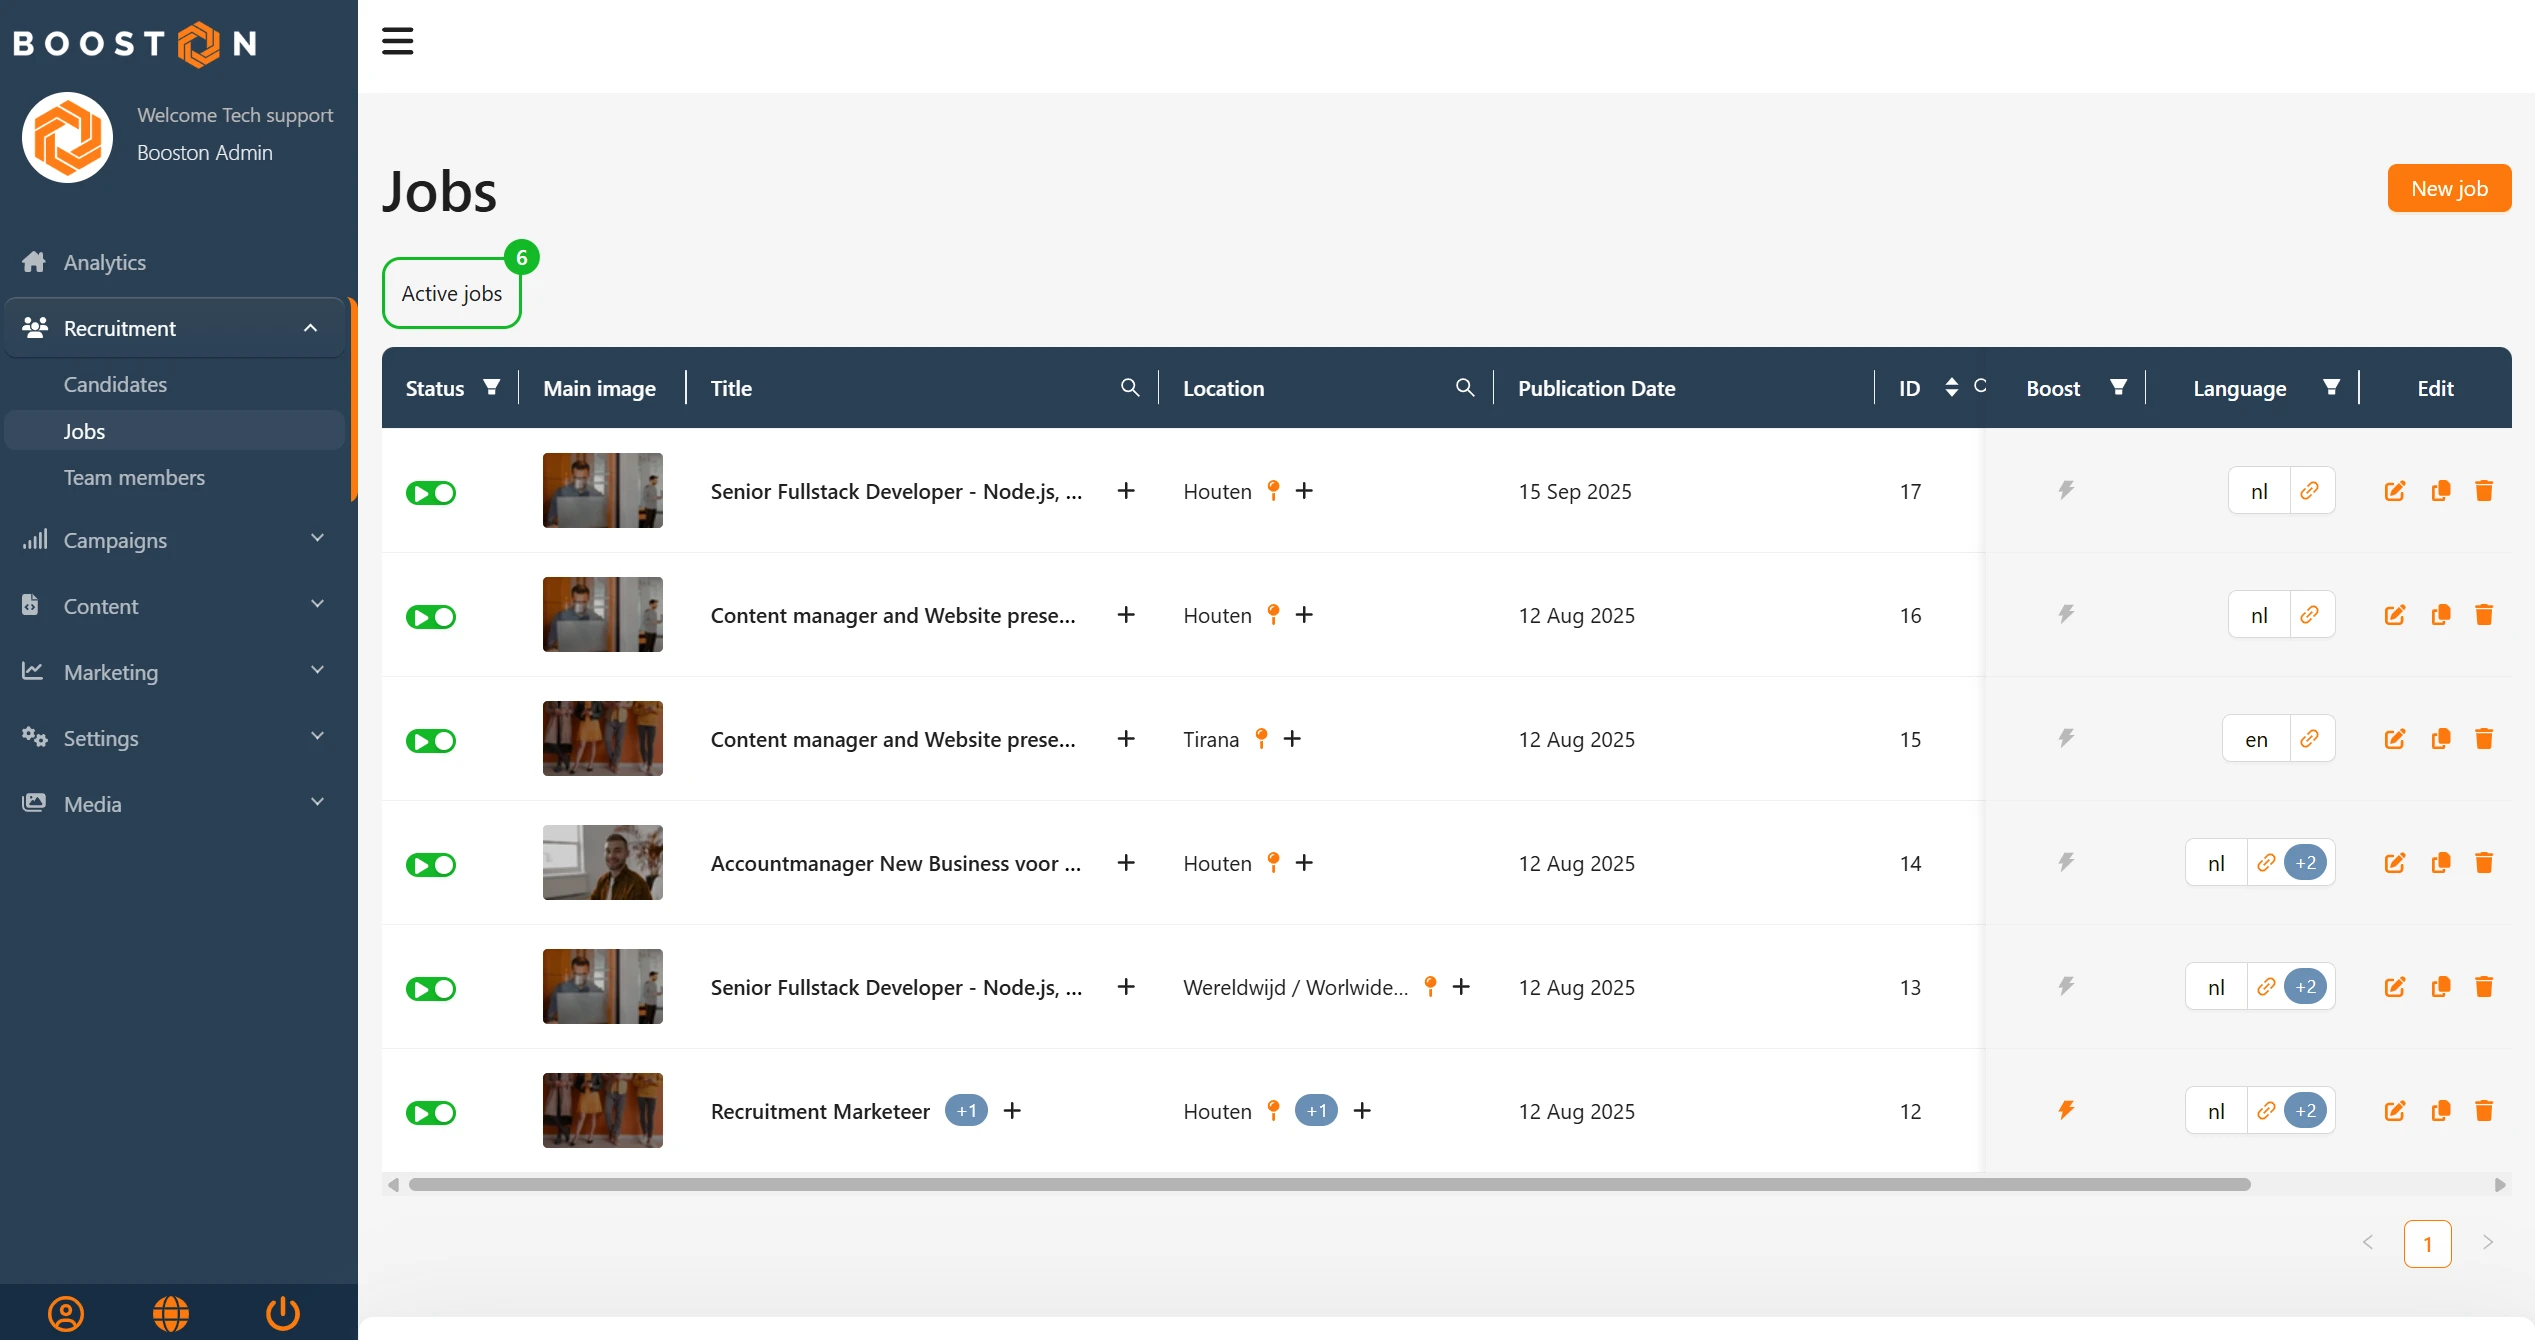
Check the result via Recruitment > Jobs and click on a job.
Note: make sure at least one job has been published from Carerix to Booston in order to check the result.
Step 4: Configure other job attributes
In the other sections of Settings > Attributes, you manage the attribute values of job attributes, such as categories, industries, salary attributes and location attributes.
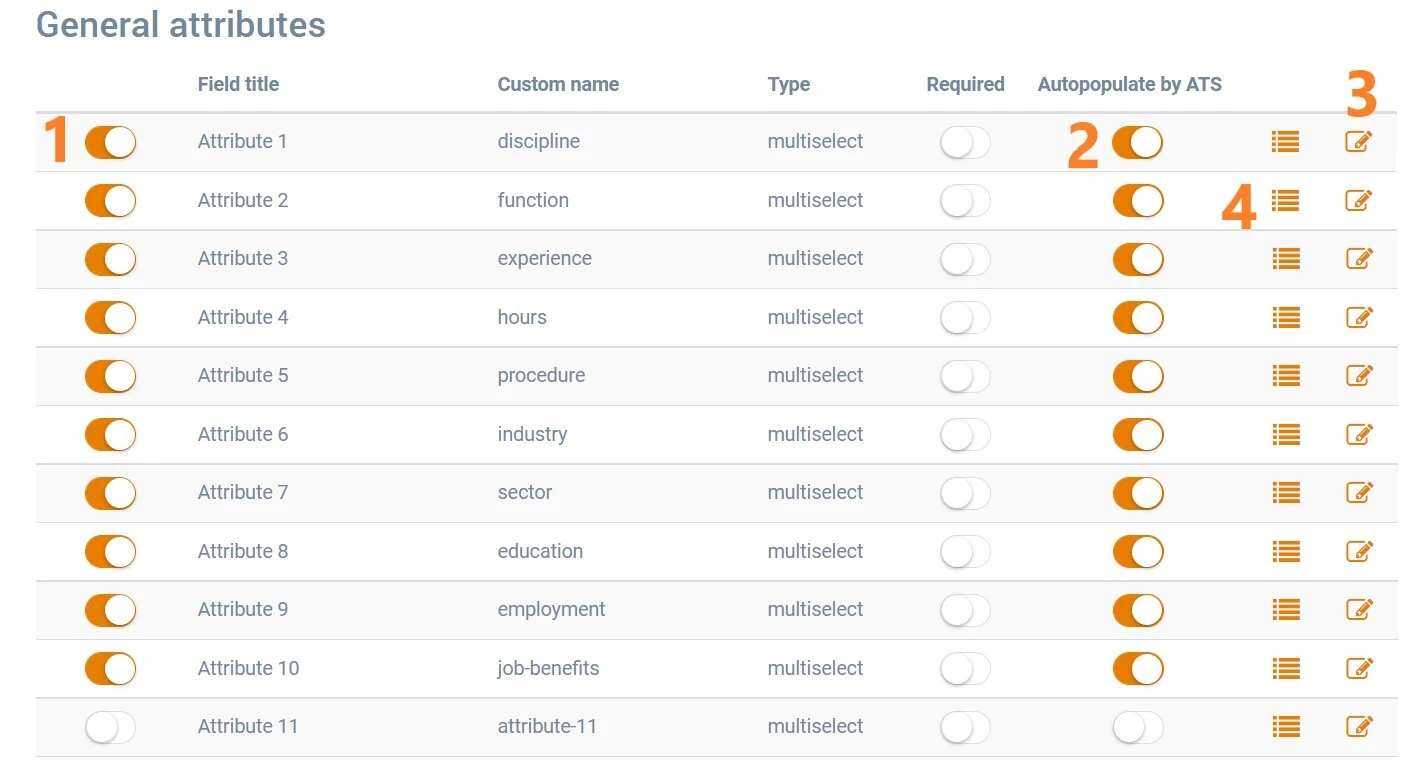
- If you set an attribute to inactive, we do not import the linked attribute value.
- If you want Carerix to fill in the information, enable Automatically filled by ATS.
- If the attribute is active but Automatically filled by ATS is disabled, you can manually add attribute values in Booston.
Edit job attributes
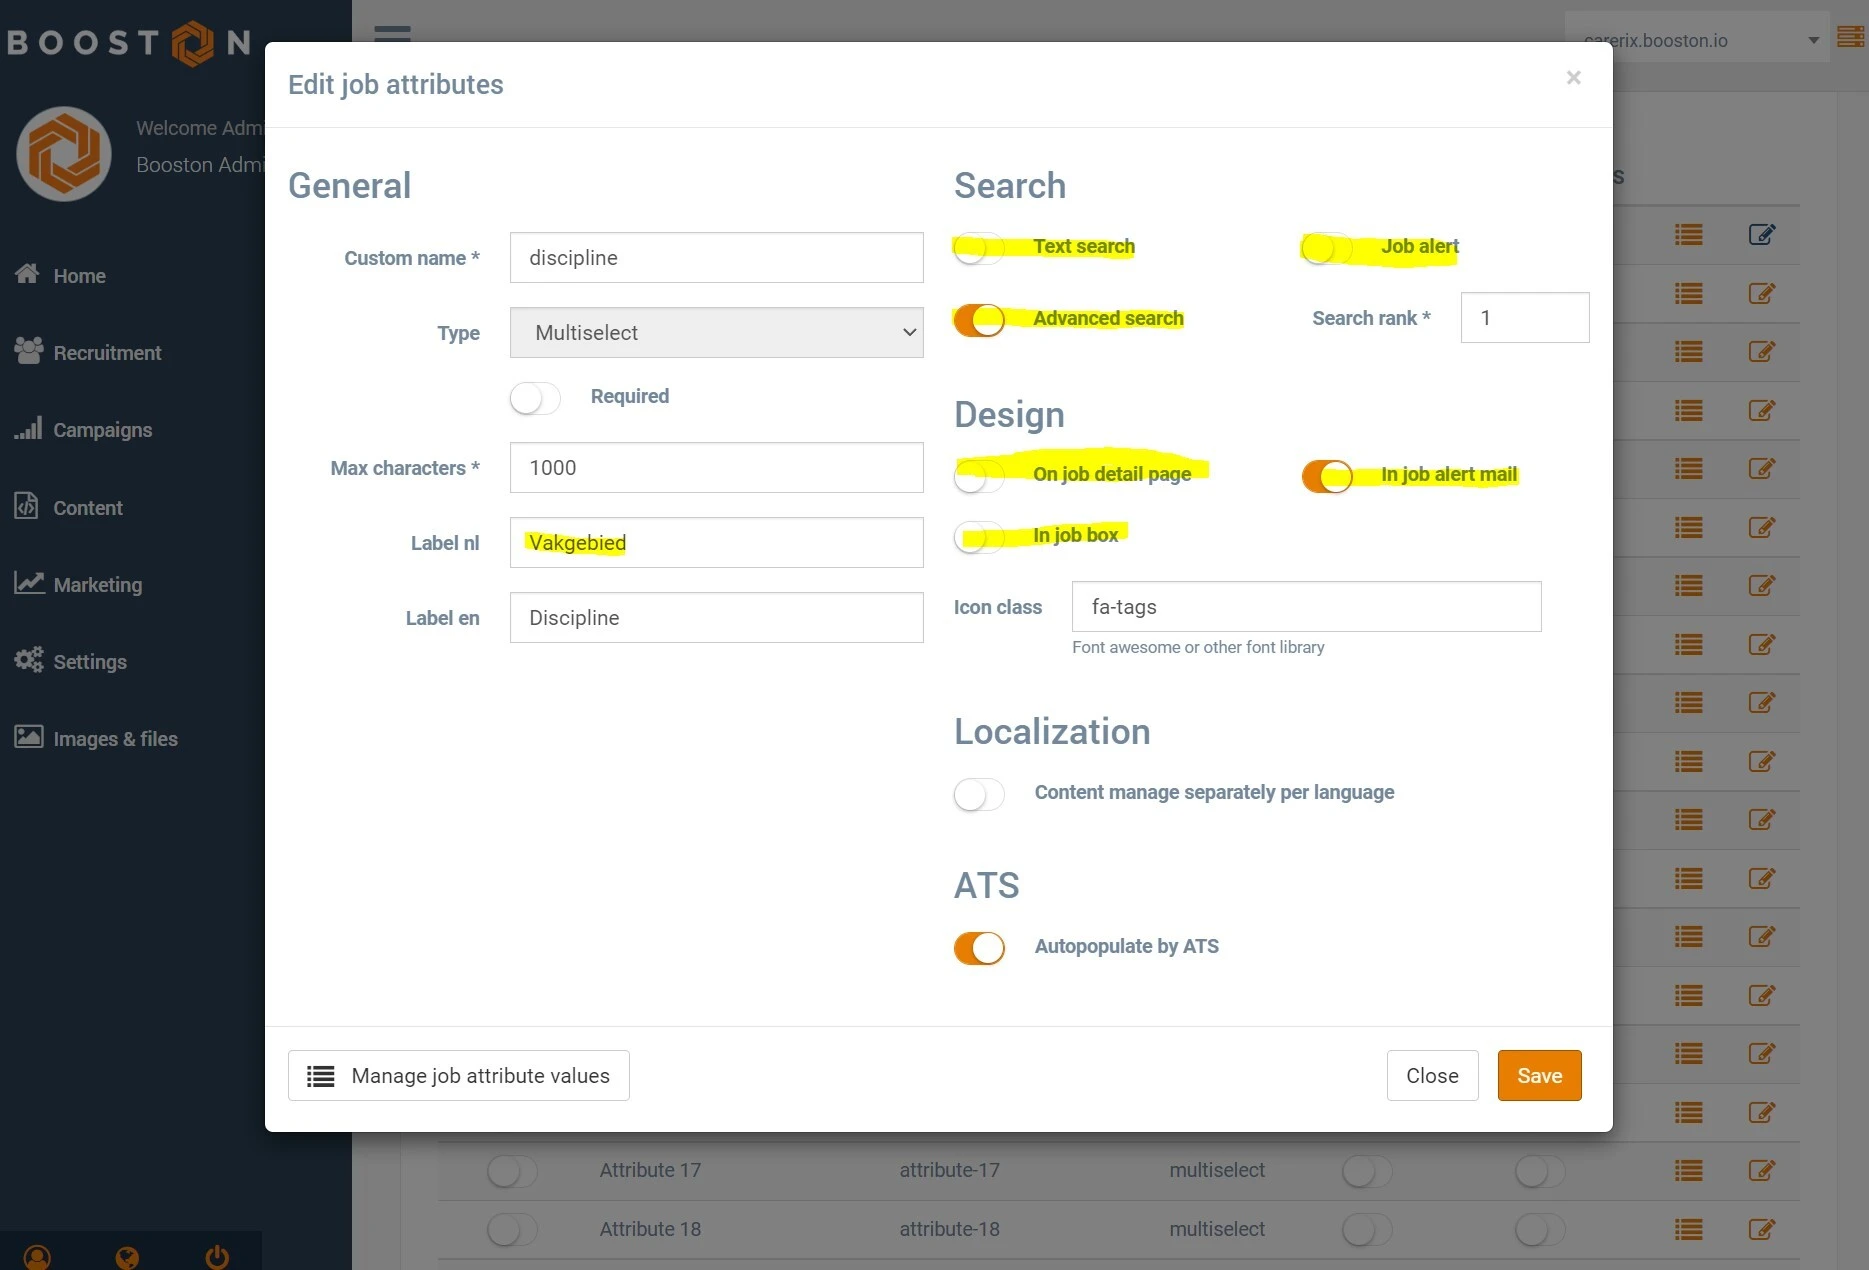
- Label: give the attribute the desired name.
- Search text: determine whether the attribute is included in a search query on the website.
- Search order: determine the order in which the attributes are shown.
- Job alert: determine whether the value is active in the job alert form.
- On the job detail page: determine whether the value is visible on the job page.
- In job box: determine whether the value is used in a job list.
- In job alert email: determine whether the value is shown in a job alert email.
Check incoming attribute values
Check the incoming attribute values from Carerix through the hamburger menu.
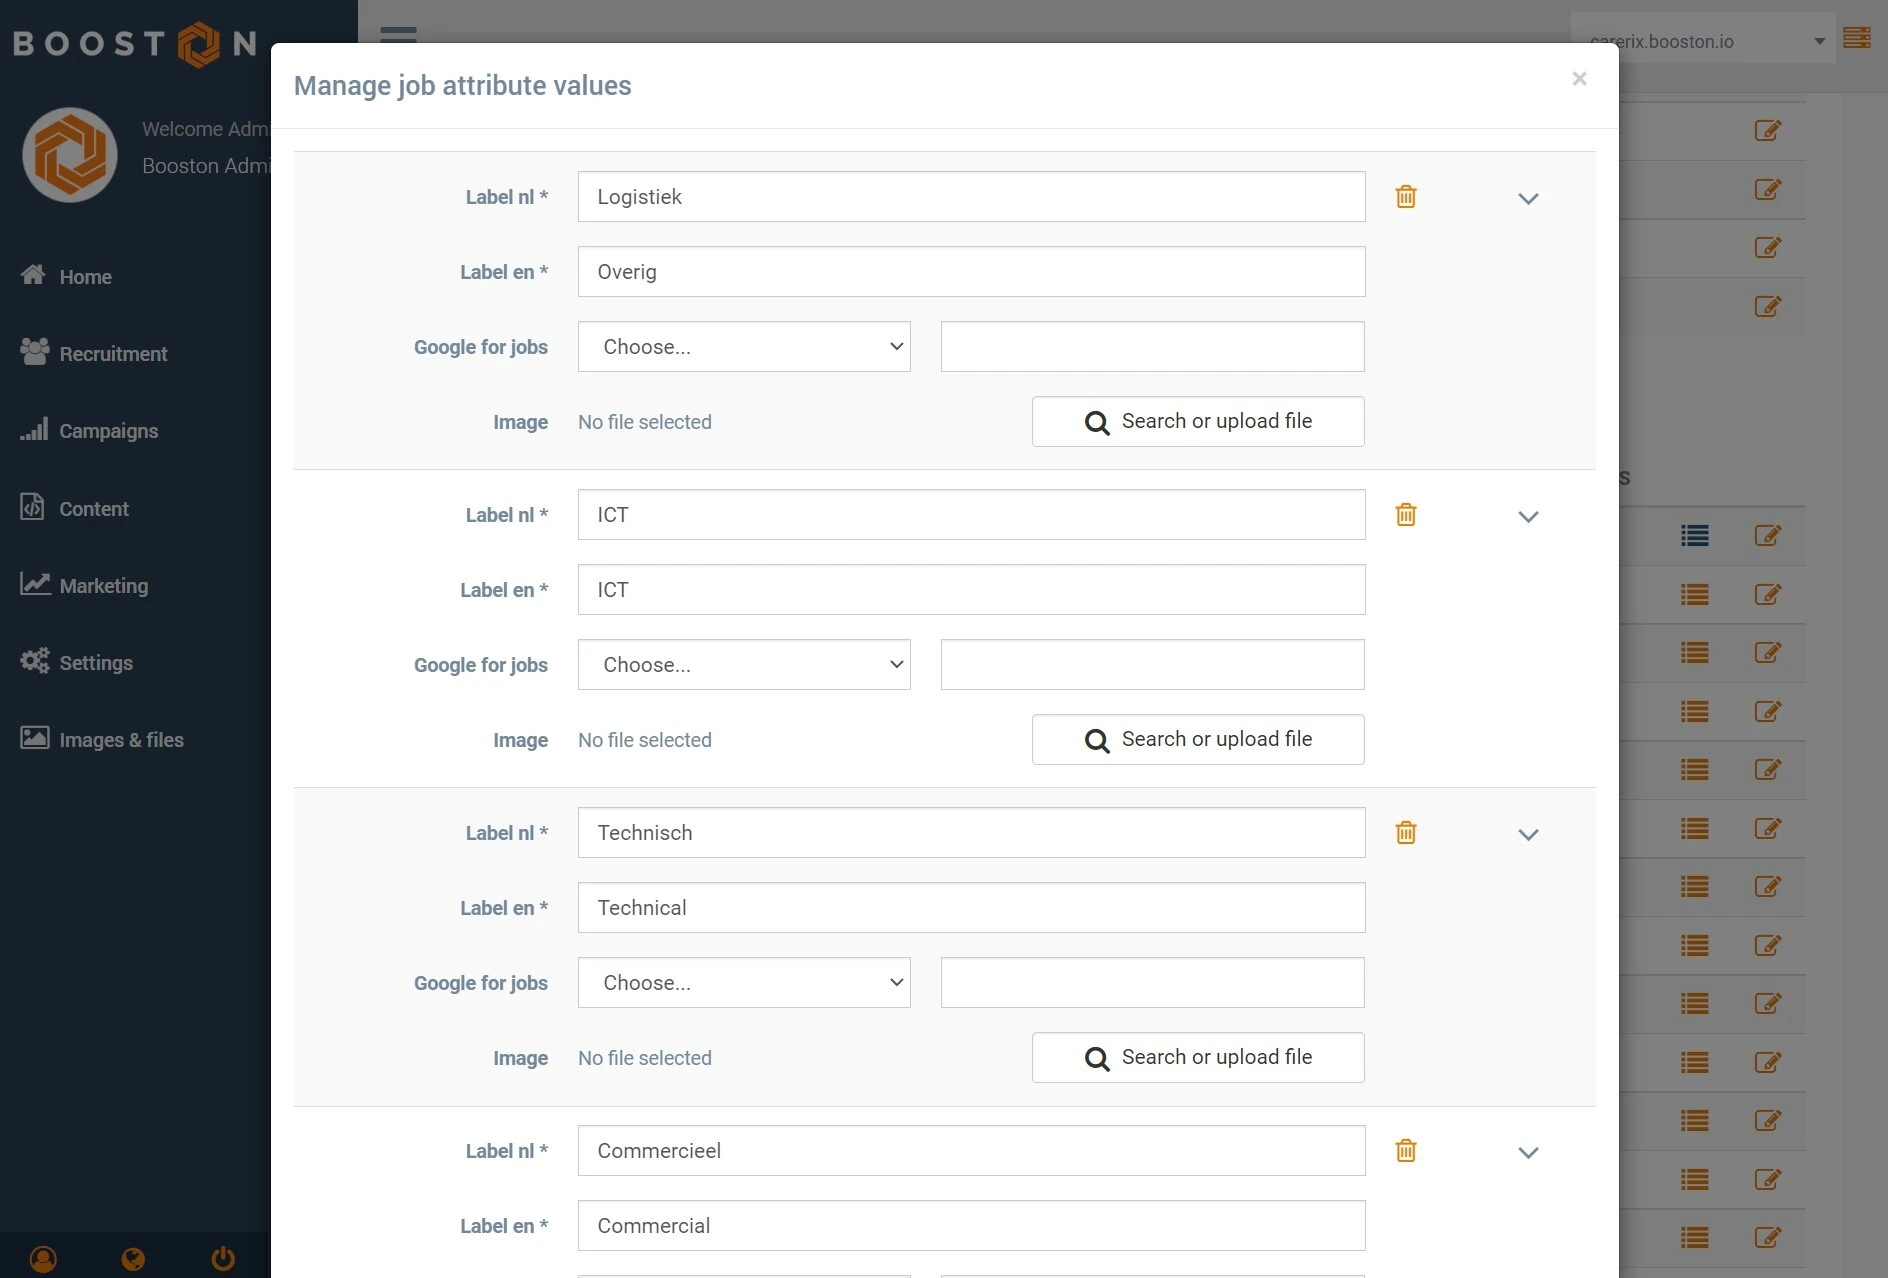
A new attribute value is added automatically as soon as a Carerix job with a previously unknown value is received. You can then rewrite values in Booston independently of Carerix.
Automatic segmentation: hours are automatically segmented into part-time or full-time. 0 up to and including 32 hours is part-time. 33 hours or more is full-time.
Publish jobs and receive candidates
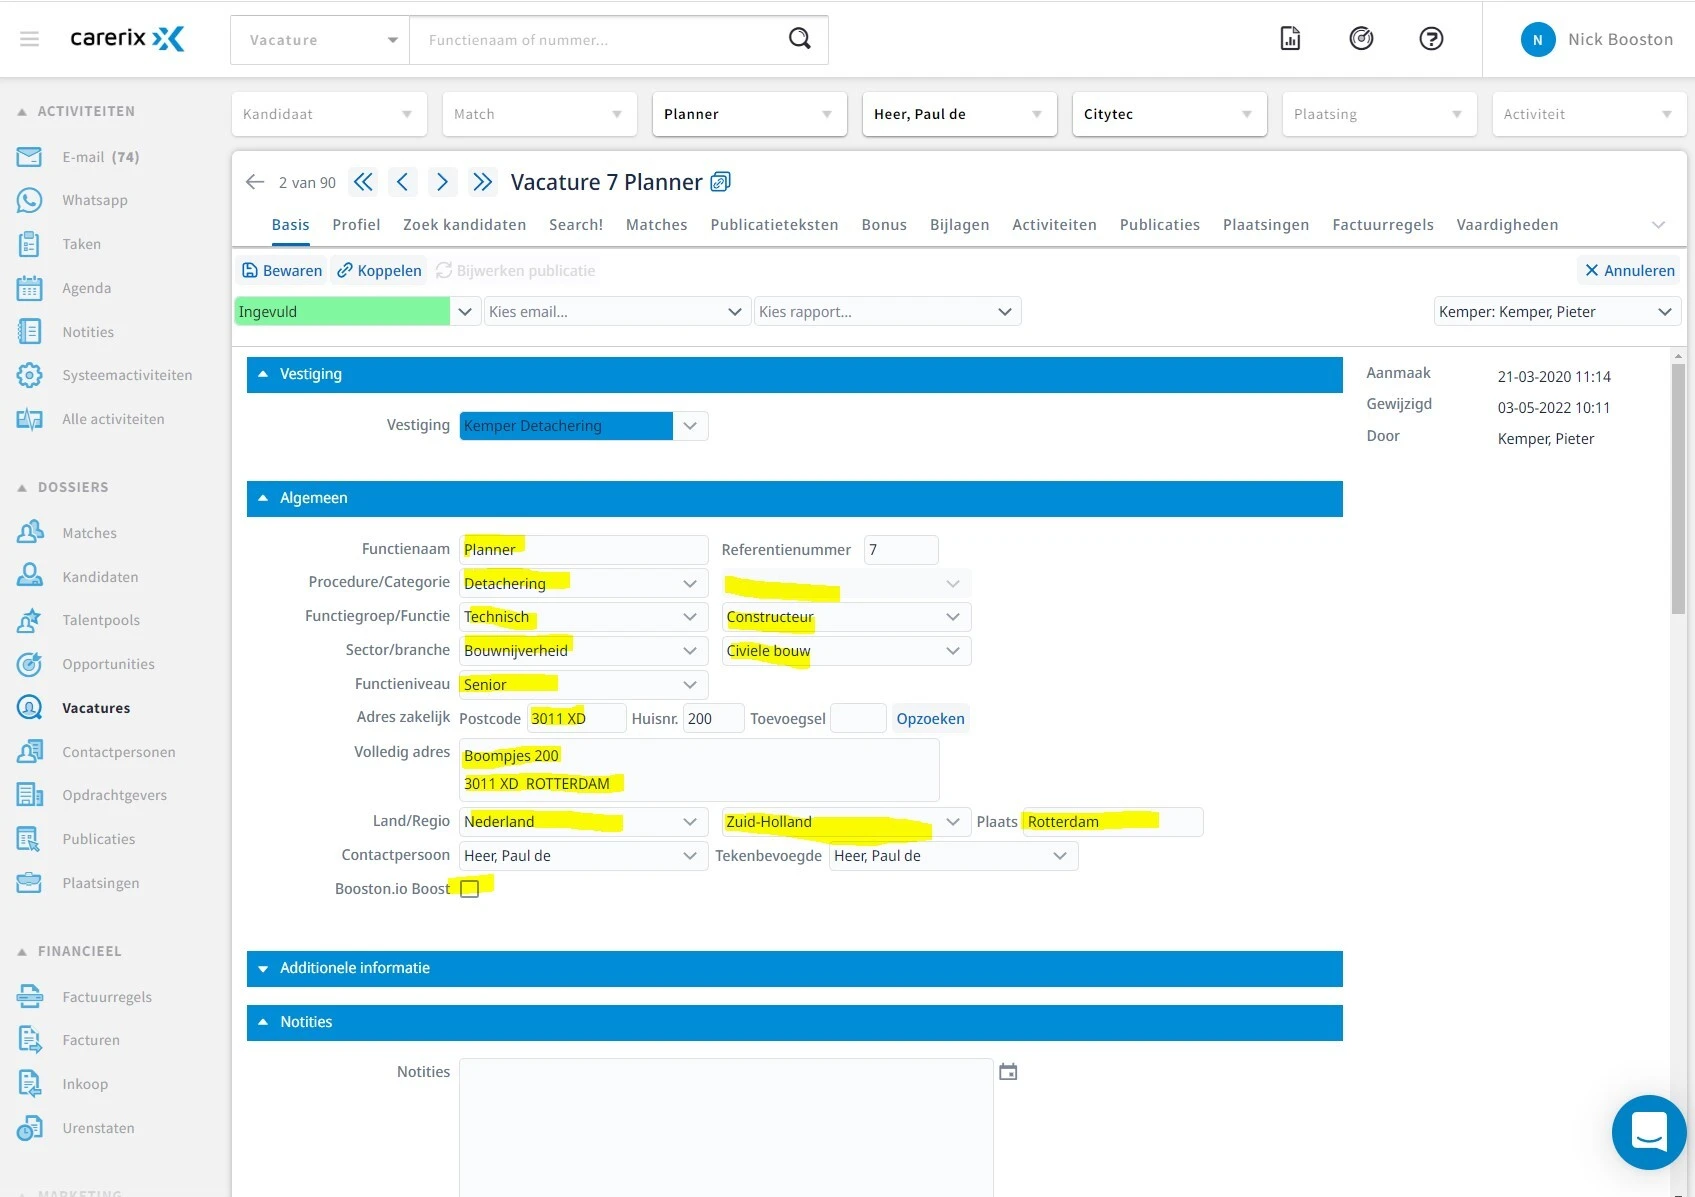
Now that the integration has been configured, you can publish from Carerix to Booston.
When your job has been configured with all desired fields, the job data, publication data, attributes and texts, among other things, are imported into Booston upon publication.
Once the job has been created, go to the Publications tab and create a new publication.
Make sure that you:
- optionally enter a correct date range;
- set the status to a positive value, such as Published;
- select the medium you use for Booston publications;
- click Save.
During the next synchronization, the newly created job and the related publication are imported into Booston. Check your new job via Recruitment > Jobs.
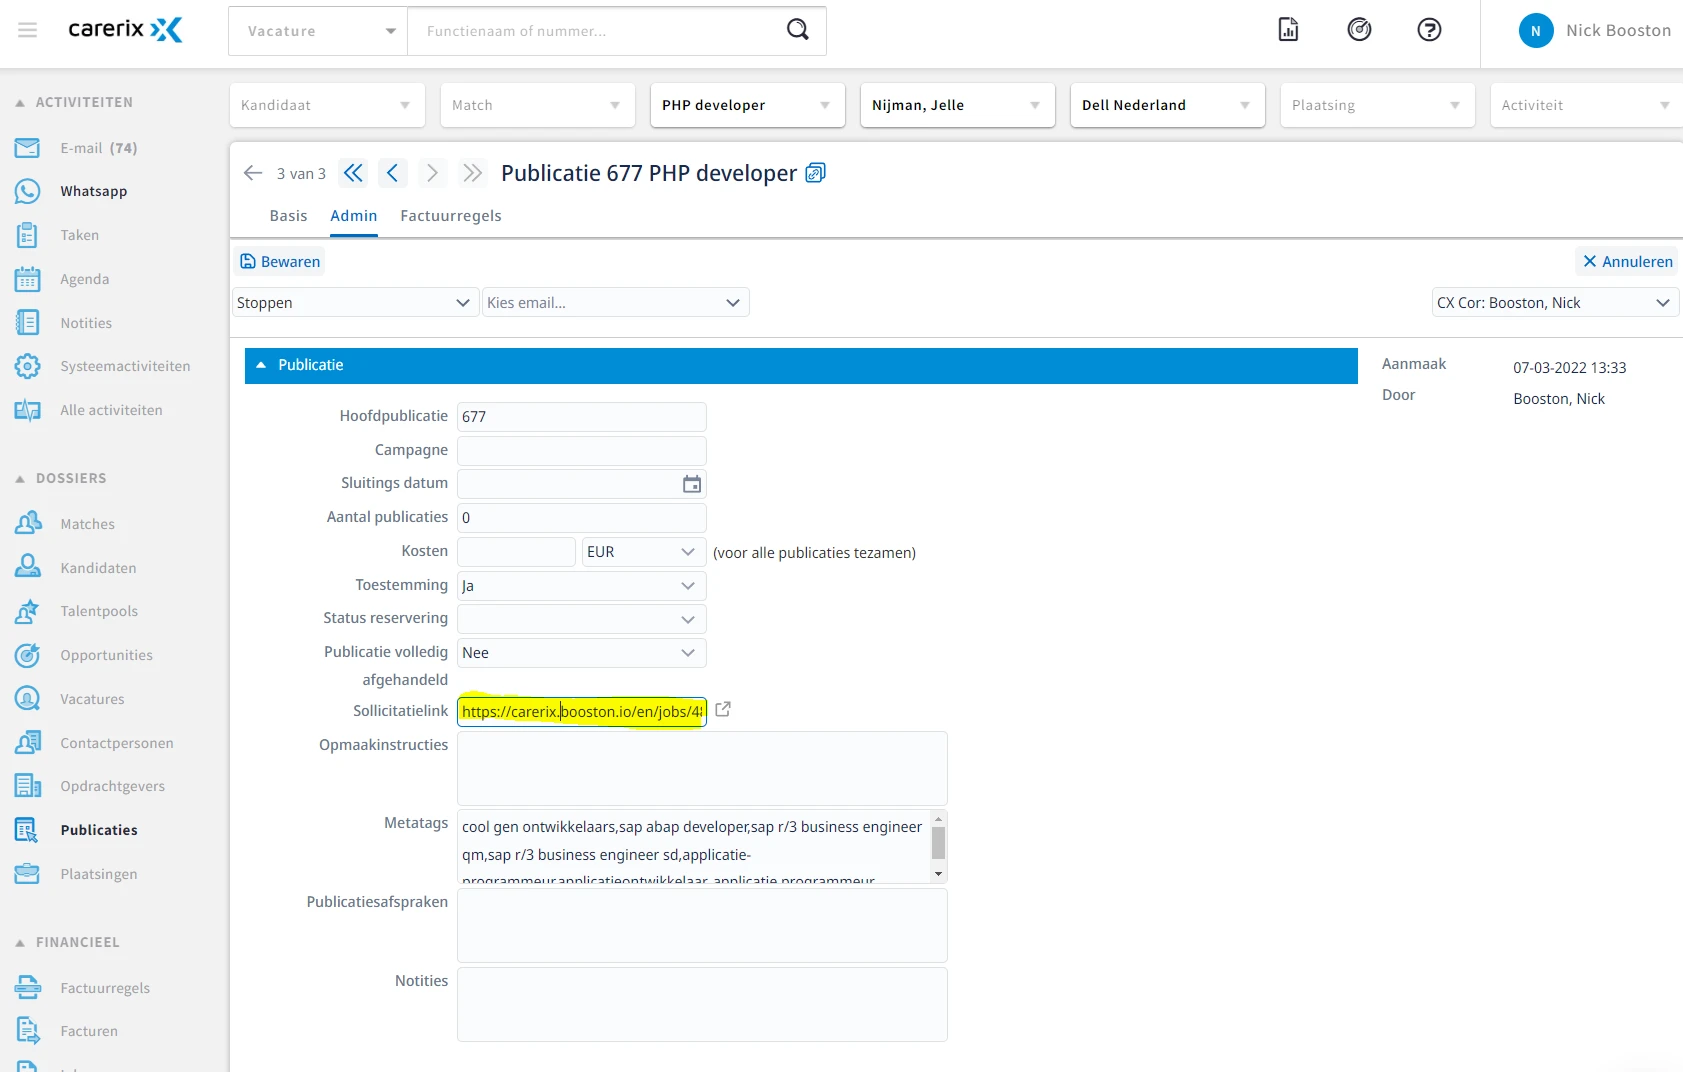
You can also check this in Carerix through the publication on the Admin tab. We also place the job URL back here.
Receive candidates in Booston
With the Booston-Carerix integration, you can request and receive the following data from candidates:
- General: first name, middle name, last name, gender, date of birth, nationality and language.
- Contact: email, phone and mobile.
- Location: street name, house number, postal code, city and country.
- Additional info: note field, driving license as multiselect and owns a car yes/no.
- Questions: 3 open questions, “From when are you available?”, 3 yes/no questions and 3 multiselect questions. These can be used freely.
- Attachment: CV and motivation letter.
- Match value and AI notes: Booston AI thoroughly reviews all information and determines the value of the match. This consists of a profile summary, why the candidate may be a match and why the candidate may not be a match. The score is shown as a star rating from 1 to 5 and can be found in Carerix.
- Candidate status: status changes are read into your Booston environment. This allows us to know, for example, that a candidate has been placed.
Note regarding duplicate candidates: Carerix uses its own deduplication logic. This may be based, for example, on the same last name and date of birth, or postal code and date of birth. A merged or unexpected candidate ID therefore comes from Carerix and is not an integration error.
Status mapping
For GraphQL customers, a simplified English-language mapping applies. By default, Placed by us is linked to Hired. DataNodeIDs differ per tenant. Therefore, the status mapping is configured per customer.
Synchronize review scores
The integration synchronizes review scores, meaning ratings from 1 to 5 stars, between Carerix and Booston.
- Import: a review given in Carerix is imported into Booston.
- Export: the review or the Booston AI match score is written back to Carerix.
This runs through the candidate attribute score. Enable Automatically filled by ATS for this attribute. Also activate Candidate review score and status import in the Functionality step of the wizard.
Note: an existing manually assigned score is not overwritten automatically. No infinite update loops are created between the AI score and the ATS.
Optional: custom fields in Carerix
Do you want to use additional Booston functionality? Then first create the corresponding fields in Carerix via Maintenance > Admin > Tables and click + new.
| Field | Function |
| Booston.io Boost! checkbox | Makes it possible to boost a job for marketing purposes. |
| Booston Candidate Source | Labels new applicants with the source “Booston”. |
| Booston Source Match | Provides applicants with the correct match source. |
| YouTube Video ID | Makes it possible to link a video to a job. |
Need help?
Do you run into an issue during setup, for example with the qualifier, attribute mapping or importing jobs? Contact us at support@booston.io. We are happy to help you configure the integration correctly.


